Hello! Welcome back to your Kubernetes crash course.
In the last lesson, we delved into the Pod lifecycle, understanding the journey a Pod takes from Pending to Running and its final states. We saw that individual Pods are the fundamental building blocks, but they are also ephemeral. If a node fails or a Pod crashes, it's gone. For any real application, we need a more robust solution.
Today, we'll build on that foundation to manage stateless applications effectively. This lesson directly addresses your goal of understanding how to run scalable services, a core task for a Platform Engineer. We will focus on the Deployment resource, the standard and most common way to run stateless workloads in Kubernetes. You will learn how to create a Deployment to manage a set of identical Pods and how to scale the number of replicas up or down to handle load.
1. The Problem: Fragile Pods
Imagine you deploy your application in a single Pod. What happens if that Pod crashes or the node it's on goes down? Your application becomes unavailable. What if traffic suddenly increases? A single Pod might not be able to handle the load.
To solve these problems of availability and scalability, we need a mechanism that:
- Ensures a specified number of Pod replicas are always running.
- Automatically replaces Pods that fail.
- Allows us to easily change the number of running Pods.
This is the job of a Kubernetes controller. Let's see how they work.
2. The Foundation: ReplicaSets
The first layer of this solution is a resource called a ReplicaSet. Its sole purpose is to maintain a stable set of replica Pods running at any given time.
The video below explains why we need a controller to manage Pods and introduces the concepts of ReplicationController (the older version) and ReplicaSet (the modern version).
Day 8/40 - Kubernetes Deployment, Replication Controller and ReplicaSet Explained
To understand Deployments, we first need to understand what they manage. This video from 'Tech Tutorials with Piyush' clearly explains the motivation behind controllers like ReplicaSets.
Watch the sections from 03:02 to 10:08 and 16:36 to 19:33. The first segment explains the problem of single Pod failure and how a controller ensures high availability. The second segment clarifies the difference between the legacy ReplicationController and the modern ReplicaSet, highlighting the importance of label selectors.
In summary:
- A ReplicaSet guarantees that a specified number of Pod replicas are running.
- If a Pod dies, the ReplicaSet controller detects this and creates a new one to replace it.
- It uses labels and selectors to identify which Pods it's supposed to manage. A
ReplicaSet's selector must match the labels on the Pods it creates from its template.
However, in modern Kubernetes, we almost never create ReplicaSets directly. Why? Because there is an even more powerful resource that manages them for us: the Deployment.
3. The Workhorse: The Deployment
A Deployment is a higher-level resource that manages ReplicaSets. While a ReplicaSet ensures a certain number of Pods are running, a Deployment adds the crucial ability to manage application updates and rollbacks in a controlled way.
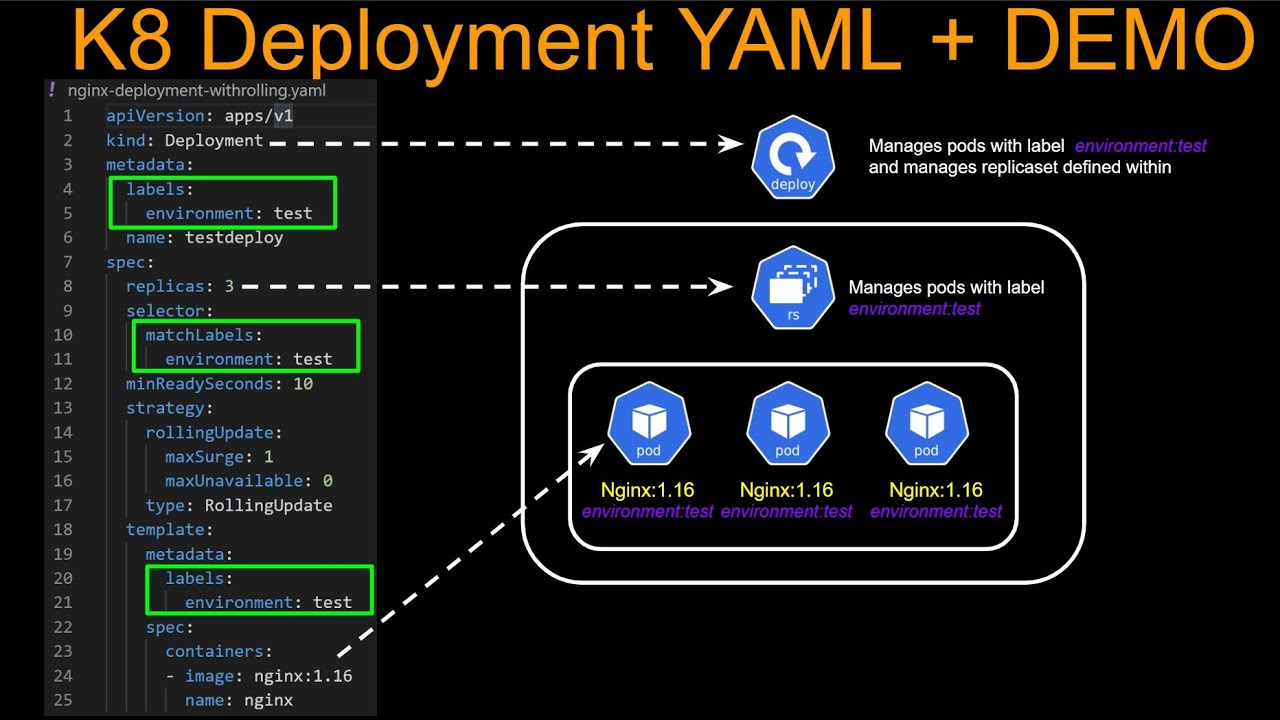
A Deployment works by creating a ReplicaSet behind the scenes. You define your desired state in the Deployment object (e.g., "I want 3 replicas of my app using image version 1.2"), and the Deployment controller makes it happen by creating and managing a ReplicaSet.
This video provides an excellent breakdown of the Deployment concept and its YAML manifest.
Kubernetes Deployment Tutorial - yaml explained + Demo
Let's watch this tutorial from 'Cloud With Raj' to get a clear visual and conceptual understanding of what a Deployment is and how it's structured.
Watch from 01:02 to 05:33. This part explains how a Deployment acts as a wrapper around a ReplicaSet and then walks through the key fields of a Deployment YAML file, especially the replicas, selector, and template fields.
Anatomy of a Deployment YAML
Let's formalize the key components you saw in the video. A Deployment manifest has four essential top-level fields: apiVersion, kind, metadata, and spec. The spec is where the magic happens.
apiVersion: apps/v1
kind: Deployment
metadata:
  name: nginx-deployment
spec:
  replicas: 3 # 1. Desired number of Pods
  selector: # 2. How the Deployment finds its Pods
    matchLabels:
      app: nginx
  template: # 3. A blueprint for the Pods to be created
    metadata:
      labels: # Must match the selector!
        app: nginx
    spec:
      containers:
      - name: nginx
        image: nginx:1.21.0
        ports:
        - containerPort: 80
spec.replicas: This is straightforward—it's the number of identical Pods you want to run.spec.selector: This tells the Deployment which Pods to manage. ThematchLabelsfield specifies that any Pod with the labelapp: nginxbelongs to this Deployment.spec.template: This is a blueprint for creating the Pods. It's essentially a complete Pod manifest (metadataandspec) embedded within the Deployment YAML. Crucially,spec.template.metadata.labelsmust matchspec.selector.matchLabels. If they don't match, the Deployment will create Pods that it can't manage, leading to an endless loop of creation.
For a detailed text reference, you can consult this article.
Kubernetes Deployment YAML File with Examples
The Spacelift blog provides a clear, written breakdown of the Deployment YAML and its components. It's a great reference to solidify your understanding.
Read the sections titled 'What are the essential components of a Kubernetes deployment YAML file?', 'Example of a basic YAML file...', 'Customizing labels and selectors...', and the FAQ 'What’s the difference between a Deployment YAML and a Pod YAML?'. This will reinforce the structure and purpose of the manifest.
4. Hands-On: Deploying and Scaling an Application
Now, let's put theory into practice. We'll create a simple NGINX deployment, verify it's running, and then scale it.
Creating the Deployment
We'll use the official Kubernetes documentation as our guide for this task.
Run a Stateless Application Using a Deployment
This guide from the official Kubernetes documentation provides the commands and a sample YAML to create and inspect an NGINX deployment. Follow the steps to get your first deployment running.
Follow the instructions in the section 'Creating and exploring an nginx deployment'. Use the provided YAML file and the kubectl apply, kubectl describe deployment, and kubectl get pods commands to create and inspect your deployment. You can do this in your local Minikube/Docker Desktop environment or a cloud shell.
After you run kubectl apply, you can check the status of all the created resources with:
kubectl get all -l app=nginx
You should see one Deployment, one ReplicaSet, and the number of Pods you specified in your manifest.
Self-Healing in Action
What happens if a Pod dies? The ReplicaSet, managed by the Deployment, will automatically create a new one. Let's see this self-healing capability.
Kubernetes Deployment Tutorial - yaml explained + Demo
Let's return to the 'Cloud With Raj' video to see a demonstration of a Deployment's self-healing power.
Watch the segment from 12:06 to 14:03. The video demonstrates how deleting a Pod causes the ReplicaSet to immediately spin up a replacement, and how deleting the ReplicaSet itself causes the Deployment to restore it.
Try it yourself! Get the name of one of your Pods and delete it:
# Get the pod name
kubectl get pods -l app=nginx

# Delete one of the pods
kubectl delete pod <your-pod-name>

# Immediately check the pods again, perhaps with the --watch flag
kubectl get pods -l app=nginx --watch
You will see the deleted Pod enter the Terminating state and a new one immediately start Pending and then Running.
Managing Replicas (Scaling)
Your application is a success, and traffic is increasing. You need to scale from 2 replicas to 4. There are two common ways to do this.
1. Declarative Scaling (The GitOps Way)
The preferred method is to update your YAML file and re-apply it. This keeps your manifest as the single source of truth for your cluster's state.
The Kubernetes documentation shows exactly how to do this.
Run a Stateless Application Using a Deployment
The official documentation demonstrates the declarative approach to scaling.
Follow the steps in the section 'Scaling the application by increasing the replica count'. Change the replicas field in your YAML to 4, then use kubectl apply -f <your-file.yaml> and verify the new Pods are created with kubectl get pods.
2. Imperative Scaling (The Quick Way)
For quick adjustments or in emergencies, you can use the kubectl scale command. This directly modifies the live object in the cluster without changing your local YAML file.
kubectl scale deployment nginx-deployment --replicas=3
This is a very common command and one you should be familiar with for interview scenarios. The video from Piyush demonstrates this and other scaling methods.
Day 8/40 - Kubernetes Deployment, Replication Controller and ReplicaSet Explained
This clip shows multiple ways to scale your application, including the powerful kubectl scale command.
Watch the segment from 19:33 to 23:24. It demonstrates three ways to change the replica count: editing the YAML, using kubectl edit, and using kubectl scale.
Test your understanding!
You have a deployment named api-gateway running with 3 replicas. You run the command kubectl scale deployment api-gateway --replicas=5. A few seconds later, a colleague who is unaware of your change modifies the original api-gateway.yaml file (where replicas is still 3) to update a container's memory limit and runs kubectl apply -f api-gateway.yaml.
What will be the final number of replicas for the api-gateway deployment, and why?
Show answer
The final number of replicas will be 3.
The kubectl scale command is imperative; it changes the live state of the object in the cluster. However, the declarative kubectl apply -f api-gateway.yaml command will overwrite the live state with the "desired state" defined in the file. Since the replicas field in the file was still 3, apply will scale the deployment back down to 3. This illustrates why maintaining the YAML file as the source of truth is a critical practice in GitOps workflows.
Conclusion
Congratulations! You've just mastered one of the most fundamental objects in Kubernetes. The Deployment is your go-to resource for managing stateless applications, providing the scalability and self-healing that modern infrastructure demands.
Key Takeaways:
- Deployments manage stateless applications by controlling
ReplicaSets, which in turn ensure a desired number ofPods are running. - The connection between a Deployment, its ReplicaSet, and its Pods is made through labels and selectors.
- A Deployment manifest consists of a
replicascount, aselector, and atemplatefor the Pods it will create. - Deployments provide self-healing: if a Pod fails, a new one is automatically created.
- You can scale a Deployment declaratively by updating the
replicasfield in your YAML and usingkubectl apply, or imperatively using thekubectl scalecommand.
We've now seen how to create and scale a set of running Pods. But what happens when you need to update the application to a new version? This is where the true power of Deployments shines. In our next lesson, we will explore how Deployments enable zero-downtime rolling updates and easy rollbacks.