Hello! Welcome to the next lesson in our journey through deep learning with PyTorch.
In our last session, we successfully built and executed a complete training loop for a feedforward neural network (FNN) to classify MNIST digits. You learned how to manage data in batches, perform the forward and backward passes, and update the model's weights. That training loop is a fundamental tool you'll use repeatedly.
Today, we'll focus on the model architecture itself. While our FNN worked for the simple MNIST task, it has significant drawbacks for more complex image data. This lesson introduces a new, powerful architecture designed specifically for this purpose: the Convolutional Neural Network (CNN).
By the end of this lesson, you will be able to describe the core components of a CNN—convolutional layers, pooling layers, and fully connected layers—and understand why this architecture is so effective for image processing tasks.
1. Why Not Just Use a Bigger FNN?
In the previous lesson, we flattened our 28x28 pixel images into a 784-element vector to feed into our fully connected network. This approach has two major problems when dealing with images:
- Loss of Spatial Information: An image isn't just a random collection of pixels; it has spatial structure. Neighboring pixels are highly related. By flattening the image, we throw away this crucial information. The network has no inherent knowledge that pixels in the top-left corner are far from pixels in the bottom-right.
- Parameter Explosion: Our simple 28x28 grayscale images were manageable. But consider a more standard 224x224 color image. This would mean
224 * 224 * 3 = 150,528input neurons. A single hidden layer with 1000 neurons would require over 150 million weights! This is computationally infeasible to train and extremely prone to overfitting.
To address these issues, we need an architecture that respects the spatial structure of images and is more efficient with its parameters. This is where Convolutional Neural Networks come in.
Neural Networks Part 8: Image Classification with Convolutional Neural Networks (CNNs)
To start, let's watch a short video from StatQuest that clearly explains why traditional neural networks are a poor fit for image data and introduces the three key benefits of using a CNN.
Watch the first 5 minutes of this video (00:00 - 04:53). Focus on the explanation of why a normal neural network doesn't scale well and isn't robust to shifts in the image. Note the three advantages a CNN provides.
2. The Building Blocks of a CNN
A CNN is built from a few key layers that are stacked together. A typical CNN architecture consists of two main parts: a Feature Extraction part and a Classification part.
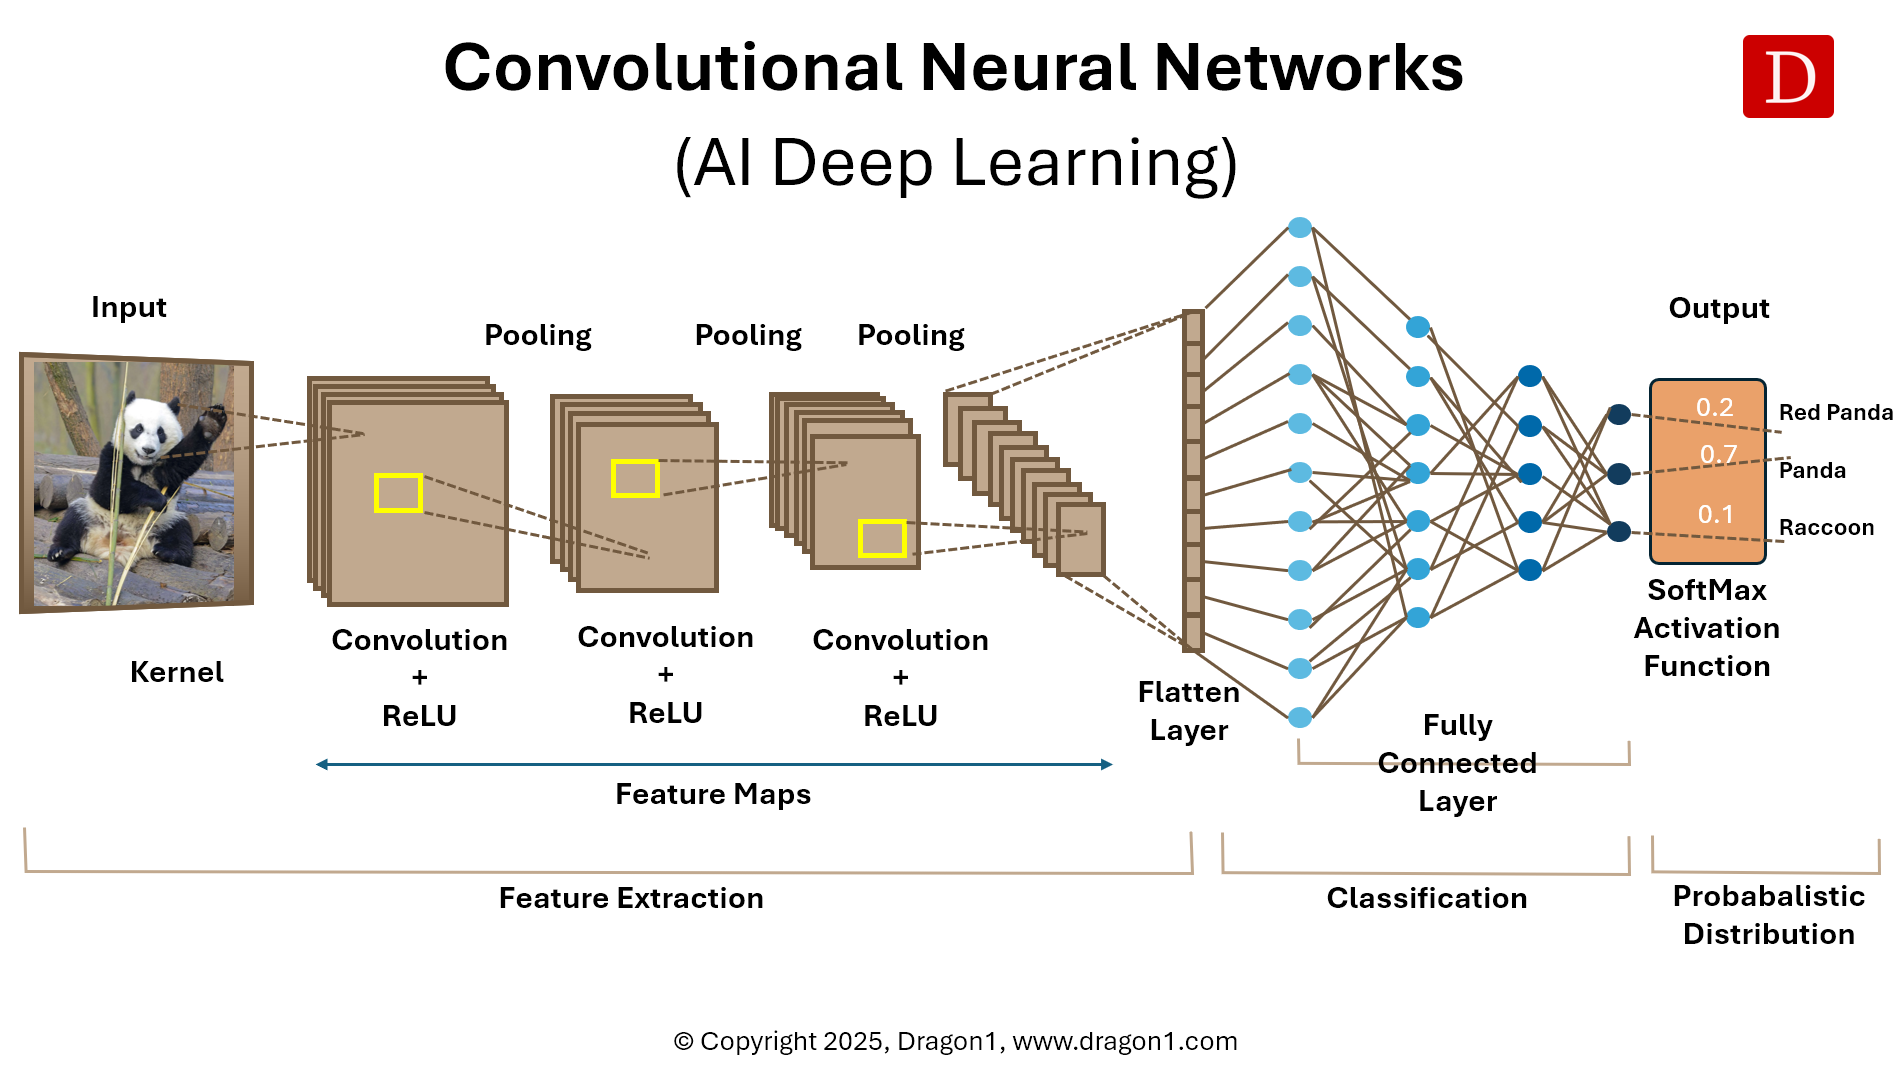
Let's break down the "ingredients" used to build these stages.
Ingredient 1: The Convolutional Layer
The core of a CNN is the convolutional layer. Instead of connecting every input to every neuron, this layer uses a small grid of weights called a filter (or kernel) that slides over the input image.
- The Operation: At each position, the filter performs an element-wise multiplication with the patch of the image it's currently covering and then sums up the results into a single output pixel. This sliding operation is called a convolution.
- Feature Detection: Each filter learns to recognize a specific low-level feature, such as a vertical edge, a horizontal edge, a specific color, or a corner. By using multiple filters in a single layer, the network can learn to detect many different features simultaneously.
- The Output: The output of this operation is called a feature map or activation map. It's a 2D grid that shows where the filter detected its specific feature in the input image.
This process is explained very clearly in the next segment of the StatQuest video.
Neural Networks Part 8: Image Classification with Convolutional Neural Networks (CNNs)
Let's see the convolution operation in action. This video segment demonstrates how a filter is applied to an input image to create a feature map.
Watch this section of the video (04:53 - 07:38). Pay close attention to how the filter slides over the input and how the dot product is calculated to produce the values in the feature map.
The key ideas here are local connectivity (each neuron in the feature map is connected to only a small patch of the input) and parameter sharing (the same filter is used across the entire image), which dramatically reduces the number of parameters.
To get a more detailed look, this next video from MIT's Deep Learning course provides an excellent, intuitive explanation of how filters are used to detect patterns.
MIT 6.S191: Convolutional Neural Networks
This video from MIT provides another excellent perspective on the convolution operation, using the example of detecting an 'X' to build intuition about how filters find patterns.
Watch the segment from 17:47 to 28:48. Focus on how a filter can be designed to match a specific shape (like a diagonal line) and how sliding this filter across the image produces high values where the shape is present.
Key Parameters of a Convolutional Layer:
When we define a convolutional layer in PyTorch, we'll see a few important parameters.
kernel_size: The dimensions of the filter (e.g., 3x3, 5x5).stride: The number of pixels the filter "steps" or "slides" at a time. A stride of 1 means it moves one pixel at a time.padding: Adding a border of zeros around the image. This allows the filter to process the edges of the image properly and can help control the output size of the feature map.out_channels: The number of filters to use in the layer. This determines the number of feature maps the layer will produce.
Ingredient 2: The Activation Function (ReLU)
Just as with FNNs, after each convolution, we apply a non-linear activation function. The most common choice in CNNs is the Rectified Linear Unit (ReLU). It is applied element-wise to the feature map, setting all negative values to zero. This introduces non-linearity, allowing the network to learn more complex patterns.
Ingredient 3: The Pooling Layer
After the activation function, we often add a pooling layer. Its primary purpose is to downsample the feature maps, reducing their spatial dimensions (width and height).
- How it Works: It operates over a small window (e.g., 2x2) and reduces the values in that window to a single value. The most common method is Max Pooling, which simply takes the maximum value from the window.
- Benefits:
- Reduces Computation: Smaller feature maps mean fewer parameters and less computation in later layers.
- Creates Local Invariance: It makes the feature detection more robust. If a feature is detected anywhere within the pooling window, the output will be similar. This means the network is less sensitive to the exact position of features.
Neural Networks Part 8: Image Classification with Convolutional Neural Networks (CNNs)
The next step in our CNN recipe is pooling. Let's return to the StatQuest video to see a simple, clear explanation of max pooling and its effect.
Watch from 07:22 to 09:39. Observe how the ReLU activation is applied first, and then how max pooling reduces the size of the feature map by selecting the highest value in each region.
Ingredient 4: The Fully Connected Layer (Classifier)
After several rounds of Convolution -> ReLU -> Pooling, the network has generated high-level feature maps that represent the content of the image. The Feature Extraction phase is complete.
Now, for the Classification phase:
- The final 2D feature maps are flattened into a single 1D vector.
- This vector is fed into a standard fully connected network (just like the one you built in previous lessons) which acts as a classifier.
- The final layer of this FNN outputs the scores for each class (e.g., 10 scores for the digits 0-9).
This final part of the process connects the learned features to the final classification task.
Neural Networks Part 8: Image Classification with Convolutional Neural Networks (CNNs)
Let's see how these final layers come together to make a prediction. This last segment from StatQuest shows the flattened output being fed into a regular neural network for classification.
Watch from 09:39 to 12:43. This part connects the pooled features to a standard fully connected network to produce the final output.
3. Hierarchical Feature Learning
A powerful property of deep CNNs is that they learn features in a hierarchical manner.
- Early Layers (close to the input image) learn to detect very simple features like edges, corners, and color gradients.
- Deeper Layers receive their input from the feature maps of earlier layers. They learn to combine these simple features into more complex ones, like eyes, noses, or ears.
- Final Layers combine these complex features to recognize entire objects, like faces or cars.
Impressively, the network learns this entire hierarchy automatically from the data during training!
MIT 6.S191: Convolutional Neural Networks
This concept of hierarchical feature learning is one of the most elegant aspects of CNNs. This short clip from the MIT lecture visualizes the actual filters learned by a network trained to detect faces.
Watch from 40:22 to 42:16. Notice how the features progress from simple lines and gradients in the first layer to parts of a face in the second, and finally to complete faces in the third layer.
Test your understanding!
Imagine a CNN is trained to classify images of cars. Which of the following features is more likely to be detected by a filter in the first convolutional layer, and which by a filter in a deeper layer?
- A complete wheel.
- A small, curved edge.
Show answer
The small, curved edge is a low-level feature that would likely be detected by a filter in the first (or an early) convolutional layer. The complete wheel is a more complex object composed of multiple simpler features (like curves, circles, and textures). It would be detected by combining the outputs of earlier layers, and thus would be recognized by a filter in a deeper layer of the network.
Conclusion
In this lesson, you've learned about the fundamental architecture of Convolutional Neural Networks. We moved from the limitations of fully connected networks to a new design that is far more effective and efficient for image data.
Key Takeaways:
- Why CNNs?: They solve the problems of FNNs for images by preserving spatial structure and being parameter-efficient.
- Convolutional Layers: Use learnable filters (kernels) to scan for features, creating feature maps. This is the core of feature extraction.
- Activation (ReLU): Introduces non-linearity, allowing the model to learn complex relationships.
- Pooling Layers (Max Pooling): Downsample feature maps to reduce computational cost and provide local invariance.
- Fully Connected Layers: Act as a classifier at the end of the network, taking the learned features as input to make a final prediction.
- Hierarchical Features: CNNs automatically learn a hierarchy of features, from simple edges in early layers to complex objects in deeper layers.
Preview of the Next Lesson:
Theory is great, but practice is better. Now that you understand the blueprint of a CNN, our next lesson, "Build and train a simple CNN for an image classification task," will guide you through implementing this architecture in PyTorch. You'll use nn.Conv2d and nn.MaxPool2d to build your own CNN and then plug it into the training loop you've already mastered to classify MNIST digits with even higher accuracy.