Hello! Welcome to the first lesson of our second module, "Local Development Stack with Docker."
In our previous lesson, we established the architectural blueprint for your data pipeline. We now have a clear high-level map of how PostgreSQL, Airflow, dbt, Python, and Kafka will work together. With that plan in place, it's time to roll up our sleeves and start building the local 'workshop' where this pipeline will come to life.
The very first, and arguably most critical, step in any professional software project is setting up a clean, reproducible development environment. In this lesson, we will focus on exactly that. We'll explore why isolating your project's dependencies is crucial and learn how to use modern tooling to create a Python environment that is not only isolated but also perfectly reproducible by you or anyone else, on any machine. This foundation is essential for building a reliable data pipeline and will prevent countless hard-to-debug issues down the line.
By the end of this lesson, you will be able to set up a robust, reproducible Python project using virtual environments and pinned dependencies, ready for the development ahead.
The Need for Isolation: Avoiding "Dependency Hell"
As you build your data pipeline, you will rely on a growing number of third-party Python packages: libraries for making API calls, connecting to databases, interacting with Kafka, and more. Your chosen frameworks, like Airflow, bring in their own extensive sets of dependencies.
This immediately presents a challenge. Imagine your project needs version 1.0 of a library, but a different project on your machine, or even a different component of the same project, requires version 2.0. If all packages are installed into a single, global location, you've entered "dependency hell." One project will inevitably break.
Virtual environments are the solution to this problem.
How to Create and Use Virtual Environments in Python With Poetry
To start, let's get a clear definition of the problem and the solution. In his video on virtual environments, ArjanCodes gives a concise overview.
Watch the first segment where he introduces "dependency hell" and positions virtual environments as the answer. Then, continue with his explanation of what a virtual environment is: a self-contained folder structure with an isolated Python interpreter and its own dependencies.
As the video explains, a virtual environment is an isolated, self-contained directory that houses a specific version of the Python interpreter plus all the libraries your project needs. This ensures that the dependencies for one project don't clash with those of another.
The Traditional Approach: venv and requirements.txt
Python has long included a built-in module for creating virtual environments: venv. It's the standard, foundational tool for this task. Let's briefly review how it works, as understanding this baseline is important.
Python Virtual Environments: A Primer – Real Python
This Real Python article provides an excellent, in-depth guide to virtual environments. It explains the 'why', 'what', and 'how' in great detail.
First, read the section "Why Do You Need Virtual Environments?" to solidify your understanding of the problems they solve. Next, familiarize yourself with the basic commands in the section "How Can You Work With a Python Virtual Environment?". This covers creating, activating, and installing packages. Finally, read the section on pinning dependencies. This introduces requirements.txt as a way to make your environment reproducible.
The workflow described in the article is the classic Python project setup:
- Create:
python -m venv .venv - Activate:
source .venv/bin/activate(or.\.venv\Scripts\activateon Windows) - Install:
pip install <package> - Reproduce:
pip freeze > requirements.txtto save the dependencies, andpip install -r requirements.txtto restore them.
While functional, this approach has some ergonomic drawbacks. You must always remember to activate the environment, and pip freeze includes every dependency, making it hard to distinguish between your direct needs and their sub-dependencies. Furthermore, a simple requirements.txt doesn't always guarantee a perfectly identical environment, especially when dealing with complex dependency trees across different operating systems.
Modernizing the Workflow with uv
To address the shortcomings of the traditional workflow, tools like Poetry and Pipenv emerged, offering a more integrated experience for managing dependencies and virtual environments. They introduced concepts like lock files for deterministic dependency resolution.
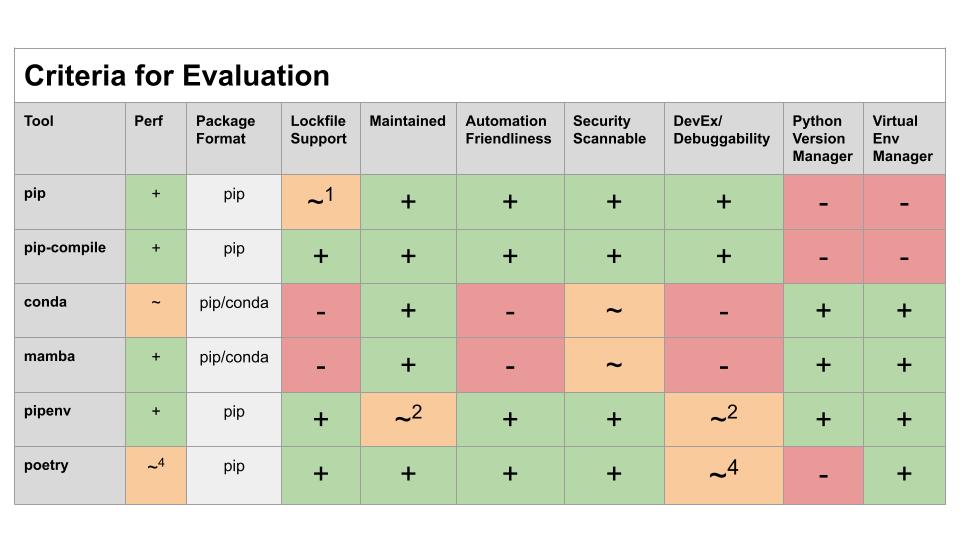
Recently, a new tool called uv has revolutionized the Python packaging landscape. Written in Rust, it is incredibly fast and aims to be a single, unified tool for package and environment management. For a project like ours—a data pipeline that will grow in complexity—adopting uv from the start provides significant advantages in speed, simplicity, and reliability.
My 2025 uv-based Python Project Layout for Production Apps
Hynek Schlawack, a prominent figure in the Python community, gives a fantastic presentation on structuring modern Python projects with uv. His video captures the excitement around this tool.
First, watch the introduction where he frames the historical pain points of Python packaging and introduces uv as the modern, all-in-one solution. Then, jump to the segment where he demonstrates the "magic" of uv. Notice how a single command, uv run, automatically handles Python installation, virtual environment creation, and dependency locking. This seamless experience is what we'll be leveraging.
Setting Up Our Project with uv
Let's get practical and set up our project environment. We will use uv to manage our virtual environment and dependencies. I'll assume you have uv installed. If not, you can typically install it with pip install uv or follow the official instructions on their website.
1. Defining the Project with pyproject.toml
Modern Python projects are defined by a pyproject.toml file in the project's root directory. This file contains metadata, dependency lists, and configuration for various tools. It's the new standard, replacing older files like setup.py.
Let's create our pyproject.toml file with some initial content:
[project]
name = "data-pipeline-project"
version = "0.1.0"
requires-python = ">=3.11"
dependencies = [


    # We will add our core production dependencies here
    "requests",
    "python-dotenv",
]

[tool.uv.dev-dependencies]


# Development-specific dependencies go here
pytest = "*"
Here's what this configuration does:
[project]: This section contains standardized metadata.name,version: Basic project identifiers.requires-python: Specifies the minimum Python version required.uvcan even download a suitable Python version for you if it's not found on your system.dependencies: A list of packages required for the project to run. We've addedrequests(for API calls) andpython-dotenv(for managing configuration), as we'll need them soon.
[tool.uv.dev-dependencies]: This is auv-specific way to define dependency groups. Here we specify packages needed only for development, likepytestfor running tests.uvwill install these by default in your local environment but they can be excluded from a production build.
2. Creating the Environment and Installing Dependencies
Now for the best part. With our pyproject.toml in place, we don't need to manually create or activate a virtual environment. uv handles it.
Open your terminal in the project directory and run a command using uv run. For example, let's check the Python version:
uv run -- python --version
The first time you run this, uv will perform several actions automatically:
- It reads
pyproject.toml. - It creates a virtual environment in a
.venvdirectory. - It installs all dependencies listed in
[project.dependencies]and[tool.uv.dev-dependencies]. - It creates a
uv.lockfile. This is the key to reproducibility. It's a "lock file" that records the exact version of every single package installed, including all sub-dependencies. - Finally, it executes the command (
python --version) within that newly created environment.
Your project is now fully set up. You should commit both pyproject.toml and uv.lock to your version control system (e.g., Git). The .venv directory should be ignored.
3. The Daily Workflow
From now on, you will rarely need to think about activating or deactivating environments. Your workflow will be centered around uv run.
- To run a Python script:
uv run python my_script.py - To run tests:
uv run pytest - To start an interactive shell:
uv run(oruv shell)
If you add a new dependency, you can use uv pip install <package-name>. uv will install it and update pyproject.toml and uv.lock for you.
This workflow is simple, fast, and removes an entire class of common errors related to environment management.
uv: Towards a unified vision for Python tooling
This blog post provides a great summary of the practical benefits and commands for uv.
Focus on the sections "Command line execution", which explains the power of uv run, and "Useful commands", which provides a concise summary of the core uv workflow.
Here is a handy cheatsheet summarizing the commands we'll be using most often.

Conclusion
In this lesson, we established the critical first layer of our development stack: a reproducible Python environment.
Here are the key takeaways:
- Isolation is Key: Virtual environments prevent dependency conflicts between projects by creating isolated
site-packagesdirectories. - Reproducibility is a Must: A project is reproducible when you can recreate its exact dependency tree. Traditional
requirements.txtfiles have limitations in this regard. uvis the Modern Standard: Theuvtool simplifies this entire process. It acts as an installer, environment manager, and resolver, all in one blazingly fast package.- The New Workflow: Your project is defined by
pyproject.toml. The exact environment state is locked inuv.lock. You interact with your project primarily throughuv run. This eliminates the need to manually activate/deactivate environments.
You now have a robust foundation for your Python code. You can be confident that your environment is clean, isolated, and can be perfectly recreated anywhere, which is essential for the data pipeline we are about to build.
Next time
With our Python environment prepared, the next step is to give our project a home. In the following lesson, we will design and implement a logical directory structure for our repository. This will provide organized locations for our ingestion scripts, transformation models, Docker files, and everything else our pipeline needs to function.