In our previous lesson, we established a framework for choosing the right model for a task, balancing the trade-offs between intelligence, speed, and cost. You learned to think like an architect, using a "cascade" of different models to build efficient and economically viable agents.
Now, we're zooming in from the architectural level to the point of execution. Once you've selected a model, how do you control its behavior on a single API call? This lesson focuses on the essential parameters that allow you to tune an LLM's output. You will learn to configure temperature, top-p, max tokens, and stop sequences to precisely manage the trade-off between determinism and creativity, and to control the shape and length of the model's response. Mastering these "dials" is fundamental to transforming a general-purpose LLM into a reliable component for your specialized agents.
The Art of Controlled Generation
At its core, an LLM generates text one token at a time by predicting the most probable next token in a sequence. However, always picking the single most probable token would lead to very repetitive and dull responses. To add creativity and variability, the process involves controlled randomness. The parameters we'll discuss are your primary tools for managing this process.
To understand how these parameters work, it's helpful to visualize the token generation process as a pipeline.
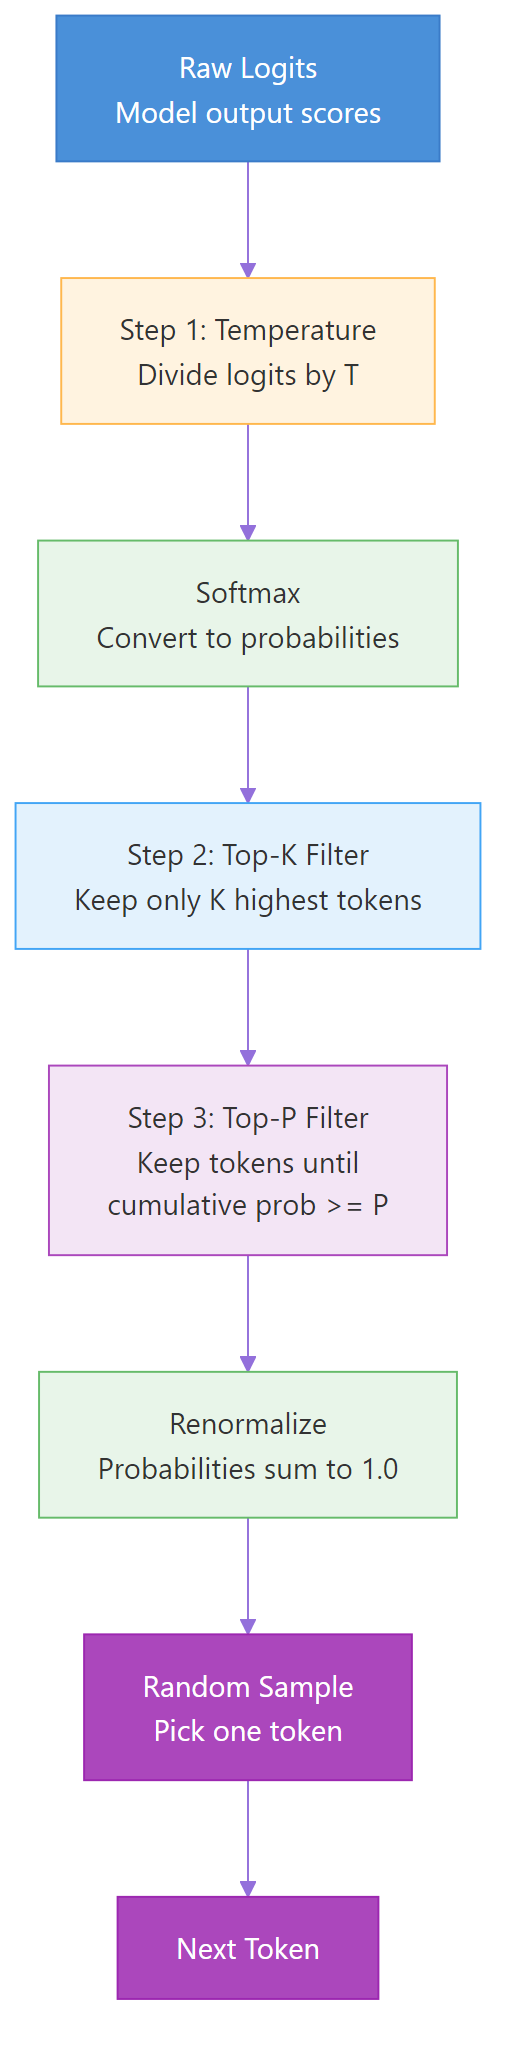
Let's break down this pipeline:
- Raw Logits: The model first produces a raw, unscaled score (a "logit") for every possible token in its vocabulary. A higher logit means the model thinks that token is a more likely candidate for the next position.
- Temperature Scaling: This is our first point of intervention. The
temperatureparameter scales these logits, either sharpening or flattening the differences between them. - Softmax: The scaled logits are then passed through a softmax function, which converts them into a probability distribution (where all probabilities sum to 1.0).
- Filtering (Top-k/Top-p): This is our second point of intervention.
Top-porTop-kfilters are applied to truncate this probability distribution, removing less likely tokens from consideration. - Sampling: Finally, the model randomly samples a token from the remaining, renormalized probability distribution.
Now, let's explore each of the key parameters in detail.
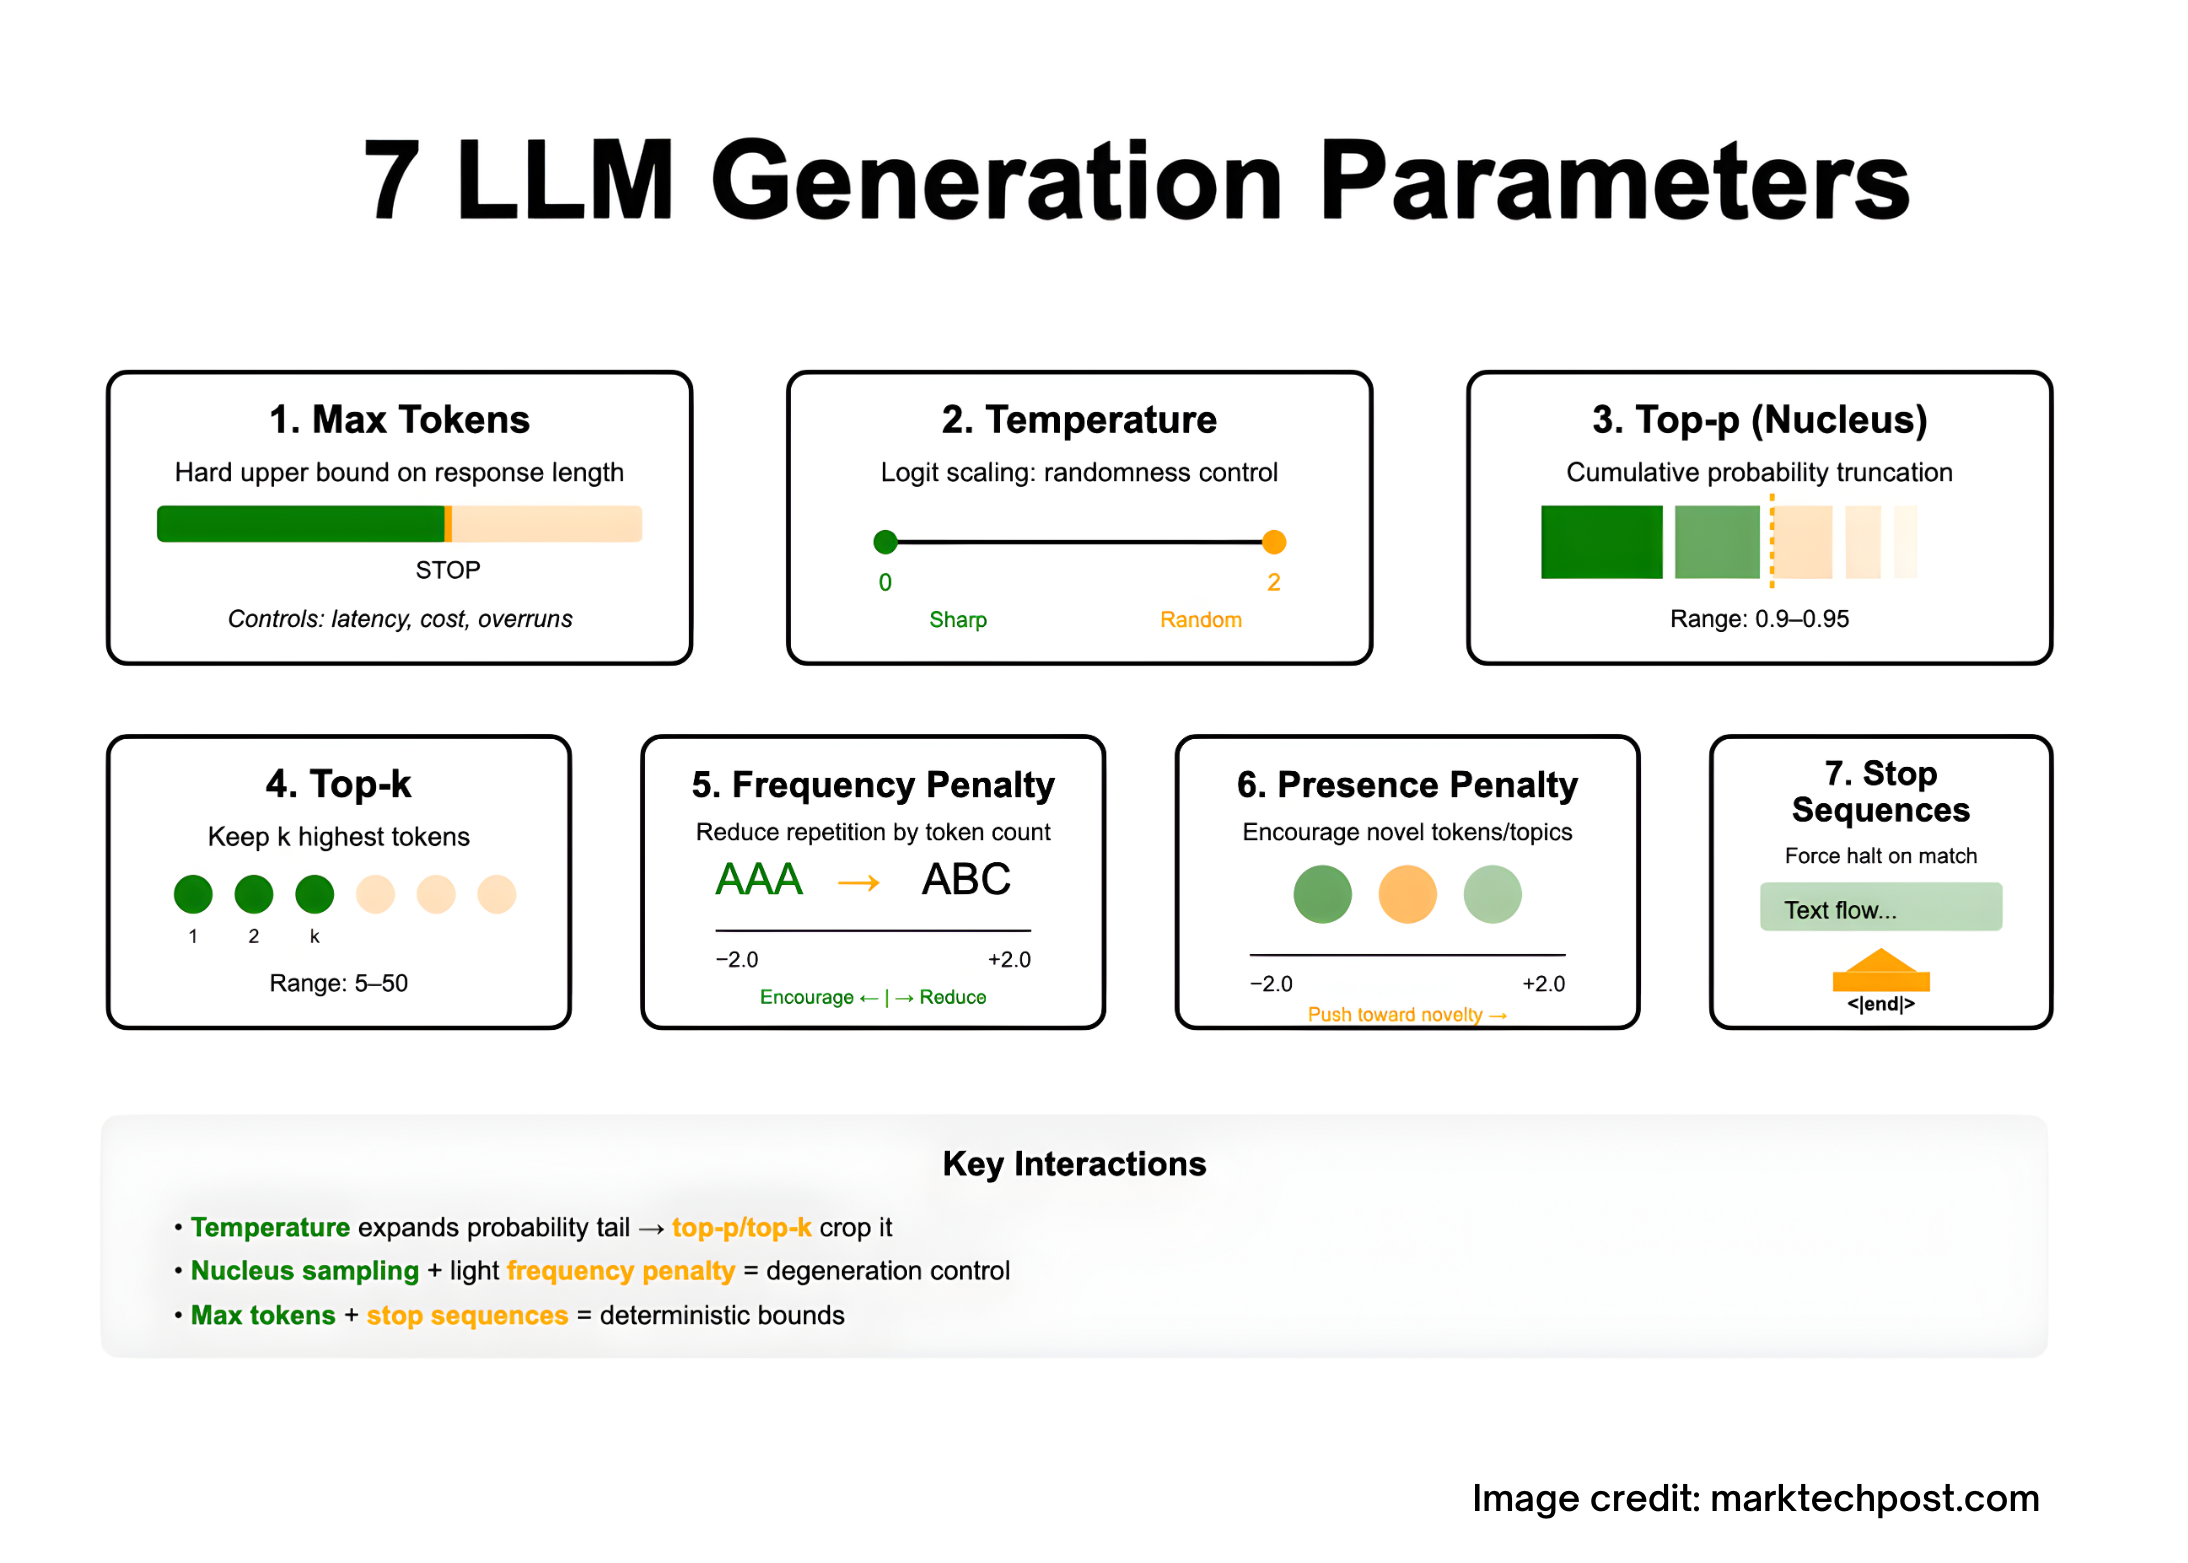
1. Temperature: The Creativity Dial
Temperature is the most common parameter for controlling the randomness of the model's output. It directly impacts the "Softmax" step by scaling the logits beforehand.
- A low temperature (e.g., 0.0 - 0.3) makes the probability distribution "spikier." The model becomes more confident and deterministic, almost always picking the token with the highest probability.
- A high temperature (e.g., 0.8 - 1.2) "flattens" the probability distribution. This increases the chance of sampling less likely tokens, leading to more diverse, surprising, and creative outputs.
LLM Settings That Every AI Developer Must Know
The KodeKloud video "LLM Settings That Every AI Developer Must Know" provides an excellent conceptual overview of these parameters. Let's start with the explanation of temperature.
Watch the segment on temperature. Notice the clear distinction between use cases: low temperature for a constrained drive-thru agent and high temperature for a creative poetry assistant.
When to use which setting:
- Low Temperature (e.g.,
0.2): Ideal for tasks requiring factual accuracy and consistency.- Use Cases: Data extraction, classification, code generation, factual Q&A. As an agent builder, you'll use low temperature for any step that needs to produce a reliable, machine-readable output for a tool.
- High Temperature (e.g.,
0.9): Ideal for tasks where creativity and variety are desirable.- Use Cases: Brainstorming ideas, writing marketing copy, creating chatbot personas, summarizing text in a novel way.
2. Top-p (Nucleus Sampling): The Probability Filter
While temperature rescales the entire probability distribution, Top-p (also known as Nucleus Sampling) provides a different way to control randomness by truncating the list of considered tokens.
It works by creating a "nucleus" of the most probable tokens that cumulatively sum to the top-p value. The model then only samples from this smaller, filtered set.
- A low
top-p(e.g.,0.1) creates a very small nucleus. The model will only consider a handful of the most likely tokens, leading to very predictable output. - A high
top-p(e.g.,0.95) creates a large nucleus, allowing for more variety while still cutting off the long "tail" of very improbable, often nonsensical tokens.
A related but distinct parameter is Top-k, which simply selects the top k most probable tokens, regardless of their cumulative probability. Top-p is generally preferred because it adapts dynamically to the situation. If the model is very certain about the next token (e.g., "Paris" has a 95% probability), top-p=0.9 might only include that single token. In contrast, top-k=10 would be forced to include 9 other very unlikely options.
LLM Settings That Every AI Developer Must Know
Let's continue with the KodeKloud video to understand Top-p and how it compares to Top-k.
Watch the explanations of Top-p and Top-k. The key takeaway is that Top-p is probability-aware, which generally leads to more natural-sounding results.
A common best practice, explicitly recommended by model providers and SDKs, is to use either temperature or top-p to control randomness, but not both. Tweaking both simultaneously can lead to unpredictable interactions. For most use cases, adjusting temperature is more intuitive and sufficient.
3. Max Tokens: The Length Limiter
The max_tokens parameter (often called maxOutputTokens in libraries like the Vercel AI SDK) is straightforward but critical: it sets a hard limit on the number of tokens the model will generate for a given response.
This is not just a suggestion; it's a deterministic bound. The generation will stop either when the model naturally concludes (generates an end-of-sequence token) or when it hits the max_tokens limit, whichever comes first.
Why is this so important?
- Cost Control: LLM APIs are priced per token. Setting a reasonable
max_tokenslimit is your first line of defense against runaway costs from unexpectedly verbose responses. - Latency Control: Generating more tokens takes more time. Limiting the output length ensures your agent responds within an acceptable timeframe.
- Preventing Run-on Output: It prevents the model from rambling or generating irrelevant information after fulfilling the core request, which is a common failure mode.
- Shaping Output: It helps ensure the output fits into a predefined format or UI element.
For an agent that needs to extract an address, you might set max_tokens to 50. For an agent writing a summary, you might set it to 512.
4. Stop Sequences: The Content-Aware Brake
While max_tokens provides a hard cutoff based on length, stop sequences provide a content-aware cutoff. A stop sequence is a string of text that, if generated by the model, will immediately halt the generation process. The stop sequence itself is not included in the final output.
This is an incredibly powerful tool for building robust agents.
LLM Settings That Every AI Developer Must Know
The KodeKloud video provides a perfect example of using stop sequences to manage conversational turns.
Watch this segment on stop sequences. The example of stopping generation before the model starts hallucinating the "customer:" part of a script is a classic and essential use case for agent developers.
Common uses for Stop Sequences in agents:
- Turn-taking: In a chat application, using
\nUser:or\nHuman:as a stop sequence prevents the model from generating the user's next turn. - Structured Formatting: When you ask a model to produce a list, you can use a stop sequence like
\n\nto prevent it from adding extra paragraphs after the list. - Agentic Loops (ReAct): In a Reason-Act loop, you might prompt the model to generate
Thought: ...followed byAction: .... By settingObservation:as a stop sequence, you can reliably parse the action the agent wants to take and pause the generation before feeding it the tool's result. We will explore this pattern in depth later.
Applying Settings in Your Code
As a JavaScript/TypeScript developer, you'll be passing these parameters as part of the options object in your API calls. The Vercel AI SDK, which we will use later in this course, provides a clean, unified interface for this.
The Vercel AI SDK documentation provides clear definitions for how these common settings are implemented. This shows you exactly how you'll apply today's concepts in your future projects.
Review the introductory code example. Then, read the definitions for the following parameters: maxOutputTokens Temperature topP, and note the recommendation that it's best to use temperature or topP, not both. stopSequences
Here's a quick summary of how you might configure a call for two different agent tasks:
Task 1: Extracting an email address from text.
Goal: Deterministic, short, accurate output.
import { generateText } from 'ai';
import { openai } from '@ai-sdk/openai';

const { text } = await generateText({
  model: openai('gpt-4o-mini'),
  prompt: `Extract the email address from the following text: "You can reach me at hello@example.com for more info."`,
  temperature: 0,         // No randomness needed
  maxOutputTokens: 50,    // The output should be very short
});
// Expected output: "hello@example.com"
Task 2: Brainstorming marketing slogans.
Goal: Creative, varied, longer output.
import { generateText } from 'ai';
import { anthropic } from '@ai-sdk/anthropic';

const { text } = await generateText({
  model: anthropic('claude-3-haiku'),
  prompt: 'Write three marketing slogans for a new brand of sustainable coffee.',
  temperature: 0.9,       // High creativity
  maxOutputTokens: 200,   // Allow room for three distinct ideas
});
// Expected output: A creative list of three unique slogans.
Conclusion
You have now learned how to move beyond the default settings and take precise control over an LLM's generation process. These parameters are the fundamental building blocks for shaping model behavior to fit the specific needs of your AI agents.
Your key takeaways are:
- Temperature controls creativity: Low temperature for deterministic tasks (extraction, classification), high for creative tasks (brainstorming, writing).
- Top-p offers an alternative to temperature: It filters the pool of potential next tokens based on their cumulative probability, but for most cases, temperature is sufficient.
- Max Tokens is a safety net: It protects you from runaway costs and latency by setting a hard limit on output length.
- Stop Sequences provide content-aware control: They are essential for managing conversational turns and implementing structured agent loops.
In our next lesson, we will build directly on this foundation. Now that you can control the general shape and creativity of the output, we will learn how to enforce a rigid, machine-readable structure using features like JSON Mode and response schemas. This is the final step needed to make LLM outputs consistently reliable for use with tools and other software components.