Hello! Welcome to the final lesson of the "Mechanical Design for 3D Printing and DIY" course.
In our last session, we created a full set of assembly instructions for your capstone project, combining exploded views and parts lists into a professional drawing package. You now have a complete digital blueprint for your desk. Today, we take the last and most crucial step: turning that digital design into a set of files that a 3D printer can understand and build.
This lesson covers the final learning outcome of the course: Export all 3D printable components as STL or 3MF files ready for slicing. This is the bridge between the design world of Fusion 360 and the physical world of manufacturing. Mastering this step is essential for bringing your gaming accessories, replacement parts, and capstone desk project to life with your future Bambu A1 printer.
1. The Language of 3D Printing: STL vs. 3MF
When you design in Fusion 360, you're working with "solid" CAD data—perfect mathematical descriptions of curves and surfaces. A 3D printer, however, can't read this directly. It needs a "mesh" file, which is an approximation of your model made up of many small triangles (or polygons).
The two most common mesh file formats are STL and 3MF.
- STL (Stereolithography): The original, decades-old standard. It's universally compatible but only contains the raw geometric shape of the model.
- 3MF (3D Manufacturing Format): A modern format designed to replace STL. It's a "smart" container that can hold not only the geometry but also colors, materials, assembly information, and even slicer settings.
To get a clear understanding of why 3MF is the superior choice for modern 3D printing, especially with a multi-material system like the Bambu AMS, please read the following article.
3MF vs. STL: The Difference Explained (And Why 3MF Is the New Standard)
This article from Snapmaker provides an excellent breakdown of the differences between STL and 3MF and explains why the industry is moving towards 3MF.
Please read the following sections to understand why 3MF is the recommended format: Start from the beginning and read through the '3MF vs. STL: A Head-to-Head Comparison' table. This gives you a quick overview. Read the section 'What is an STL File?' to understand its history and its "data poverty." Read 'What is a 3MF File?' to see how it solves STL's problems by acting as a 'container' for the entire "digital thread." Finally, review the FAQ section 'What's the difference between 3MF, STL, and STEP?'. This reinforces the critical distinction between design files (like STEP or Fusion's .f3d) and print-ready mesh files.
Key takeaway: For your projects, especially any involving multiple colors or parts with your planned Bambu A1 with AMS, 3MF is the strongly recommended format. It's more efficient, carries more information, and results in smaller, more reliable files.
2. Exporting Models from Fusion 360
Fusion 360 offers several ways to export your components as mesh files. The most common and useful methods are accessed through the "Save as Mesh" command or the "3D Print" utility.
The official Autodesk Fusion channel has a concise video that covers these methods thoroughly. We'll watch it in segments.
The Core Export Process
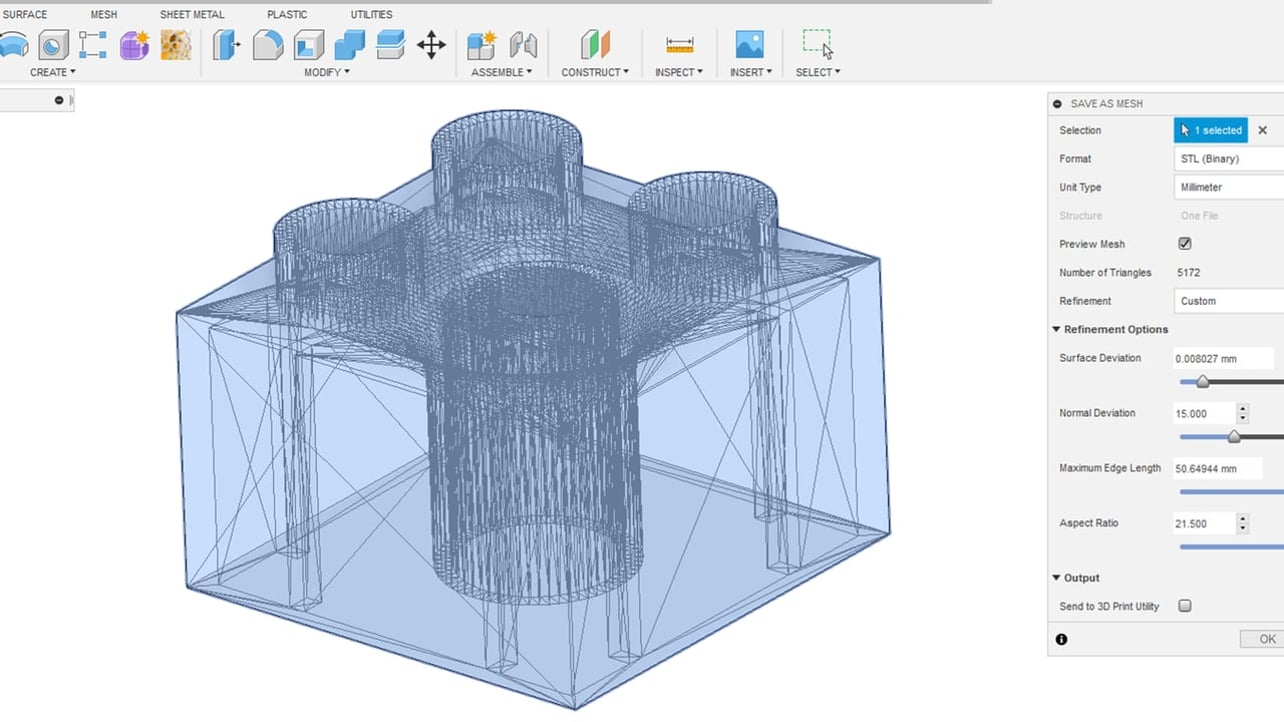
First, let's look at the basic export dialog and its most important settings. You can access this by right-clicking a component in the Browser tree and selecting "Save as Mesh."

This action opens the Save as Mesh dialog, which is where you'll define the quality of your exported file.
How to Export Your Autodesk Fusion Model for 3D Printing
Let's watch the first part of the Autodesk video. It covers the essential options in the export dialog.
Watch from 00:43 to 02:44. This segment covers the core export options. Focus on: Format: Choosing between 3MF, STL (Binary), etc. Unit Type: Ensuring this is set to Millimeter to match your design. Refinement Settings: Understanding how 'Medium', 'High', and 'Custom' settings affect the quality of curved surfaces. The higher the refinement, the smoother the curve, but the larger the file size.
The Refinement setting is crucial for parts with curves. A 'Low' refinement will make a cylinder look faceted, while a 'High' refinement will produce a much smoother surface. For most functional parts you'll design, High is a good starting point.
A Streamlined Workflow: Sending Directly to the Slicer
Instead of saving a file to your computer and then manually opening it in your slicer software (like Bambu Studio), you can send it directly from Fusion 360. This is incredibly efficient, especially when you're iterating on a design.
How to Export Your Autodesk Fusion Model for 3D Printing
Now let's look at a more efficient workflow. Since you'll be using Bambu Studio, this feature will be a significant time-saver.
Continue watching the same video from 02:44 to 04:37. This part demonstrates how to use the 'Print Utility' option to send a model directly to a slicer like Bambu Studio.
For a second look at this specific workflow, the following short video is an excellent, focused demonstration.
Export Fusion 360 to Bambu Studio
This video from What Make Art gives another clear, quick demonstration of the Fusion 360 to Bambu Studio workflow.
Watch the entire video (it's less than 2 minutes). It reinforces the process of selecting the component, choosing the 3MF format, and how Bambu Studio handles the imported parts.
Handling Assemblies and Multi-Part Exports
What if you want to export all the 3D printed parts for your desk at once? Or what about a single component that's designed with multiple bodies for multi-color printing? The export utility handles this as well.
How to Export Your Autodesk Fusion Model for 3D Printing
Finally, let's see how to handle assemblies. This is key for managing all the printable parts of a large project like your desk.
Watch the next segment from 04:37 to 05:41. It explains the 'Structure' option that appears when you export an assembly. Pay close attention to the difference between exporting as 'One File' versus 'One Body Per File'.
When exporting for your Bambu A1, you have two powerful options:
- Exporting an assembly with 'One Body Per File': This will generate separate 3MF/STL files for each component, which you can then arrange on the build plate in Bambu Studio for a large print job.
- Exporting a multi-body component as a single 3MF file: If you've designed a single part with multiple bodies for different colors, exporting it as one 3MF file allows Bambu Studio to recognize those separate bodies. You can then assign different filaments to each one to be printed with the AMS.
3. Practical Application & Course Conclusion
Let's put this into practice with a quick exercise using your capstone project.
Exercise (10 minutes):
- Open your capstone desk project file in Fusion 360.
- In the Browser tree, locate one of the simple 3D printed accessories you designed (for example, the headset mount or a cable clip from Module 11).
- Export as STL: Right-click the component and select Save as Mesh. In the dialog:
- Set Format to
STL (Binary). - Set Unit Type to
Millimeter. - Set Refinement to
High. - Click OK and save the file to your computer.
- Set Format to
- Export as 3MF: Repeat the process for the same component, but this time set the Format to
3MF. - Compare: Navigate to where you saved the files. Notice the difference in file size between the STL and 3MF versions. The 3MF file is typically smaller and more efficient.
- (Optional): If you already have Bambu Studio installed, try the "Send to 3D Print Utility" option to send the component directly and see it appear on the virtual build plate.
Congratulations!
You have now completed the entire "Mechanical Design for 3D Printing and DIY" course. Take a moment to reflect on your journey: you started with no CAD experience and have progressed through installing Fusion 360, mastering 2D sketching, creating robust 3D models, designing complex parametric assemblies, and finally, producing a complete set of manufacturing and assembly documents for a significant capstone project.
Key Takeaways from this Lesson:
- The 3MF format is modern, efficient, and superior to STL for nearly all 3D printing applications.
- Use the Save as Mesh or 3D Print utilities in Fusion 360 to export your models.
- Always check your Unit Type (mm) and Refinement settings before exporting.
- Leverage the direct-to-slicer workflow to speed up design iteration.
- Use the 'One Body Per File' option to export all parts of an assembly at once.
You now possess the foundational skill set to confidently pursue your goals. Whether it's designing and printing a custom gaming accessory this weekend, reverse-engineering a broken part for a household repair, or beginning the fabrication of your custom PC desk, you have the knowledge to turn your ideas into reality.
The learning process never truly ends, but your formal instruction in this course is complete. Well done, and I wish you the best of luck with all your future projects.