Hello! Welcome back to our module on Azure API Management.
In our last lesson, you did some excellent work securing your API. You learned how to apply policies to control who can call your API (using JWT validation) and how often (using rate limiting). These are crucial inbound controls that protect your backend services.
Today, we'll build on that by exploring policies that control what data flows through the gateway. This lesson is all about transformation. You will learn to apply policies to transform a request or response, such as modifying headers, rewriting URLs, and even changing the structure of the message body. This capability is at the heart of what makes APIM such a powerful tool for decoupling clients from backend services and is a key topic for the AZ-204 exam.
1. The Concept of API Transformation
Before we dive into specific policies, let's solidify the "why." Why would you want to change a request or response as it passes through the gateway?
- Compatibility: You might have a modern client application that expects JSON, but it needs to communicate with a legacy backend that only produces XML. APIM can handle the translation.
- Decoupling: Your backend API might have a URL structure like
/api/v1/users?userId=123. You can expose a cleaner, more user-friendly URL like/users/123to your clients and have APIM rewrite it internally. If the backend URL changes later, you only update the APIM policy, and your clients are unaffected. - Security: A backend service might return headers that reveal information about the server technology (like
X-AspNet-Version). It's a security best practice to remove these before the response reaches the client. - Enrichment: You can add information to the request before it reaches the backend. For example, you could add a header with the name of the product the user is subscribed to, allowing your backend to tailor its logic.
All these transformations are made possible by policy expressions. As you've seen, policies are XML snippets, but they can contain C# expressions using the @(...) syntax. These expressions give you access to the request and response context, allowing for dynamic and powerful manipulations.
To start, let's watch a short video that provides a high-level overview of policies and where they fit in the request pipeline.
AZ-204 - Connect and Consume services - Azure API Management
This clip from a video by Alan Rodrigues gives a concise overview of what policies are and the different stages where they can be applied: inbound, backend, outbound, and on-error. This will be a good refresher.
Watch from 01:05:31 to 01:08:30. Focus on understanding the different processing sections (inbound, outbound) as we will be applying transformation policies in both.
2. Inbound Transformations: Modifying the Incoming Request
Inbound transformations modify the request before it is forwarded to your backend API. This is useful for standardizing requests, enriching them with data, or routing them based on their content.
Example 1: Rewriting the Request URL
A very common transformation is to change the URL. Imagine your client calls /courses?id=az204 but your backend expects /api/course/az204. The rewrite-uri policy can handle this translation seamlessly.
The following video demonstrates this exact scenario.
AZ-204 - Connect and Consume services - Azure API Management
This segment clearly demonstrates how to use the rewrite-uri policy to transform a query parameter into a path segment, a very practical use case.
Watch from 01:10:20 to 01:13:48. Notice how the policy uses a C# expression to read the query parameter from the context.Request object and then constructs a new URL template.
The core of this policy looks like this:
<rewrite-uri template="/api/course/@(context.Request.Url.Query.GetValueOrDefault("courseid"))" />
Here, @(...) executes a C# expression to extract the courseid query parameter and embed it into the new path.
Example 2: Adding Context with Request Headers
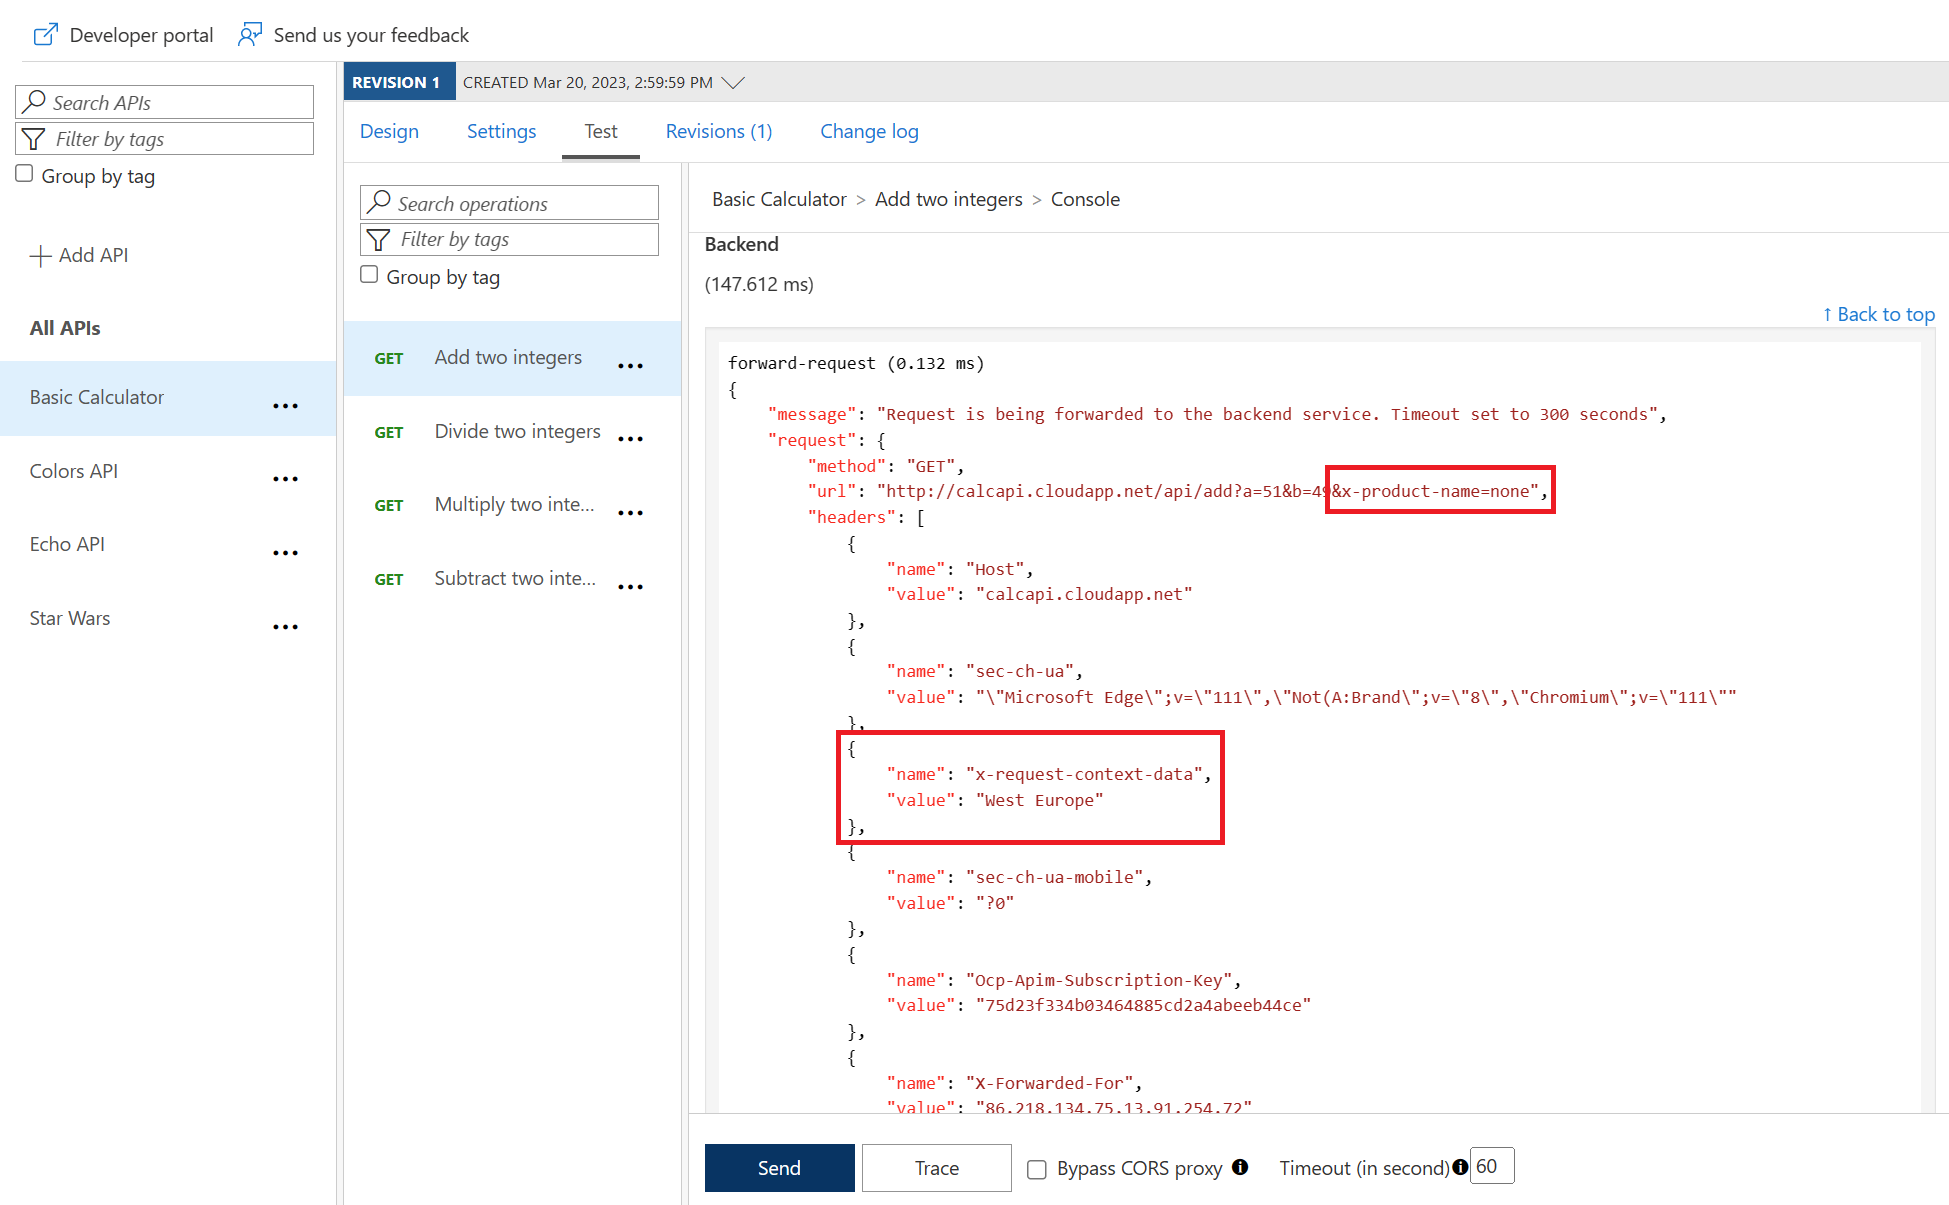
You can also use policies to add headers to the request before it reaches the backend. This is a great way to pass along context that your backend might need.
Let's look at how to add headers that contain the product name and user ID associated with the API call. Given your C# background, you'll recognize the syntax for accessing properties on the context object.
API Management - Hands-on Lab Script - part 4
This lab guide contains excellent, practical examples of different policies. We'll use a specific section to see how to add headers with dynamic values.
Read the section titled 'Amend what’s passed to the backend'. Focus on the XML snippet that uses the set-header policy with C# expressions like @(context.Product.Name) and @(context.User.Id). This shows how to enrich the request with data available only at the gateway.
3. Outbound Transformations: Modifying the Outgoing Response
Outbound transformations modify the response from your backend before it is sent back to the client. This is where you can clean up data, change its format, or add custom headers.
Example 1: Setting and Removing Response Headers
A simple and common task is to manage response headers. You might add a custom header for tracking or remove a default header for security.
Transform and protect your API in Azure API Management
This Microsoft Learn article provides a very clear, step-by-step guide for adding a custom header to a response using the form-based policy editor in the Azure portal.
Read the sections 'Transform an API to add a custom response header' and 'Test the custom response header'. Follow the steps to understand how to use the set-header policy in the outbound section.
To remove a header, you use the same set-header policy but with a different action. This is useful for removing headers like X-Powered-By that could leak information about your backend technology. The lab script you looked at earlier shows a perfect example of this.
<outbound>
    <base />
    <!-- Add a custom header -->
    <set-header name="X-Custom-Header" exists-action="override">
        <value>My custom value</value>
    </set-header>
    <!-- Remove a potentially revealing header -->
    <set-header name="x-aspnet-version" exists-action="delete" />
</outbound>
Example 2: Transforming the Response Body
Modifying the body of the response is an even more powerful capability.
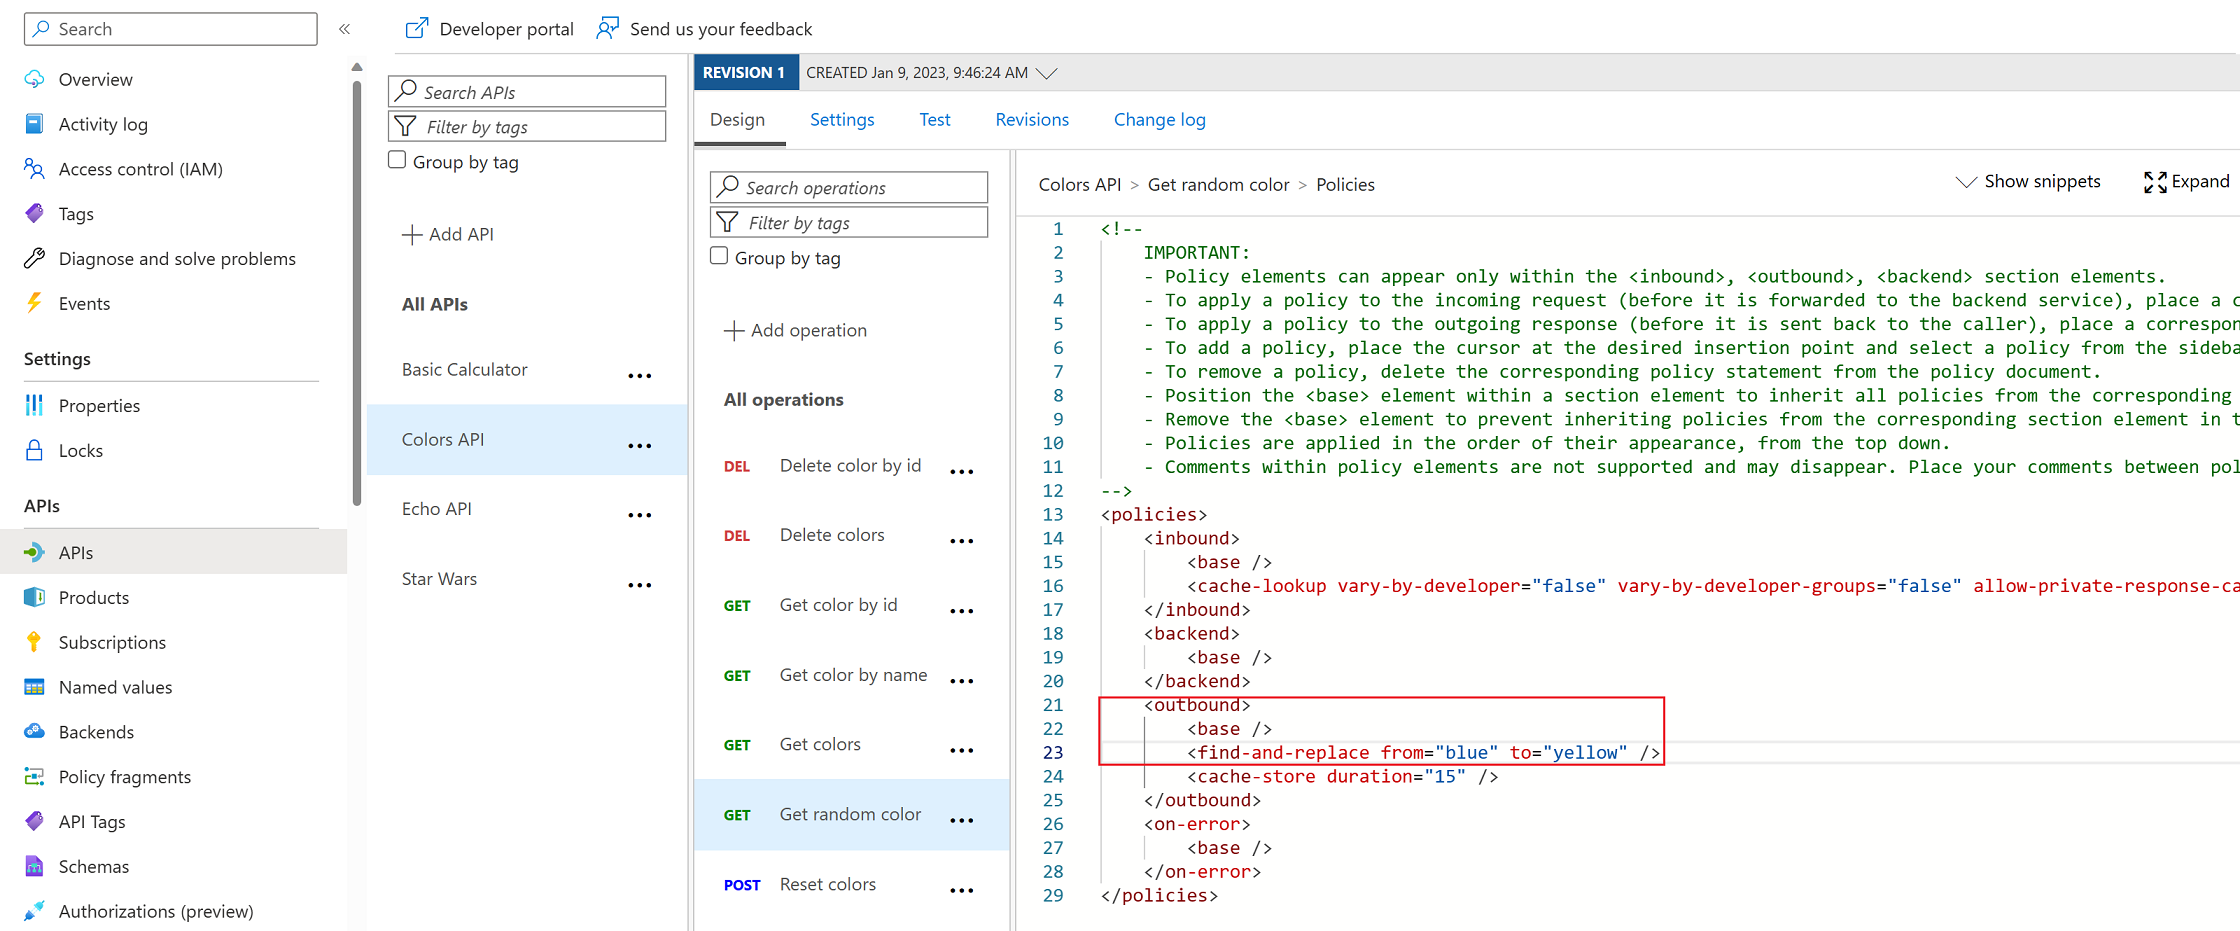
Simple String Replacement
You can perform a simple find-and-replace on the response body. For instance, if your backend returns a term you want to change for public consumption, the find-and-replace policy is ideal.
Conditional Transformations with C#
You can also perform more complex, conditional transformations. For example, you could strip out certain properties from a JSON object for users on a "Starter" plan but return the full object for "Unlimited" plan users.
Since you're proficient in C#, the policy expression for this will look familiar. It involves parsing the response body into a JSON object and then manipulating it directly.
API Management - Hands-on Lab Script - part 4
Let's return to the hands-on lab script to see an advanced example of a conditional body transformation.
Read the section titled 'Transformation - conditional'. Pay close attention to the <set-body> policy. Notice how it uses a C# code block @{ ... } to parse the JSON body and remove properties if the product name is 'Starter'. This is a prime example of APIM's flexibility.
Hands-On Practice
Now it's your turn to apply a transformation. Let's try a simple outbound transformation.
-
Navigate to your APIM instance and select the API you have been working with.
-
Select an operation (e.g.,
GET /WeatherForecast). -
Go to the Design tab and in the Outbound processing section, click the
</>icon to open the policy editor. -
Inside the
<outbound>section, add a policy to set a new header and remove an existing one. If your backend is an ASP.NET Core app, it likely includes anX-Powered-Byheader you can practice removing.<outbound> <base /> <set-header name="X-Source" exists-action="override"> <value>Processed-by-APIM</value> </set-header> <set-header name="X-Powered-By" exists-action="delete" /> </outbound> -
Save the policy.
-
Go to the Test tab, send a request to the operation, and inspect the response headers. You should see your new
X-Sourceheader and confirm that theX-Powered-Byheader is gone.
Conclusion
You have now seen how API Management can act as a powerful transformation layer between your clients and backends. This decoupling is a fundamental principle of modern API architecture and a key skill for an Azure developer.
Key Takeaways:
- Policies can transform both requests (inbound) and responses (outbound).
- The
rewrite-uripolicy is used to change the request path and query string, decoupling client-facing URLs from backend implementations. - The
set-headerpolicy can add, modify, or delete headers, which is useful for enriching context or enhancing security. - The
find-and-replaceandset-bodypolicies allow for modification of the message body, from simple string substitution to complex, conditional logic using C# expressions. - The
contextvariable is the key to dynamic transformations, providing access to all information about the request, response, product, user, and more.
Next Steps
Your API is now proxied, secured, and capable of transformation. However, your backend App Service is likely still accessible via its public URL (*.azurewebsites.net). In a real-world scenario, you would want to lock this down so that it only accepts traffic from your APIM instance. In our next lesson, we will cover exactly that: securing your backend API.