Welcome to your next lesson!
In our previous session, you successfully configured your Spring Boot application to communicate with a Redis server. We set up the necessary dependency, configured the connection properties, and, most importantly, created a custom RedisTemplate with string serializers to ensure our data is stored in a readable and predictable format. The connection is live and verified.
Now, it's time to use that connection. This lesson focuses on the fundamental commands that form the bedrock of many Redis-based patterns, including our first distributed rate-limiting algorithm.
Your learning outcome for this lesson:
You will learn to perform basic Redis operations: GET, SET, INCR, and EXPIRE. You will use these commands both directly via the Redis command-line interface (CLI) for hands-on understanding and programmatically within your Spring Boot application using the RedisTemplate.
1. The Core Redis Commands for State Management
At its heart, Redis is a key-value store. The most basic operations involve setting, getting, and manipulating these values. For our rate limiter, four commands are particularly important:
SET: Sets a key to hold a string value.GET: Retrieves the value of a key.INCR: Atomically increments the integer value of a key by one.EXPIRE: Sets a time-to-live (TTL) on a key, after which it's automatically deleted.
The INCR command is especially powerful. Because Redis is single-threaded, an INCR operation is atomic. This means that even if thousands of requests try to increment the same counter simultaneously, Redis will process them one by one, guaranteeing that the final count is correct and there are no race conditions during the increment itself.
To see these commands in action and understand their nature, let's start with a short video.
Redis Deep Dive w/ a Ex-Meta Senior Manager
This video from 'Hello Interview' provides an excellent overview of Redis's single-threaded nature and demonstrates the core SET, GET, and INCR commands.
Watch the section from 01:51 to 05:26. Pay close attention to the explanation of why being single-threaded simplifies operations and makes commands like INCR atomic.
2. Hands-on with the Redis CLI
The best way to build an intuition for Redis is to interact with it directly. If you started Redis using Docker or Homebrew as discussed in the last lesson, you have access to the Redis Command-Line Interface (redis-cli).
Open a new terminal and run redis-cli to connect to your local server. Now, let's try out the commands.
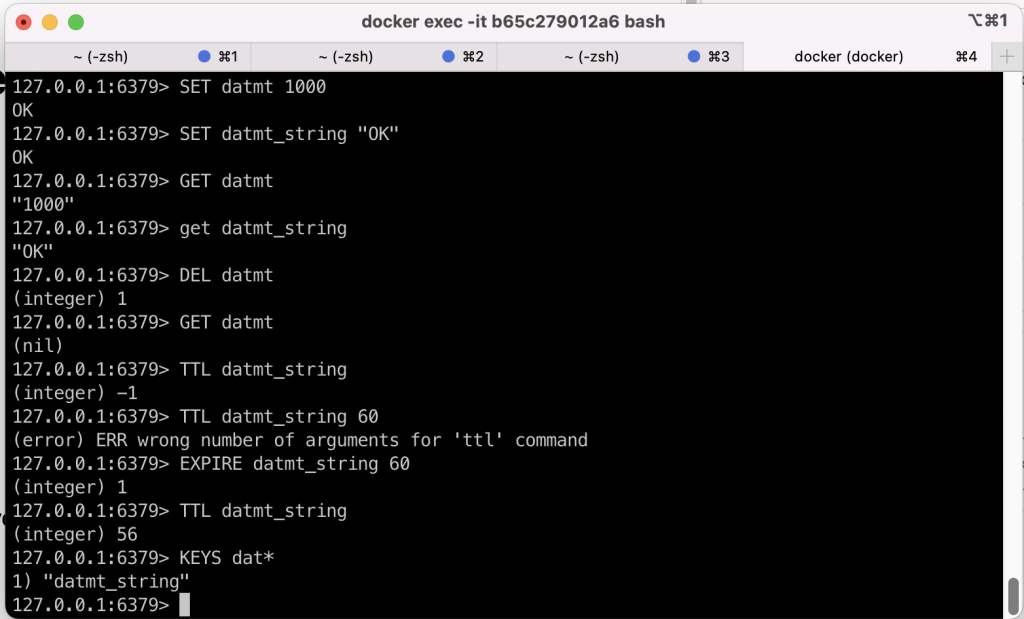
Follow this sequence of commands in your redis-cli session:
SET user:1:pageviews 50- This sets the key
user:1:pageviewsto the string value"50".
- This sets the key
GET user:1:pageviews- This should return
"50".
- This should return
INCR user:1:pageviews- This will increment the value and return the new value,
(integer) 51. Redis is smart enough to interpret the string"50"as a number for this operation.
- This will increment the value and return the new value,
INCR counter- If the key
counterdoesn't exist, Redis initializes it to0before incrementing. This command will return(integer) 1.
- If the key
EXPIRE counter 30- This sets a 30-second timeout on the
counterkey. It will return(integer) 1to indicate the timeout was set.
- This sets a 30-second timeout on the
TTL counter- Running this immediately will show the remaining time, e.g.,
(integer) 28.TTLstands for Time To Live.
- Running this immediately will show the remaining time, e.g.,
- Wait about 30 seconds and then run
GET counter.- The command will return
(nil), as the key has been automatically deleted by Redis.
- The command will return
This auto-expiration is fundamental to our rate limiter, as it allows us to discard old request counters without any manual cleanup.
3. Using Redis in Spring Boot with RedisTemplate
Now, let's translate these CLI commands into Java code using the RedisTemplate<String, String> we configured previously. The template provides different "operations" objects for different Redis data types. For our simple key-value strings, we'll use opsForValue().
You can inject your configured RedisTemplate into any Spring component (like a @Service or @Component).
import org.springframework.data.redis.core.RedisTemplate;
import org.springframework.stereotype.Service;
import java.util.concurrent.TimeUnit;

@Service
public class RedisDemoService {

    private final RedisTemplate<String, String> redisTemplate;

    public RedisDemoService(RedisTemplate<String, String> redisTemplate) {
        this.redisTemplate = redisTemplate;
    }

    public void demonstrateCommands() {
        String key = "demo:key";

        // 1. SET
        redisTemplate.opsForValue().set(key, "Hello, Redis!");
        System.out.println("SET key '" + key + "' to 'Hello, Redis!'");

        // 2. GET
        String value = redisTemplate.opsForValue().get(key);
        System.out.println("GET key '" + key + "': " + value);

        // 3. INCR
        String counterKey = "demo:counter";
        redisTemplate.opsForValue().set(counterKey, "100"); // Initialize counter
        Long incrementedValue = redisTemplate.opsForValue().increment(counterKey);
        System.out.println("INCR key '" + counterKey + "': " + incrementedValue); // Prints 101

        // 4. EXPIRE
        boolean expired = redisTemplate.expire(key, 10, TimeUnit.SECONDS);
        System.out.println("EXPIRE on key '" + key + "' set for 10 seconds: " + expired);

        // 5. TTL
        Long ttl = redisTemplate.getExpire(key, TimeUnit.SECONDS);
        System.out.println("TTL for key '" + key + "': " + ttl + " seconds");
    }
}
Key RedisTemplate Methods:
opsForValue().set(key, value)maps toSET.opsForValue().get(key)maps toGET.opsForValue().increment(key)maps toINCR.expire(key, timeout, timeUnit)maps toEXPIRE.getExpire(key, timeUnit)maps toTTL.
4. The INCR + EXPIRE Pattern for Rate Limiting
We now have all the tools needed to implement a basic fixed window counter in a distributed environment. The logic relies on a combination of INCR and EXPIRE.

Here's the pattern:
- For each incoming request, generate a key that includes the client identifier and the current time window (e.g.,
ratelimit:ip:127.0.0.1:1672531200). - Execute
INCRon this key. - Check the returned value. If it's greater than your limit, reject the request.
- Crucially, if the returned value is exactly 1, it means this is the first request for this key in this window. You must immediately call
EXPIREon the key to ensure it gets cleaned up after the window closes.
This video segment explains this exact use case.
Redis Deep Dive w/ a Ex-Meta Senior Manager
Let's revisit the 'Redis Deep Dive' video, which has a section dedicated to implementing a rate limiter using this very pattern.
Watch the segment from 12:05 to 14:14. It clearly explains how to combine INCR and EXPIRE to enforce a limit over a specific time period.
A Critical Flaw: The Race Condition
There's a subtle but critical problem with performing two separate commands (INCR then EXPIRE). What if your application successfully performs the INCR, but then crashes before it can send the EXPIRE command? The counter key would be created but would never expire, leading to a memory leak and permanently blocking that client once their first-window count is established.
This is a classic race condition in distributed systems. While INCR is atomic, the sequence of INCR and EXPIRE is not.
The official Redis documentation for the INCR command discusses this exact problem in a dedicated 'Rate limiter' pattern section. This is an excellent resource for understanding the problem at a deeper level.
Read the section titled 'Pattern: Rate limiter 2'. It demonstrates the naive implementation and explicitly points out the race condition. Notice that it suggests solving this problem by using a Lua script sent via the EVAL command. This is exactly what we will be doing in a future lesson to guarantee atomicity.
For now, just be aware of this issue. We will solve it properly when we discuss atomicity and implement Lua scripting.
5. Practical Exercise: Write a Verifying Test
Let's solidify this knowledge by writing an integration test. In your test source folder, create a test class that uses @SpringBootTest. This will load your application context, including the RedisTemplate bean.
import org.junit.jupiter.api.Test;
import org.springframework.beans.factory.annotation.Autowired;
import org.springframework.boot.test.context.SpringBootTest;
import org.springframework.data.redis.core.RedisTemplate;
import static org.assertj.core.api.Assertions.assertThat;

import java.util.concurrent.TimeUnit;

@SpringBootTest
class RedisOperationsTest {

    @Autowired
    private RedisTemplate<String, String> redisTemplate;

    @Test
    void testBasicRedisOperations() throws InterruptedException {
        String key = "test:key";
        String counterKey = "test:counter";

        // Clean up before starting
        redisTemplate.delete(key);
        redisTemplate.delete(counterKey);

        // Test SET and GET
        redisTemplate.opsForValue().set(key, "test-value");
        String value = redisTemplate.opsForValue().get(key);
        assertThat(value).isEqualTo("test-value");

        // Test INCR
        Long count = redisTemplate.opsForValue().increment(counterKey);
        assertThat(count).isEqualTo(1L);
        count = redisTemplate.opsForValue().increment(counterKey);
        assertThat(count).isEqualTo(2L);

        // Test EXPIRE and TTL
        redisTemplate.expire(key, 2, TimeUnit.SECONDS);
        Long ttl = redisTemplate.getExpire(key, TimeUnit.SECONDS);
        assertThat(ttl).isNotNull().isBetween(1L, 2L);

        // Wait for key to expire
        Thread.sleep(2100); // Sleep for slightly longer than the TTL

        // Verify key is gone
        value = redisTemplate.opsForValue().get(key);
        assertThat(value).isNull();

        // Clean up after test
        redisTemplate.delete(counterKey);
    }
}
This test provides a working, verifiable example of using RedisTemplate for the core commands and serves as a blueprint for testing your rate limiter's Redis interactions later.
Conclusion
You now have the practical skills to manipulate data in Redis from your Spring Boot application. This is a massive step forward in building our distributed rate limiter.
Key Takeaways:
- The four essential commands for our purpose are
SET,GET,INCR, andEXPIRE. - You can interact with Redis directly using
redis-cli, which is invaluable for debugging and exploration. - In Spring Boot,
RedisTemplateis the primary tool for Redis operations, withopsForValue()providing methods for string-based keys. - The
INCR+EXPIREpattern is the foundation of the fixed-window rate limiting algorithm. - This simple pattern has a significant race condition if the
EXPIREcommand fails after anINCR, which can be solved with atomic operations.
Next Steps
In the next lesson, we will tackle that race condition head-on. We will dive into why atomicity is critical for correctness in distributed rate limiters. You'll understand the limitations of sending multiple commands and be introduced to Lua scripting as the canonical solution in Redis for executing multiple commands as a single, indivisible operation.