Introduction
In our last lesson, we explored how Spring Boot's @EnableAutoConfiguration feature automatically configures your application based on the dependencies it finds on the classpath. This "convention over configuration" approach is incredibly powerful, but it raises a critical question for any experienced software engineer: how do you manage all those dependencies without descending into "dependency hell"? Manually adding dozens of libraries and ensuring their versions are compatible is tedious and error-prone, especially in complex microservice architectures.
This lesson focuses on Spring Boot's elegant solution to this problem: starters. You will learn how starters act as curated dependency bundles that simplify your build configuration, ensure compatibility, and serve as the primary trigger for the auto-configuration process we just discussed. By the end of this lesson, you'll understand the crucial role starters play in making Spring Boot development so rapid and reliable.
The Foundation: Centralized Dependency Management
Before we dive into starters, it's essential to understand the build system mechanism that makes them possible. Since you're new to the Java ecosystem, let's briefly look at how a build tool like Maven handles dependency versions.
In a large system, multiple components might depend on the same library but require different versions, leading to conflicts. Maven solves this by allowing a project to inherit from a parent POM (Project Object Model). This parent can define a <dependencyManagement> section, which acts as a centralized "bill of materials" (BOM), specifying the exact versions for a vast array of common libraries. Any module inheriting from this parent can then declare a dependency without a version number, and Maven will automatically use the version defined in the parent.
This is precisely how Spring Boot works. Your project's pom.xml inherits from spring-boot-starter-parent, which in turn inherits from spring-boot-dependencies, a massive POM that contains a curated list of hundreds of compatible dependencies.
To see this mechanism explained from the ground up, the following video provides an excellent walkthrough.
Spring Boot Tips : Part 1 - How DependencyManagement works in SpringBoot applications
This video from SivaLabs starts with a basic Maven project and builds up the concept of a parent POM and dependency management, culminating in an explanation of how Spring Boot uses this exact pattern.
Watch from 03:47 to 14:29. The first part (until 11:35) explains the general Maven concept of a parent POM and <dependencyManagement>. The second part (from 11:35 onwards) shows how this applies directly to the spring-boot-starter-parent in a Spring Boot project. Focus on understanding how the parent POM allows you to omit version tags for dependencies.
What are Spring Boot Starters?
Now that you understand the underlying dependency management system, we can properly define starters.
The official Spring Boot documentation provides the most precise definition. Please read the following section to get the core concept.
Read the section titled 'Starters'. It clearly defines what starters are and their purpose as 'one-stop shops' for dependencies.
As the documentation states, a starter is simply a set of convenient dependency descriptors. Instead of you having to hunt down and add spring-web, spring-webmvc, tomcat-embed, jackson-databind, and other libraries to build a web application, you just add one dependency: spring-boot-starter-web.
This single starter accomplishes two things:
- It declares all the necessary transitive dependencies.
- It relies on the
spring-boot-starter-parentto provide the correct, compatible versions for all of them.
The image below powerfully illustrates this simplification. On the left is the list of dependencies you might need to manage manually; on the right is the Spring Boot way.

The starter itself is essentially a pom.xml file with no code, just a list of other dependencies. The following diagram shows some of the key dependencies that spring-boot-starter-web transitively pulls into your project.
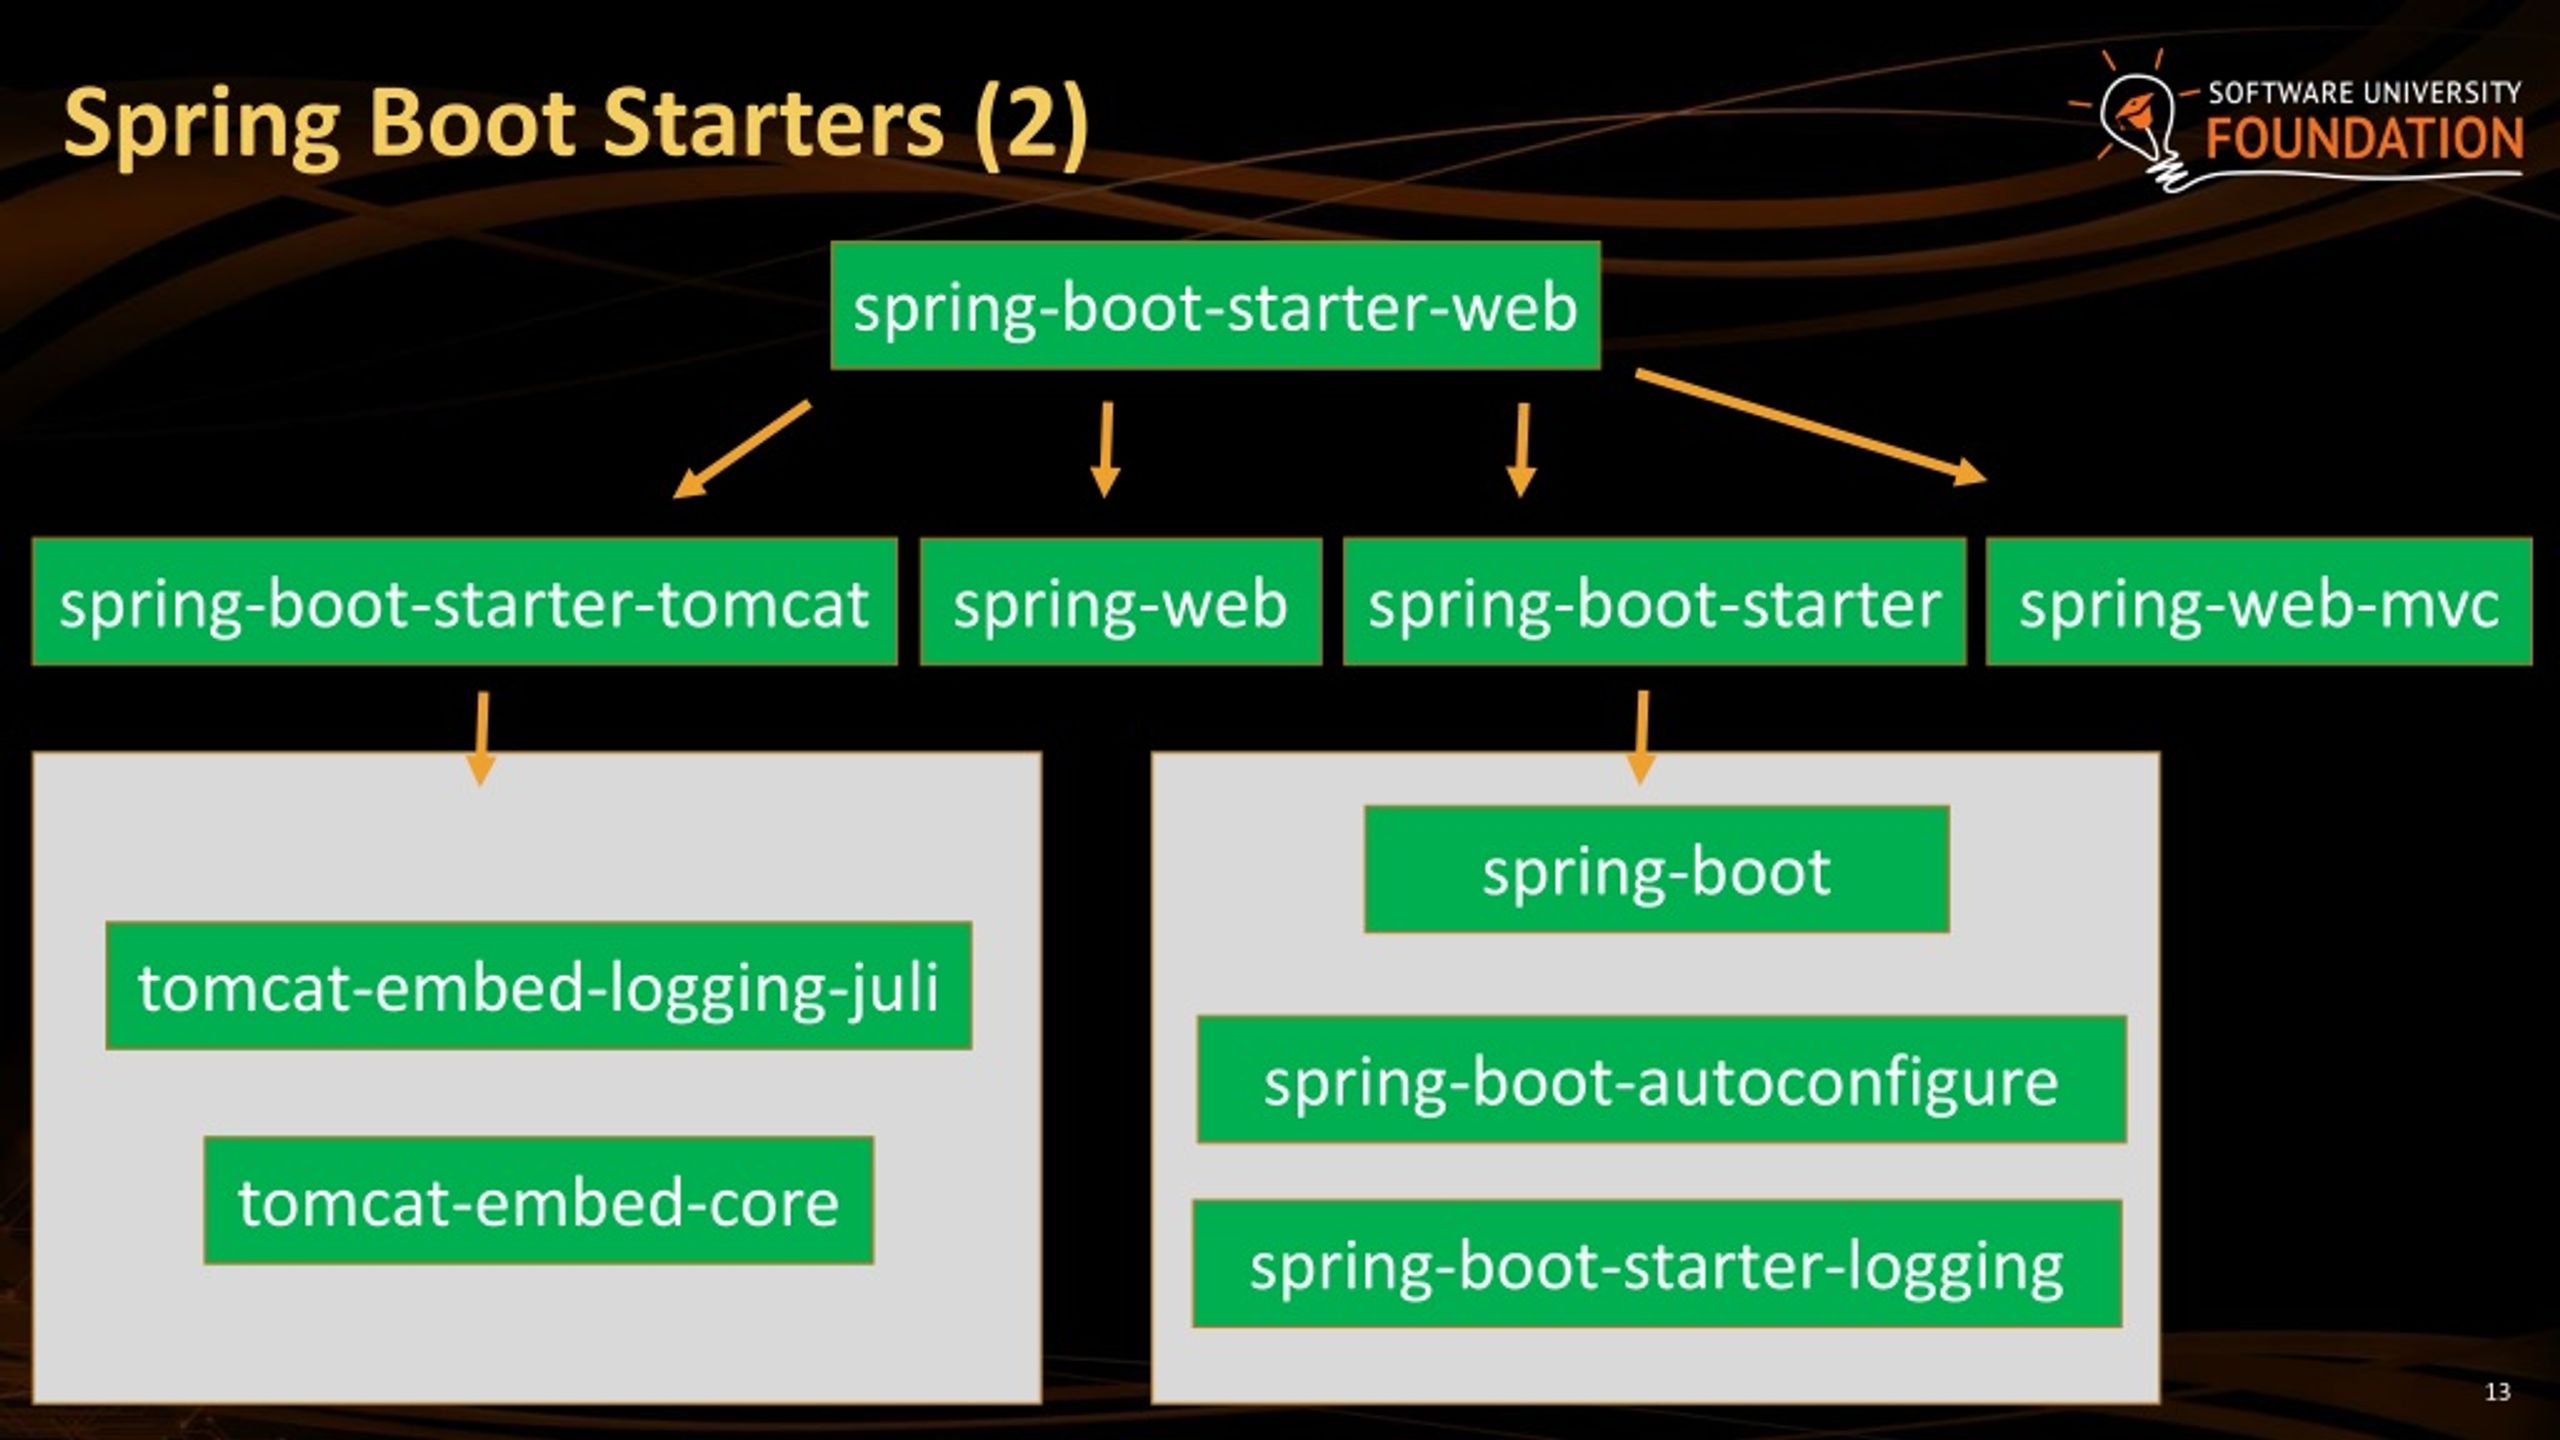
How Starters and Auto-Configuration Work Together
This is where everything connects. The relationship between starters and auto-configuration is the cornerstone of Spring Boot's efficiency:
- You Add a Starter: You declare a starter like
spring-boot-starter-data-jpain yourpom.xml. - Dependencies are Added: Your build tool downloads the starter and all of its transitive dependencies (e.g., Hibernate, Spring Data JPA, HikariCP connection pool) and places them on the application's classpath. The versions are managed by the parent POM.
- Auto-Configuration is Triggered: At startup, Spring Boot's auto-configuration engine (from our previous lesson) scans the classpath. It finds classes like
org.hibernate.Sessionandjavax.sql.DataSource. - Beans are Configured: Based on finding these classes, conditional auto-configuration classes (like
DataSourceAutoConfigurationandHibernateJpaAutoConfiguration) activate, configuring all the necessary beans for you (aDataSource, anEntityManagerFactory, etc.) with sensible default settings.
This two-step process—starters for dependency management and auto-configuration for component setup—is what makes it possible to get a production-ready application running with minimal effort.
A Tour of Essential Starters
Spring Boot provides a wide array of starters for different tasks. Given your goal of building web applications and microservices, some are more critical than others.
Top 7 Spring Boot Starters You Should Know in 2024 - Java Brains
The following video from Java Brains provides an excellent tour of the most common and useful starters you'll encounter.
Watch from 00:55 to 11:20. The video covers six fundamental starters. Pay attention to the purpose of each one:
Here is a summary of the key starters from the video that are directly relevant to your goals:
spring-boot-starter: The foundational starter that every application needs. It includes core utilities, logging (Logback), and auto-configuration support.spring-boot-starter-web: For building web applications and REST APIs. It includes an embedded Tomcat server and the Spring Web MVC framework. This will be the foundation for nearly all of your projects.spring-boot-starter-data-jpa: For persisting data in relational databases using the Java Persistence API (JPA). It includes Hibernate as the default implementation.spring-boot-starter-security: Provides authentication and authorization for your applications. It’s highly configurable but provides sensible defaults out of the box.spring-boot-starter-test: Includes a comprehensive set of libraries for unit and integration testing, such as JUnit 5, Mockito, and AssertJ. It's included by default in all projects generated by Spring Initializr.spring-boot-starter-actuator: Crucial for microservices. It exposes production-ready endpoints to monitor and manage your application's health, metrics, configuration, and more.
Controlling Your Dependencies
While Spring Boot's managed dependencies are a huge benefit, you always retain full control. An experienced engineer knows that sometimes you need to use a specific library version that differs from the managed one.
There are two primary scenarios:
-
Overriding a Managed Dependency Version:
The recommended way to do this is to set a specific property in yourpom.xml. Thespring-boot-dependenciesPOM defines properties for many dependency versions (e.g.,mockito.version). You can override this property in your ownpom.xmlto change the version for both direct and transitive dependencies. -
Using a Dependency Not Managed by Spring Boot:
If you need to use a library that isn't part of Spring Boot's curated list, you simply declare it in your<dependencies>section and include the<version>tag, just as you would in any standard Maven project.
The video you watched earlier also demonstrates how to handle these cases.
Spring Boot Tips : Part 1 - How DependencyManagement works in SpringBoot applications
Let's revisit the SivaLabs video to see exactly how to override default versions and add unmanaged dependencies.
Watch from 14:29 to 20:14. This segment covers:
- Overriding with properties: How to find a version property (like
commons-lang3.version) and override it in your project's POM. - Using unmanaged dependencies: What happens when you add a library not in the parent BOM (like
commons-io). - Overriding transitive dependencies: A practical example of upgrading the version of Mockito, which is pulled in transitively by
spring-boot-starter-test.
This flexibility ensures you get the benefits of the managed bill of materials without being locked into it.
Conclusion
In this lesson, you've seen how Spring Boot starters solve the complex problem of dependency management in a simple and effective way. They are the key that unlocks the power of auto-configuration we discussed previously.
Key Takeaways:
- Starters Simplify Dependency Management: They are "one-stop shop" dependency descriptors that bundle all necessary libraries for a specific functionality.
- Versions are Managed Centrally: The
spring-boot-starter-parentprovides a "bill of materials" that ensures all transitive dependencies are compatible, preventing version conflicts. - Starters Trigger Auto-Configuration: By adding libraries to the classpath, starters provide the trigger for Spring Boot's auto-configuration engine to create and configure the necessary beans.
- You Remain in Control: You can easily override managed dependency versions or add new, unmanaged dependencies as needed.
You now have a complete picture of the "magic" behind Spring Boot: you add a starter to get the right dependencies, and auto-configuration wires them up for you. In our next lesson, we will explore how to customize the behavior of these auto-configured components using application.properties and application.yml files, giving you fine-grained control over your application's settings.