Introduction
Welcome to the first lesson of our module on Spring Boot Essentials. In the previous module, we explored the heart of the Spring Framework: the Inversion of Control (IoC) container, dependency injection, and how to manage beans using component scanning and Java configuration. We concluded by mastering how to resolve ambiguity with @Qualifier when multiple beans implement the same interface.
Now, we shift our focus from the granular details of bean management to the bigger picture of application development. While the Spring Framework provides powerful but unopinionated tools, Spring Boot adds a layer of convention and automation on top, dramatically simplifying the process of building production-ready applications.
In this lesson, you will learn how to generate a new Spring Boot project using the Spring Initializr, the standard tool for bootstrapping Spring applications. This is the first practical step in building any Spring-based web application, REST API, or microservice.
From Spring Framework to Spring Boot
Before we create a project, it's crucial to understand why Spring Boot exists and the problems it solves. The Spring Framework is modular and flexible, but this flexibility comes at the cost of configuration. Setting up a new web application from scratch with the core framework involves manually configuring a web server, managing dependencies, and wiring components together.
Spring Boot automates this setup by providing:
- Opinionated "starter" dependencies to simplify your build configuration.
- Auto-configuration to automatically configure your application based on the JAR dependencies you have on the classpath.
- Embedded servers (like Tomcat or Netty) to create standalone applications that just run.
The following video provides an excellent overview of the relationship between the Spring Framework and Spring Boot.
Spring Boot Tutorial for Beginners [2025]
Watch this segment from the 'Spring Boot Tutorial for Beginners' by Programming with Mosh to understand how Spring Boot builds upon the Spring Framework to make development faster and easier.
Please watch from 05:55 to 08:22. The video explains the modular nature of the Spring Framework and how Spring Boot simplifies development by handling boilerplate setup.
Setting Up Your Development Environment
To build Spring Boot applications, you'll need a standard Java development environment. Since you are new to the Java ecosystem, let's quickly review the required components:
- JDK (Java Development Kit): Spring Boot 3.x requires Java 17 or later.
- Build Tool: You'll need either Maven or Gradle. These tools manage project dependencies and the build lifecycle. We will be using Maven in this course as it's very common in the Spring world.
- IDE (Integrated Development Environment): An IDE with good Java and Maven/Gradle support is essential. IntelliJ IDEA Ultimate is highly recommended for its excellent, built-in Spring Boot integration, which we'll see shortly.
The next part of the same video gives a good walkthrough of getting these tools installed.
Spring Boot Tutorial for Beginners [2025]
This segment covers the setup of the JDK, IntelliJ IDEA, and Maven. Even if you have a JDK installed, it's a useful overview of the typical toolchain for a Java developer.
Watch from 08:22 to 11:55. You can skim this if you are already comfortable with installing developer toolchains. The key takeaway is the set of tools used for Spring development.
Creating a Spring Boot Project with Spring Initializr
The Spring Initializr is a web-based tool that generates a skeleton Spring Boot project for you. It allows you to select your build tool, language, Spring Boot version, and initial dependencies, and then it produces a complete, runnable project.
There are three primary ways to use the Initializr:
- The web interface at
start.spring.io. - The integration built into modern IDEs like IntelliJ IDEA Ultimate.
- The command line, using tools like
curl.
We will explore all three.
Method 1: The Web Interface (start.spring.io)
This is the most common and intuitive way to start. You simply navigate to the website and fill out a form.
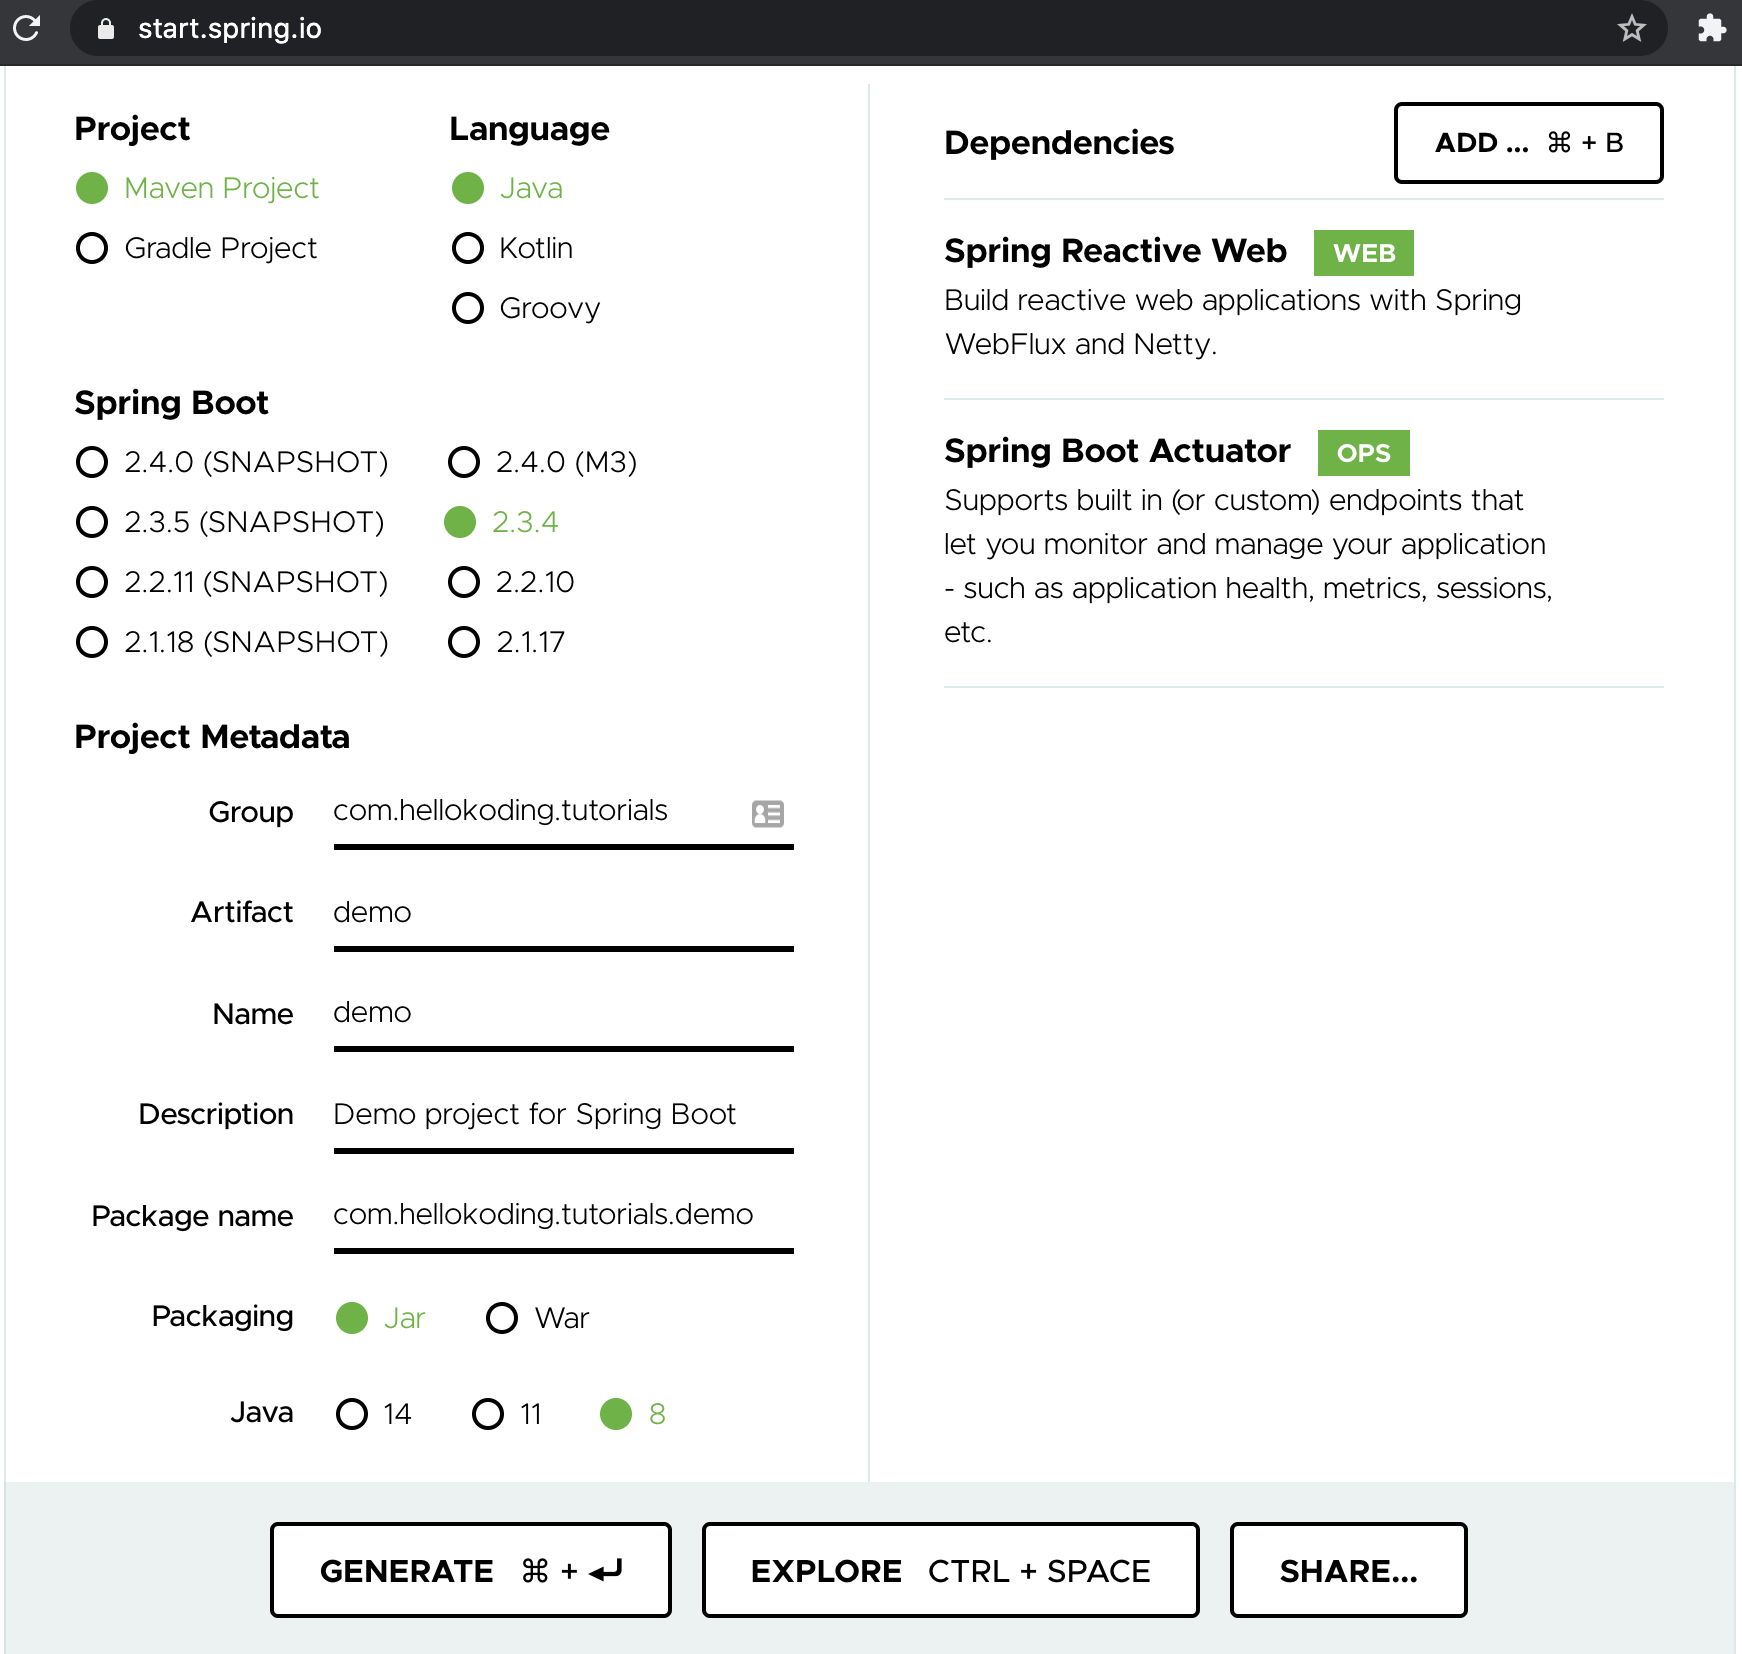
The video below provides a clear, concise walkthrough of using the web interface.
Spring Boot Tutorial for Beginners [2025]
Let's see the Spring Initializr web UI in action. This video will guide you through each option to generate a project.
Watch from 11:55 to 13:39. Pay attention to the explanation of each setting, particularly Project Metadata and Dependencies.
To solidify your understanding, here is a breakdown of the key configuration options you'll set in the Initializr. These correspond to standard Maven project coordinates.
How to Set Up a Spring Boot Project from Scratch
This article from OneUptime provides a helpful table that defines each setting in the Spring Initializr. It's a great reference to keep handy.
Read the section 'Method 1: Using Spring Initializr (Recommended)' and focus on the table under 'Using the Web Interface'. This will clarify the meaning of terms like Group, Artifact, and Packaging.
A key concept to grasp here is dependencies, or "Starters". For example, if you want to build a web application, you add the Spring Web dependency. Spring Boot will then automatically include and configure everything you need, like an embedded web server (Tomcat) and the Spring MVC framework.
Method 2: Integrated in Your IDE
For a more streamlined workflow, you can generate projects directly from your IDE. IntelliJ IDEA Ultimate Edition has the Spring Initializr built-in, presenting the exact same options you see on the website. This is the preferred method for many professional developers.
Spring Boot Tutorial for Beginners [2025]
This next segment shows how to create a project without leaving your IDE, using the Spring Initializr integration in IntelliJ IDEA.
Watch from 13:39 to 15:19. Notice how the options mirror the web interface, making the process familiar and convenient.
Method 3: The Command Line (An Alternative for Power Users)
Given your extensive experience in software engineering, you might appreciate that the Spring Initializr is also accessible via an API. You can generate a project directly from your terminal using a command-line tool like curl. This is useful for scripting and automation.
The resource you read earlier, "How to Set Up a Spring Boot Project from Scratch", also includes an example of how to do this. Simply refer back to the section "Using the Command Line" within the article to see the curl command structure. It's a powerful option to be aware of.
Exploring the Generated Project
After generating and downloading the project (or creating it in your IDE), you'll have a standard Maven project structure. Let's see how to open it and what the key files are.
pom.xml: The Maven Project Object Model file. It defines the project's metadata, dependencies (including the Spring Boot starters you selected), and build settings.src/main/java: The root for your Java source code.src/main/resources: The location for configuration files (likeapplication.properties) and other non-code resources.src/test/java: The root for your test code.- The main application class (e.g.,
DemoApplication.java): This class contains themainmethod, which is the entry point for your application. It will be annotated with@SpringBootApplication.
The following video shows how to import the project into IntelliJ and take a first look at these files.
Spring Tutorial - 1 - Creating a New Spring Boot Project with Initializr
This video by Kody Simpson demonstrates how to open the downloaded project in IntelliJ and provides a tour of the initial project structure, including the main application class.
Watch from 04:51 to 07:20. The key part is seeing the project being imported and running for the first time, which confirms that the generated project is a complete, working application out of the box.
Conclusion
In this lesson, you've taken a major step from understanding Spring's core concepts to creating a real, runnable application. You now have a practical skill that is the starting point for all Spring Boot development.
Key Takeaways:
- Spring Boot simplifies Spring development with auto-configuration, starter dependencies, and embedded servers.
- Spring Initializr is the go-to tool for generating new Spring Boot projects.
- You can use the Initializr via its web interface (
start.spring.io), integrated IDE features, or the command line. - The Initializr generates a standard Maven or Gradle project with a main application class annotated with
@SpringBootApplication. - Adding "starter" dependencies like Spring Web automatically brings in and configures related functionality.
You've now created a project with a mysterious @SpringBootApplication annotation. What does it do? In our next lesson, we will deconstruct this powerful annotation and explore the core concept behind Spring Boot's magic: auto-configuration.