Introduction
Welcome to your first lesson in the "Basics of the Spring Framework" course! As an experienced software engineer, you're used to building complex systems. This course will equip you to do the same using the powerful Spring ecosystem.
Today's goal is to cover the foundational first step in any Java journey: writing, compiling, and running a basic Java application. We will start with the fundamental command-line tools and then move on to using a modern build tool, which is standard practice in professional development.
This lesson directly addresses the learning outcome: Write and compile a basic Java class with a main method using a build tool (Maven or Gradle).
Given your background in C++, you'll find many concepts familiar, but Java has its own unique compilation model and tooling. We'll draw comparisons to C++ where it helps clarify these differences. Mastering this initial step is crucial, as every Spring application, from a simple web service to a complex microservice, is built upon these principles.
The Java "Hello, World!"
In Java, every piece of code resides within a class. Let's start with the simplest possible application.
A basic "Hello, World!" program in Java looks like this:
public class HelloWorld {
    public static void main(String[] args) {
        // This is the entry point of the application
        System.out.println("Hello, World!");
    }
}
Let's break this down:
public class HelloWorld: This defines a class namedHelloWorld. By convention, the filename must match the public class name, so this code would be saved in a file calledHelloWorld.java.public static void main(String[] args): This is the main method. It serves as the entry point for any standalone Java application, similar to themainfunction in C++ or Go. The Java Virtual Machine (JVM) looks for this specific method signature to start execution.

System.out.println("Hello, World!");: This line prints the string "Hello, World!" to the console. It is the Java equivalent of C++'sstd::cout << "Hello, World!" << std::endl;or Python'sprint("Hello, World!").
To understand these concepts from the perspective of a C++ developer, the following video provides some excellent analogies and explanations.
Learn Java, for C++ Programmers
Watch these short segments from the video 'Learn Java, for C++ Programmers' to see a direct comparison of a simple Java program to its C++ equivalent.
Please watch the following clips: Basic 'Hello World' Structure (07:44 - 08:18): This shows the boilerplate of a simple Java program. The 'main' Method (12:05 - 12:43): This details the main method signature, comparing it to C++. Standard Libraries (13:50 - 15:14): This explains how Java's standard library differs from C++'s, focusing on the System.out.println call.
From Source Code to Execution
A key difference between Java and C++ lies in the compilation process. C++ code is typically compiled directly into native machine code for a specific operating system and architecture. Java takes a different approach to achieve platform independence ("write once, run anywhere").
- Compilation (
.java->.class): You use the Java compiler,javac, to compile your.javasource file into an intermediate format called bytecode. This bytecode is saved in a.classfile. - Execution (JVM): You then use the
javacommand to launch the Java Virtual Machine (JVM). The JVM loads the.classfile, interprets the bytecode, and executes it. The JVM is the piece of software that is platform-specific (you need a different JVM for Windows, macOS, and Linux), but it can run the same platform-agnostic bytecode everywhere.
This two-step process is a cornerstone of the Java platform. The video you just watched provides a great demonstration of this. I encourage you to watch this next clip from the same video and then try it yourself.
Learn Java, for C++ Programmers
This clip demonstrates the compile-and-run cycle using the javac and java commands.
Please watch the following clips: Java Compilation Model (06:48 - 07:44): Explains the process of compiling to bytecode and running on the JVM. Compiling and Running in Practice (08:37 - 09:37): Shows the actual javac HelloWorld.java and java HelloWorld commands.
Practice: Your First Compilation
Now it's your turn.
- Make sure you have a Java Development Kit (JDK) installed. Version 17 or newer is recommended for modern Spring development.
- Create a file named
HelloWorld.javawith the code from above. - Open a terminal or command prompt in the same directory.
- Compile the code:
javac HelloWorld.java - Run the application:
java HelloWorld(Note: you do not include the.classextension).
You should see "Hello, World!" printed to your console.
For a more detailed, step-by-step guide, you can refer to the following document.
Compiling and Running a Java Program
This PDF, 'A Crash Course from C++ to Java', provides a clear, text-based walkthrough of compiling and running a basic Java application.
Read the section detailing the command-line instructions for compiling and running the program. It starts with 'To build and execute the program...' and ends just before the mention of the BlueJ environment.
Automating the Build with Gradle
Manually calling javac works for a single file, but modern applications consist of hundreds of files and rely on external libraries (dependencies). This is where build automation tools come in. In the Java world, the two most dominant build tools are Maven and Gradle.
These tools are analogous to make or CMake in the C++ world. They manage the entire build lifecycle: compiling code, managing dependencies, running tests, and packaging the application.
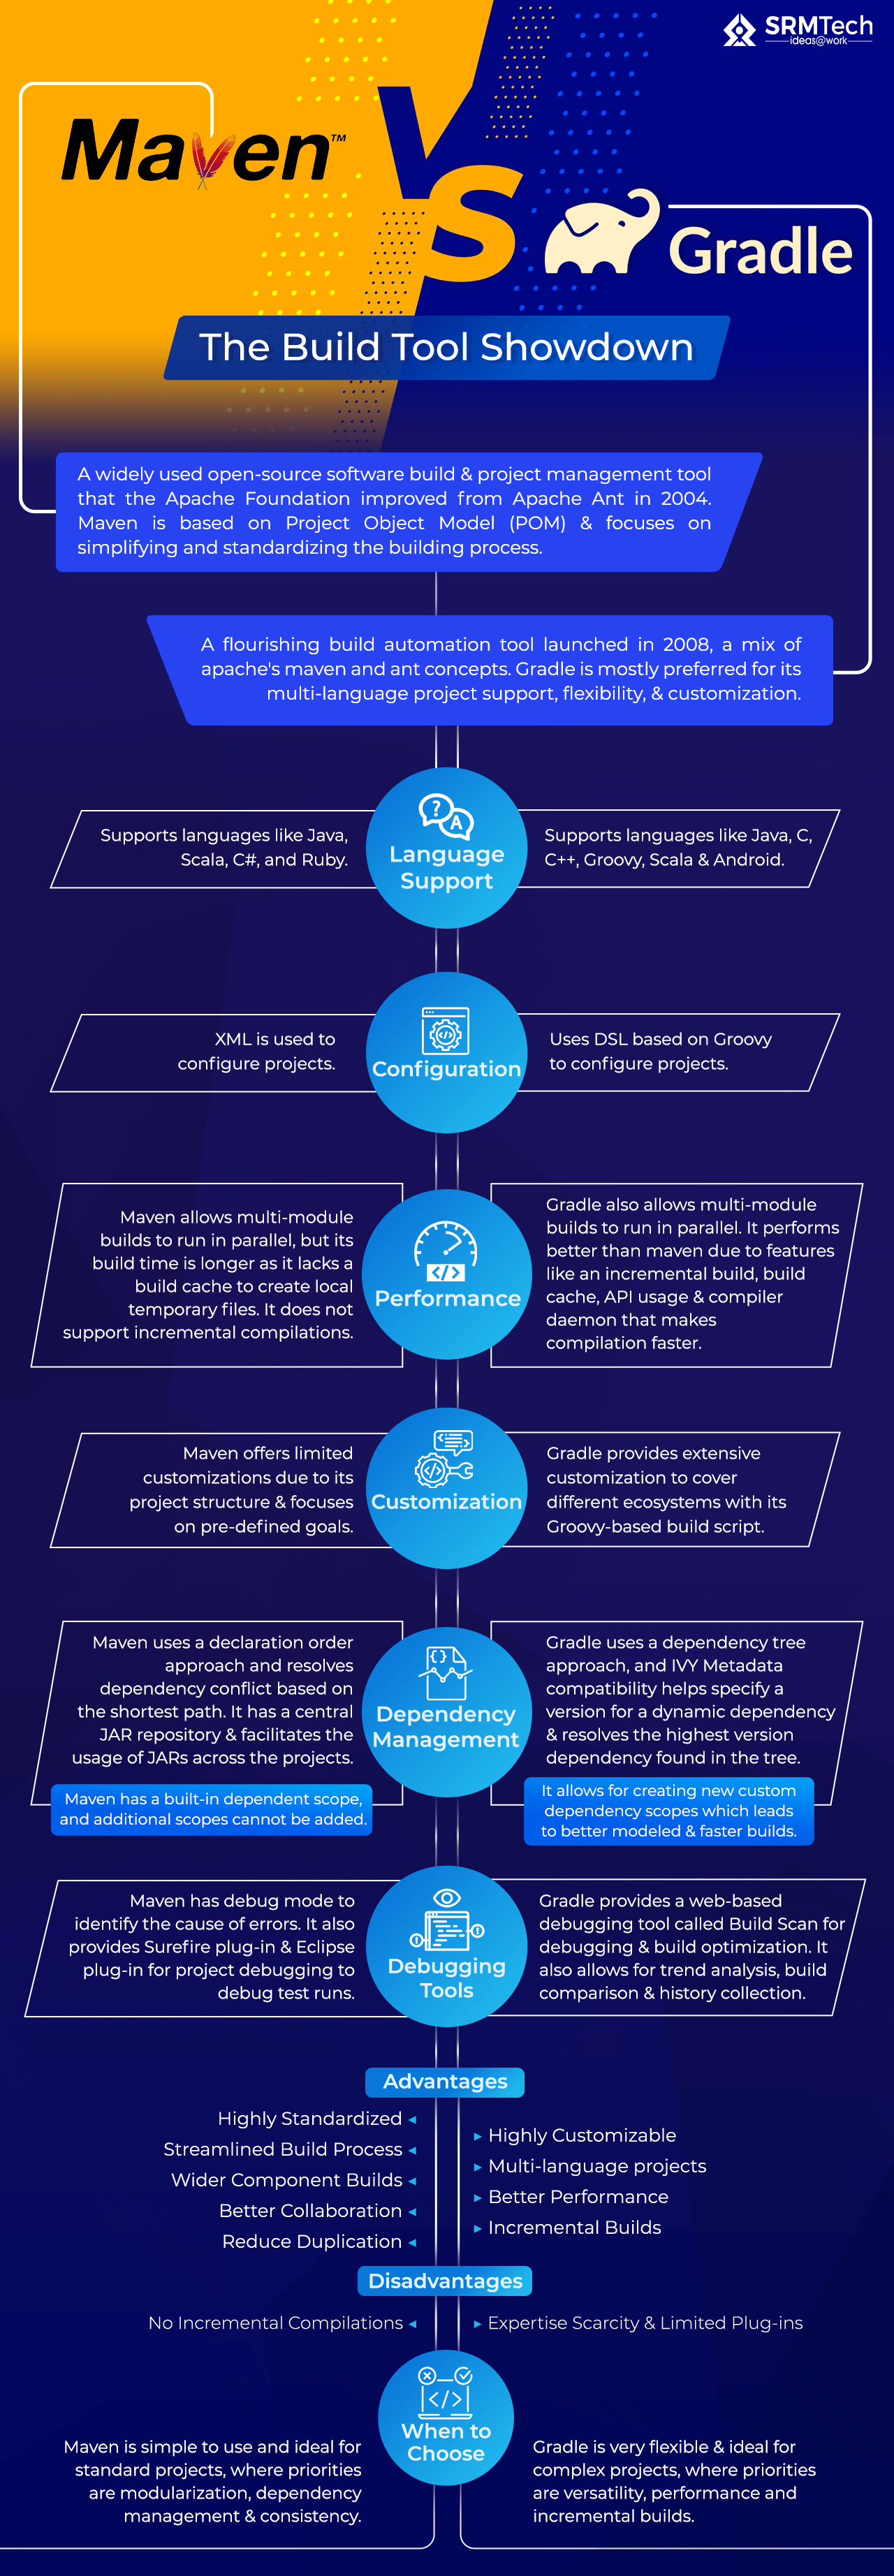
For this course, we'll primarily use Gradle, but the principles are transferable to Maven. We will now create the same "Hello, World!" project using Gradle.
The following guide provides an excellent walkthrough for setting up a project from scratch.
How to Set Up a Java Project with Gradle for Beginners
Let's walk through creating a standard Java project structure using Gradle. This article, 'How to Set Up a Java Project with Gradle for Beginners', guides you through every step.
Please read and follow the instructions from the beginning of the article ('Getting the Project Started') down to the end of the 'Running the Project' section. The key steps are: Create a project directory and run gradle init. Understand the generated project structure, especially src/main/java and build.gradle. Examine the build.gradle file to see how the project is configured. Review the auto-generated App.java file, which contains the main method. Use the ./gradlew build and ./gradlew run commands to compile and execute your application.
By following the steps in the article, you've successfully created, compiled, and run a Java application using a standard industry tool. You've seen how Gradle automates the process of finding source files, compiling them, and executing the main method you define.
The Maven Alternative
While we used Gradle, it's worth being familiar with Maven, as you will encounter it frequently. Maven uses an XML file called pom.xml (Project Object Model) to define the project and its dependencies.
The core concepts are the same as in Gradle:
- Standard Directory Layout:
src/main/javafor source code. - Dependency Management: Dependencies are declared in
pom.xml. - Build Lifecycle: Maven uses goals like
compile,test, andpackage.mvn clean installis a very common command to build a project.
The following video provides a quick but comprehensive overview of Maven. You don't need to follow along with the coding, but focus on understanding the core concepts and how they compare to what you just did with Gradle.
To give you a complete picture, this 'Maven Tutorial - Crash Course' explains the fundamentals of Maven. Pay attention to the pom.xml structure and the lifecycle commands, and compare them in your head to Gradle's build.gradle and tasks.
Watch these sections to understand the key components of a Maven project: The pom.xml File (05:37 - 13:36): This is the heart of a Maven project. Understand the roles of groupId, artifactId, version, and the dependencies block. Maven Commands (13:36 - 17:53): See how commands like mvn clean, compile, and test work. Packaging and Installing (17:53 - 20:36): Learn how mvn package creates a JAR file and mvn install places it in your local repository.
Conclusion
In this lesson, you've taken the first critical step into the Java ecosystem. You now understand the fundamental process of turning Java source code into a running application and how to automate that process with a modern build tool.
Here are the key takeaways:
- Java code is organized into classes, and the
public static void main(String[] args)method is the application's entry point. - Java's compilation model involves compiling source code (
.java) to platform-independent bytecode (.class), which is then executed by the Java Virtual Machine (JVM). - Build tools like Gradle and Maven are essential for managing modern Java projects. They automate compilation, dependency management, and packaging.
- Gradle uses a
build.gradlescript and tasks (e.g.,run,build), while Maven uses apom.xmlfile and goals (e.g.,compile,package).
In our next lesson, we will dive deeper into two concepts you've already encountered: the Java classpath and JAR packaging. You saw that the build tools created a .jar file, and we'll explore exactly what that is and how Java uses it to manage and run applications.