Hello! Welcome to your next lesson in our Spring Boot course.
In our last session, we focused on externalizing application configuration, a crucial step for creating deployable artifacts that are independent of their environment. We learned to build a self-contained executable JAR and configure it at runtime using environment variables and command-line arguments.
Today, we'll take the next logical step: packaging our application and its runtime environment into a standardized, isolated unit using Docker. Our learning outcome is to create a Dockerfile to containerize a Spring Boot application.
Containerization is a foundational practice in modern software development, especially for the microservice architectures you're familiar with. It ensures that your application runs consistently across different environments, from your local machine to production servers in the cloud. We will explore how to write an effective Dockerfile for a Spring Boot application, starting with a basic approach and then moving to an optimized, production-ready solution.
1. From an Executable JAR to a Docker Image
First, let's establish the overall process. A Dockerfile is a text file that contains a series of instructions for building a Docker image. This image is a read-only template that includes your application code, a runtime (like the Java Runtime Environment), and any other necessary files or dependencies. From this image, you can launch one or more running instances, which are called containers.

The core task is writing the Dockerfile. It's the recipe that defines your application's environment.
2. Creating a Basic Dockerfile
Let's start with the most straightforward approach: taking the executable JAR we learned to build and packaging it into an image that contains a Java Runtime Environment (JRE).
A simple Dockerfile for a Spring Boot application looks like this:
# Use an official OpenJDK runtime as a parent image
FROM eclipse-temurin:17-jre-jammy


# Set an argument for the JAR file path
ARG JAR_FILE=target/*.jar


# Copy the JAR file from the build context to the container at /app.jar
COPY ${JAR_FILE} app.jar


# Specify the command to run on container start
ENTRYPOINT ["java","-jar","/app.jar"]
Let's break down these instructions:
FROM: Specifies the base image. We're using an official image that contains the Java 17 JRE on a minimal Linux distribution.ARG: Defines a build-time variable. This allows us to pass the path to our JAR file when we build the image.COPY: Copies files or directories from your local machine (the build context) into the container's filesystem. Here, we copy our application's JAR file and rename it toapp.jar.ENTRYPOINT: Configures the command that will be executed when the container starts. In this case, it runs our application usingjava -jar.
The following video provides a practical demonstration of this process, from building the JAR to creating a Dockerfile and building the image.
How to Dockerize a Spring Boot Application: Step-by-Step Tutorial + Pushing to Docker Hub
This video from CodeOps Trek will walk you through the essential steps of creating a JAR and then writing your first Dockerfile.
Please watch the following segments: Build the JAR file (06:19 - 07:00): This is a quick recap of what we've done before, showing the Maven command to package the application. Create the Dockerfile (07:00 - 08:18): This section explains each line of a basic Dockerfile, similar to the one above. Build the Docker Image (08:18 - 09:31): Watch how the docker build command is used with the Dockerfile to create a new image.
Once the image is built, you can run it with the docker run command. This is where our previous lesson on external configuration becomes directly applicable. You can pass environment variables to the container using the -e flag:
docker run -p 8080:8080 -e "SPRING_DATASOURCE_URL=jdbc:postgresql://db:5432/mydb" -e "SPRING_DATASOURCE_USERNAME=user" my-app:latest
This command does two things:
- Maps port 8080 on your host machine to port 8080 in the container, so you can access the application from your browser.
- Sets the database configuration using environment variables, which the Spring Boot application will pick up at startup.
3. The Need for Optimization: Understanding Image Layers
The simple Dockerfile works, but it's not efficient for development or continuous integration. To understand why, we need to look at how Docker images are built: in layers.
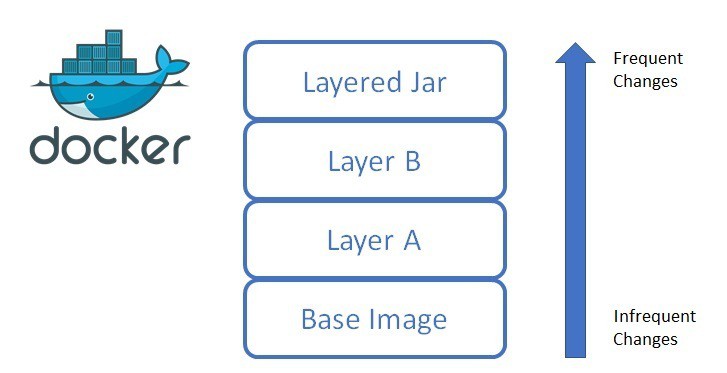
Docker caches these layers. When you rebuild an image, Docker reuses unchanged layers from the cache, which makes builds much faster.
In our simple Dockerfile, the COPY ${JAR_FILE} app.jar instruction copies the entire application JAR in a single layer. Even a one-line code change results in a completely new JAR file. This invalidates the COPY layer and all subsequent layers, forcing Docker to rebuild them. For a large application, this means re-uploading hundreds of megabytes to a container registry every time you push an update, even for a small bug fix.
To improve this, we can use a more advanced technique: multi-stage builds.
4. Production-Grade Dockerfiles with Multi-Stage Builds
A multi-stage build uses multiple FROM instructions in a single Dockerfile. Each FROM starts a new "stage." This allows you to use one stage with a full build environment (like a JDK and Maven) to compile your code and build the application, and then a separate, lightweight final stage to run it. You copy only the necessary artifacts from the build stage to the final stage.
This approach has two major benefits that will resonate with your system design experience:
- Smaller Final Image: The final image contains only the JRE and your application JAR, not the entire JDK, Maven, source code, or any intermediate build files. This reduces the image size significantly.
- Improved Security: The attack surface of your production image is minimized because it doesn't contain build tools or other unnecessary binaries.
The following official Docker guide provides an excellent hands-on tutorial for this concept.
Let's read the official Docker documentation to understand the concept and then see a practical example for a Java application.
Please read two key sections from this guide: Start with the Explanation section. It introduces the concept of multi-stage builds and shows the general structure of a multi-stage Dockerfile. Next, read the section titled Use multi-stage builds. This provides a complete, commented Dockerfile for a Spring Boot application, contrasting it with a single-stage build and highlighting the dramatic reduction in image size. Pay close attention to how it uses a builder stage and a final stage, and the COPY --from=builder instruction.
Here's an example of a multi-stage Dockerfile based on the principles from the guide:
# ---- Build Stage ----
# Use a base image with a full JDK and Maven
FROM eclipse-temurin:17-jdk-jammy AS builder


# Set the working directory
WORKDIR /app


# Copy the Maven wrapper and pom.xml to leverage layer caching
COPY .mvn/ .mvn
COPY mvnw pom.xml ./


# Download dependencies
RUN ./mvnw dependency:go-offline


# Copy the source code
COPY src ./src


# Build the application, creating the executable JAR
RUN ./mvnw clean package -DskipTests


# ---- Final Stage ----
# Use a lightweight JRE image for the final container
FROM eclipse-temurin:17-jre-jammy

WORKDIR /app


# Copy only the built JAR file from the builder stage
COPY --from=builder /app/target/*.jar app.jar


# Expose the application port
EXPOSE 8080


# Set the entrypoint to run the application
ENTRYPOINT ["java","-jar","app.jar"]
This Dockerfile is more complex but far more efficient. Notice how it first copies only the pom.xml and runs dependency:go-offline. Since your project's dependencies change much less frequently than your source code, this dependency layer will often be cached, making subsequent builds much faster.
This video also provides a great visualization of creating and comparing single vs. multi-stage builds.
Multi Stage Docker Builds | Java/SpringBoot Example | Tech Primers
To see the size reduction in action, this video from Tech Primers provides a concise demonstration.
Watch the following segments: First Stage (02:13 - 05:30): The presenter builds the first stage (builder), which compiles the code using Maven inside the container. Second Stage (05:30 - 06:16): The presenter adds the final, lightweight stage that copies the JAR from the builder stage. Size Comparison (08:13 - 09:00): This is the key takeaway. The video shows the final image size is significantly smaller than the intermediate build image, demonstrating the main benefit of this approach.
Conclusion
You have now learned how to take a Spring Boot application and package it into an optimized, production-ready Docker container. This is a critical skill for deploying applications in modern, cloud-native environments.
Key Takeaways:
- A Dockerfile is a recipe for building a Docker image. A basic file copies the application JAR into a JRE base image.
- Image layering is a core Docker concept. Efficient Dockerfiles leverage layer caching to speed up builds by placing infrequently changing files (like dependencies) in earlier layers.
- Multi-stage builds are the best practice for creating small and secure production images. They separate the build environment from the runtime environment, ensuring only the necessary artifacts are included in the final image.
- You can pass runtime configuration to a Docker container using the
-eflag withdocker run, directly applying what you learned in the previous lesson.
In our next lesson, we'll address the question: "How do we know if our application running inside the container is healthy?" We will learn to use Spring Boot Actuator to expose and interpret application health and info endpoints. These endpoints are essential for monitoring and are used by container orchestration platforms like Kubernetes to manage the application's lifecycle.