Introduction
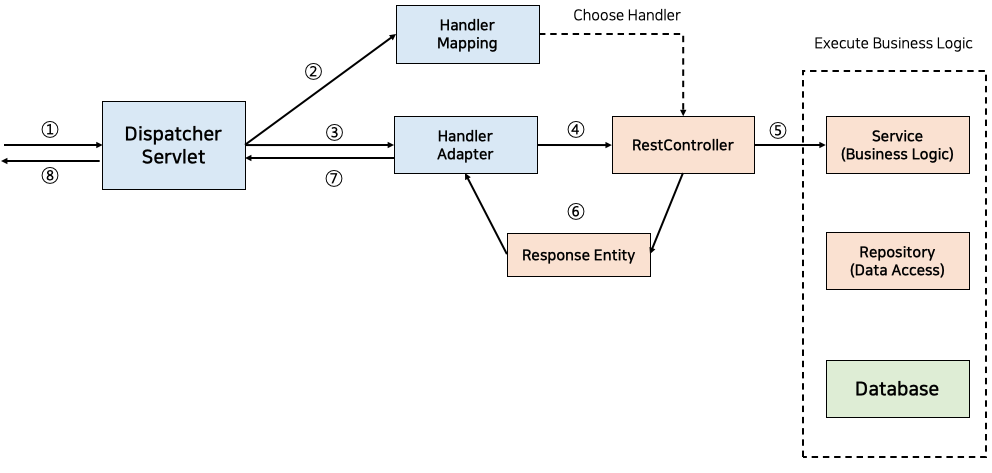
Welcome back! In our previous lesson, we explored the internal architecture of Spring MVC, focusing on how the DispatcherServlet acts as a front controller to orchestrate the handling of HTTP requests. You learned about the roles of HandlerMapping (finding the right method) and HandlerAdapter (executing it).
Now that you understand the "how" of the request lifecycle, this lesson transitions to the "what": we will write the actual code that handles these requests. Your goal is to create a REST controller using @RestController and map endpoints with @GetMapping and @PostMapping.
This is where your goal of building REST APIs begins to take concrete shape. We'll define a class that Spring recognizes as a request handler and create our first live endpoints for retrieving and creating data.
The Role of a REST Controller
In the Model-View-Controller (MVC) pattern, the Controller is the component responsible for processing incoming requests, interacting with the model (business logic and data), and selecting a view to render the response. For REST APIs, however, we don't render views like HTML pages. Instead, we return raw data, typically in JSON format.
Spring provides a specialized annotation, @RestController, for this exact purpose. To understand its significance, let's first see where the controller fits into the request flow we studied previously.
A key distinction in Spring is between @Controller and @RestController. The following short video explains this difference and why @RestController is the standard choice for building APIs.
Spring Boot: @Controller vs @RestController ✅
This video from Selenium Express clearly explains the difference between @Controller and @RestController, and the role of @ResponseBody.
Watch the full video. It demonstrates how @Controller is used for view-based web applications and how @RestController simplifies the creation of REST APIs by automatically including @ResponseBody behavior.
As the video showed, @RestController is a convenience annotation that combines two others:
@Controller: Marks the class as a Spring-managed component that can handle web requests.@ResponseBody: Tells Spring that the return value of every method in this class should be written directly to the HTTP response body. Spring'sHttpMessageConverterinfrastructure (which we discussed in the last lesson) then serializes this return value into JSON.
This makes @RestController the go-to annotation for the APIs you intend to build.
Mapping HTTP Methods: @GetMapping and @PostMapping
With a class marked as @RestController, the next step is to map specific HTTP requests to your methods. This is done using mapping annotations. The HandlerMapping component scans for these annotations at startup to build its routing table.
The two most fundamental methods are GET, for retrieving data, and POST, for creating data.

@GetMapping: Handling Data Retrieval
The @GetMapping annotation maps HTTP GET requests to a specific handler method. The value of the annotation specifies the URL path.
For example, to create an endpoint that returns a list of all users when a client sends a GET request to /users, you would write:
import org.springframework.web.bind.annotation.GetMapping;
import org.springframework.web.bind.annotation.RestController;
import java.util.List;

@RestController
public class UserController {

    // In a real app, this would come from a service/database.
    private final List<User> users = List.of(
        new User(1L, "John Doe", "john.doe@example.com"),
        new User(2L, "Jane Smith", "jane.smith@example.com")
    );

    @GetMapping("/users")
    public List<User> getAllUsers() {
        return users;
    }
}
When this endpoint is called, Spring automatically serializes the returned List<User> into a JSON array.
@PostMapping: Handling Data Creation
The @PostMapping annotation maps HTTP POST requests. These requests typically carry data in the request body, such as a JSON object representing the new resource to be created.
To access this data, you use the @RequestBody annotation on a method parameter. This tells Spring to use an HttpMessageConverter to deserialize the request body into an instance of your specified Java class.
import org.springframework.web.bind.annotation.PostMapping;
import org.springframework.web.bind.annotation.RequestBody;
import org.springframework.web.bind.annotation.RestController;
import java.util.ArrayList;
import java.util.List;

@RestController
public class UserController {

    // Using an ArrayList to allow adding new users.
    private final List<User> users = new ArrayList<>(List.of(
        new User(1L, "John Doe", "john.doe@example.com")
    ));

    @PostMapping("/users")
    public User addUser(@RequestBody User newUser) {
        // In a real app, you would save this to a database and assign a new ID.
        System.out.println("Received new user: " + newUser);
        users.add(newUser);
        return newUser;
    }

    // ... other methods like getAllUsers()
}
Here, @RequestBody User newUser instructs Spring to parse the JSON from the POST request's body and create a User object from it.
A Complete Controller Example
Let's look at a complete, production-style example from the official Spring documentation. This guide builds a simple payroll API. The EmployeeController demonstrates how to inject a repository (the data layer) and use it to implement GET and POST endpoints.
Building REST services with Spring
The official Spring guide, 'Building REST services with Spring', provides a concise and complete example of a REST controller. We will focus on the controller implementation itself.
In this guide, locate the code for EmployeeController.java. Read through this class to see how @GetMapping and @PostMapping are used in a complete controller. Note how the controller's responsibility is limited to handling the web request and delegating the actual data operations to the repository.
The EmployeeController from the guide is an excellent illustration of good design:
- It's annotated with
@RestController. - The
all()method is mapped with@GetMapping("/employees")to fetch all records. - The
newEmployee()method is mapped with@PostMapping("/employees")and uses@RequestBodyto receive the new employee data. - It demonstrates dependency injection by taking the
EmployeeRepositoryin its constructor. This follows the principle of delegating business/data logic to other components, which aligns well with clean system design.
You might have noticed the one() method uses @GetMapping("/employees/{id}"). The {id} part is a path variable, a powerful feature for fetching specific resources. We will cover @PathVariable in detail in our next lesson.
Testing Your Endpoints with a Client
Now that you've seen how to write the code, how do you test it? Since browsers can only easily send GET requests, you need a dedicated API client tool to send POST requests and inspect JSON responses. Postman is a very popular choice for this.
The following video provides a practical walkthrough of creating GET and POST endpoints and testing them with Postman. This will help you see the concepts in action and troubleshoot common issues.
#15 Spring Web Http methods GET and POST
This comprehensive video from Telusko demonstrates building and testing GET and POST endpoints. It's a great practical complement to the code we've just studied.
Please watch the following two segments: Testing GET requests (01:26 - 04:54): This part introduces Postman and shows how to send a simple GET request to fetch a list of products. Creating and testing a POST endpoint (12:20 - 20:20): This segment is crucial. It walks through creating a PostMapping, explains the importance of the @RequestBody annotation (and shows what happens when you forget it), and demonstrates how to send a JSON payload with Postman to create a new resource.
The video highlights a critical point: debugging is part of the process. Forgetting @RequestBody is a common mistake for beginners, and seeing the effect (a null object on the server) provides a memorable lesson on why that annotation is essential.
Conclusion
In this lesson, you've made the leap from theory to practice by building the core of a REST API. You now have the tools to create endpoints that can serve and accept data, forming the foundation of any web service or microservice.
Key Takeaways:
@RestControlleris the primary annotation for creating REST API controllers in Spring. It combines@Controllerand@ResponseBody.@GetMapping(\"/path\")maps HTTP GET requests to a handler method, which is typically used for retrieving data.@PostMapping(\"/path\")maps HTTP POST requests, used for creating new resources.@RequestBodyis a crucial parameter annotation that tells Spring to deserialize the incoming request body (e.g., JSON) into a Java object.- The return value of a method in a
@RestControlleris automatically serialized to JSON and sent in the HTTP response body.
In our next lesson, we will expand on this foundation by learning how to handle dynamic parts of URLs and query parameters. You'll learn to use @PathVariable and @RequestParam to create more flexible and powerful endpoints, such as GET /users/{userId} to fetch a specific user.