Hello! Welcome to the next lesson in your journey with the Spring Framework.
In the previous module, we delved into the heart of Spring's bean management, culminating in our exploration of web-specific bean scopes. You saw how Spring uses AOP-like proxies to manage the lifecycle of beans tied to requests and sessions. Today, we'll look at another powerful, AOP-like feature that addresses a different cross-cutting concern: exception handling.
This lesson focuses on the learning outcome: Implement centralized exception handling using @ControllerAdvice and @ExceptionHandler. Our goal is to move away from scattered, repetitive try-catch blocks within our controllers and establish a robust, centralized, and maintainable strategy for handling errors in a REST API. For an experienced software engineer like yourself, the value of keeping your business logic clean and separating concerns like error handling will be immediately apparent.
The Problem: Unhandled Exceptions and Code Duplication
When building a REST API, what happens when an error occurs? By default, Spring Boot provides a generic "whitelabel" error page or a JSON response that is often too verbose for an API client, exposing internal Java exception details.
The naive solution is to wrap the logic in every controller method with a try-catch block. However, this violates the DRY (Don't Repeat Yourself) principle, pollutes your controllers with boilerplate code, and becomes a maintenance nightmare.
Let's watch a short segment of a video that perfectly illustrates this problem and its initial, suboptimal solution.
Master Exception Handling in Spring Boot: @ExceptionHandler & @ControllerAdvice Explained
The video 'Master Exception Handling in Spring Boot' by CodeSnippet starts by demonstrating the issues with handling exceptions directly in the controller.
Watch from 04:36 to 13:32. The video first shows the default, unhelpful '500 Internal Server Error' response. Then, it implements a try-catch block to return a custom error structure. As you watch, notice how implementing this for a second API endpoint requires duplicating the entire catch block, highlighting the scalability problem.
A Better Way: @ExceptionHandler
As you saw, duplicating error handling logic is not a sustainable design. Spring provides the @ExceptionHandler annotation as a first step toward centralization. By creating a method annotated with @ExceptionHandler within a controller, you can define a single point for handling a specific type of exception for all methods in that controller.
This is a significant improvement, as it co-locates all error handling logic for a given controller in one place.
Master Exception Handling in Spring Boot: @ExceptionHandler & @ControllerAdvice Explained
Let's continue with the same video to see how @ExceptionHandler refactors the controller.
Watch from 13:32 to 18:17. This section removes the try-catch blocks from the API methods and introduces a single method annotated with @ExceptionHandler(ProductNotFoundException.class). Notice how this one method now handles the exception for both API endpoints in the controller.
The Global Solution: Centralizing with @ControllerAdvice
The @ExceptionHandler method is great, but it's still scoped to a single controller. What if a ProductNotFoundException could be thrown from an OrderController as well? We would have to duplicate the handler method in the new controller.
This is where @ControllerAdvice comes in. It's a specialization of the @Component annotation that allows you to apply @ExceptionHandler, @InitBinder, and @ModelAttribute methods across all controllers in your application. By combining @ControllerAdvice with @ExceptionHandler, we can create a truly global exception handling mechanism.
Master Exception Handling in Spring Boot: @ExceptionHandler & @ControllerAdvice Explained
The CodeSnippet video now demonstrates the final step to full centralization.
Watch from 18:17 to 24:38. This segment explains the need for @ControllerAdvice, creates a GlobalExceptionHandler class, and moves the @ExceptionHandler method into it. It also clarifies the subtle but important difference between @ControllerAdvice and @RestControllerAdvice.
To solidify this concept, let's look at a formal definition from a well-written guide.
Guide to Spring Boot Error Handling for REST APIs
The article 'Guide to Spring Boot Error Handling for REST APIs' on Toptal provides a concise explanation of the key annotations.
Please read the section titled 'Spring Boot Error Handler'. It clearly defines the roles of @RestController, @ExceptionHandler, and @ControllerAdvice, reinforcing what you just saw in the video.
Crafting a Standardized Error Response
Now that we have a central place to catch exceptions, we need to decide what to send back to the client. A well-designed API should return consistent, predictable, and useful error responses. A common practice is to create a dedicated Plain Old Java Object (POJO) to represent your API error structure.
The Toptal article you just referenced proposes an excellent ApiError class for this purpose. It includes fields for status, timestamp, a user-friendly message, a debug message, and even a list of sub-errors for handling validation failures (which we will cover in a later lesson).
Guide to Spring Boot Error Handling for REST APIs
Let's examine the structure of a custom error response object from the Toptal article.
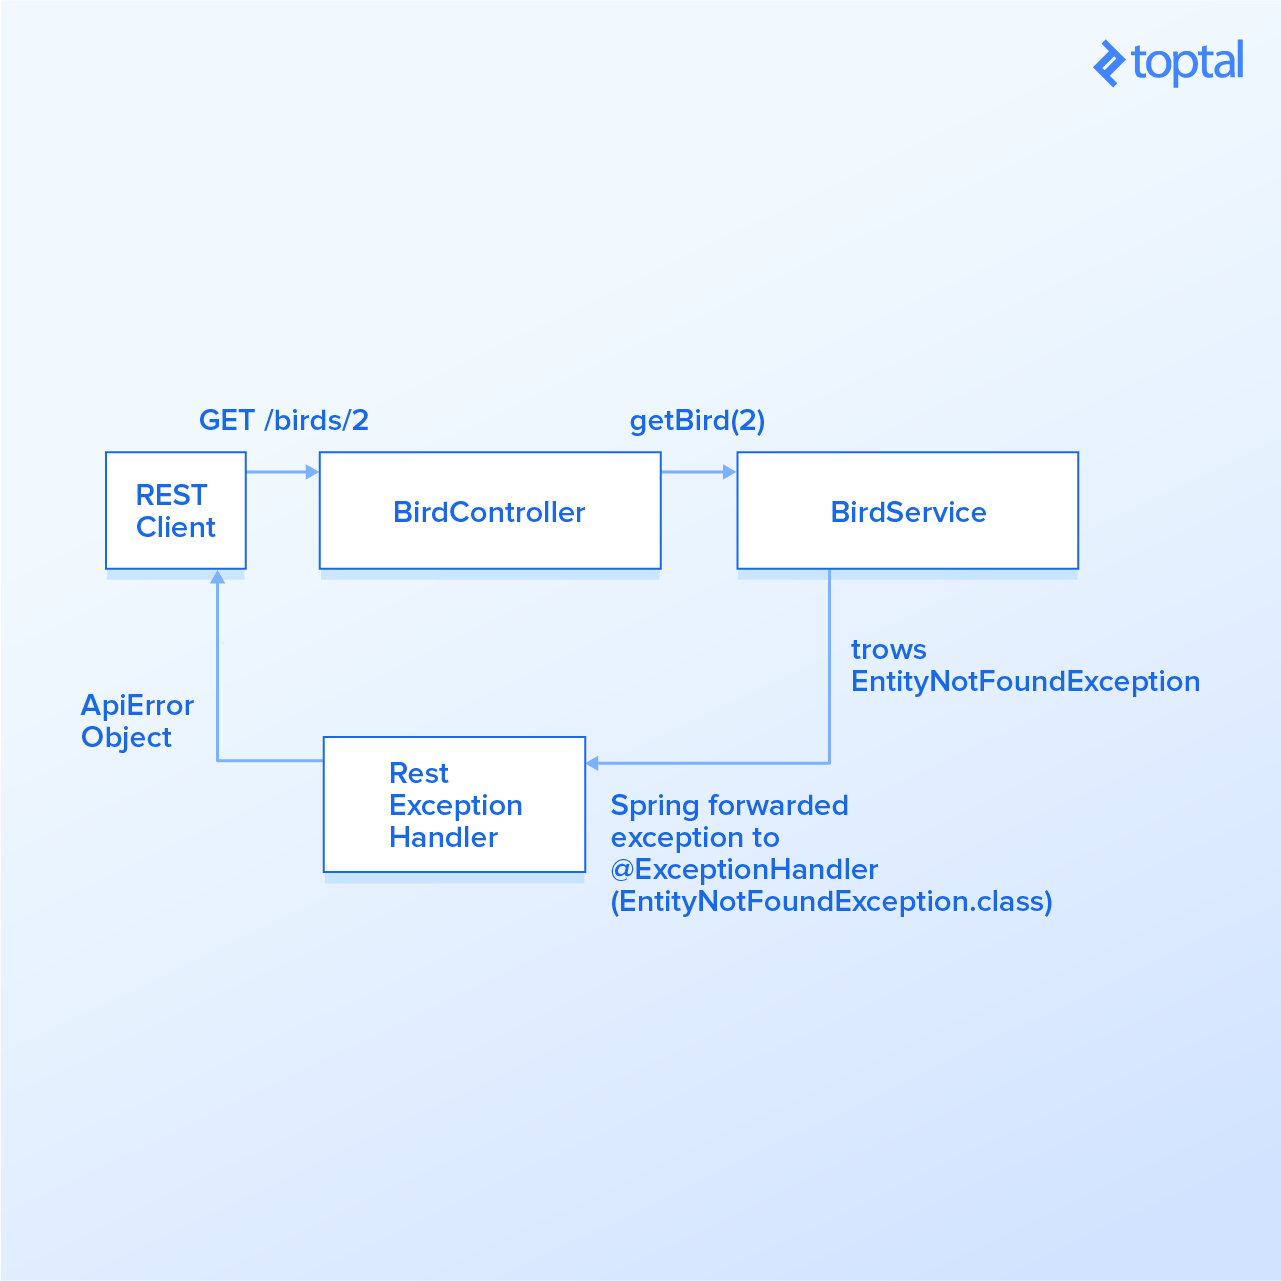
First, read the section 'Making Error Responses Clearer'. Pay close attention to the definition of the ApiError and ApiValidationError classes. Then, jump to the section 'Implementing Custom Exceptions' and look at the handleEntityNotFound method. See how it instantiates the ApiError object and uses a helper method (buildResponseEntity) to wrap it in a ResponseEntity with the correct HTTP status.
The key components in the handler method are:
- Creating an instance of your custom
ApiErrorDTO. - Populating it with details from the exception and the request.
- Wrapping this DTO in a
ResponseEntity, which allows you to precisely control the HTTP status code and headers of the response.
This flow is captured perfectly in the following diagram from the article.
Putting It All Together: A Practical Demonstration
Let's watch one more video that walks through the entire process from start to finish: creating a custom exception, defining the advice class, building the payload, and testing the result. This will serve as a great hands-on summary.
Spring Boot Tutorial | How To Handle Exceptions
The video 'Spring Boot Tutorial | How To Handle Exceptions' by Amigoscode provides a clear, step-by-step implementation of a global exception handler.
Watch from 00:59 to 13:59. This covers the entire workflow: Creating a custom exception. Creating the ApiExceptionHandler class annotated with @ControllerAdvice. Defining the error payload class (similar to ApiError). Implementing the @ExceptionHandler method to build and return a ResponseEntity. Throwing the exception from a controller and demonstrating the custom JSON response in the client. This video concisely brings together all the concepts we've discussed.
Expanding Your Handler
Your global exception handler can be extended to handle as many exception types as you need. You simply add more @ExceptionHandler methods to your @ControllerAdvice class, one for each specific exception you want to handle. You can even create a catch-all handler for Exception.class to ensure no error ever goes unhandled.
Master Exception Handling in Spring Boot: @ExceptionHandler & @ControllerAdvice Explained
The CodeSnippet video briefly shows how to add handlers for multiple exception types.
Watch this short clip from 24:38 to 25:30. It illustrates how you can simply add more methods to the GlobalExceptionHandler to handle different exceptions like ArrayIndexOutOfBoundsException.
Additionally, for very simple cases where you just want to map an exception to an HTTP status code without a custom body, you can annotate the exception class itself with @ResponseStatus.
Exception Handling in Spring MVC
The official Spring blog provides context on this alternative approach.
Read the section 'Using HTTP Status Codes'. This shows how annotating a custom exception like OrderNotFoundException with @ResponseStatus(value=HttpStatus.NOT_FOUND) is a quick way to ensure a 404 is returned whenever it's thrown and not otherwise handled.
Conclusion
In this lesson, we established a complete, professional strategy for handling exceptions in a Spring Boot REST API. By moving logic out of individual controllers and into a centralized @ControllerAdvice, we've created a solution that is clean, scalable, and easy to maintain.
Key Takeaways:
- Handling exceptions directly in controllers leads to code duplication and violates the separation of concerns.
- The
@ExceptionHandlerannotation defines a method that handles specific exceptions. - The
@ControllerAdviceannotation makes these handlers global, applying them to exceptions thrown from any controller. Use@RestControllerAdviceas a convenience for REST APIs. - Creating a custom error DTO (e.g.,
ApiError) and returning it inside aResponseEntitygives you full control over the error response's structure and HTTP status. - A single
@ControllerAdviceclass can contain multiple@ExceptionHandlermethods to handle various types of exceptions.
Today, we've focused on the mechanism for catching exceptions. In our next lesson, "Define custom exception classes and map them to specific HTTP error responses," we will dive deeper into the design of those exceptions. We'll explore how to create a meaningful hierarchy of custom exceptions that accurately represent your application's business-specific error states.