Welcome to your first lesson! We're kicking off your journey into graphic design by getting you acquainted with Canva, the tool we'll be using to create professional-looking social media posts. Since you're new to design, our main goal today is to build a solid foundation by learning to find your way around the Canva environment. Think of it like the first day in a new kitchen: before you start cooking, you need to know where the tools, ingredients, and workspaces are.
By the end of this lesson, you will be able to confidently navigate Canva's two main areas: the Dashboard, which is your home base for managing all your work, and the Editor, which is the creative space where your designs come to life. This will prepare you for our next lesson, where we'll start exploring the basic ingredients of design.
Getting Started with Canva
First things first, let's get you set up. Canva is a web-based platform, which makes it very accessible. You don't need to install any complex software. The first step is to create a free account.
For a quick overview of what Canva is and how to sign up, please read the following brief sections from an article by Zapier.
How to use Canva: A beginner's guide
This reading will introduce you to Canva and guide you through the simple account creation process.
Please read the sections What is Canva? and How to use Canva. Don't worry about the paid plans for now; the free version is more than enough for us to get started.
Your Home Base: The Canva Dashboard
Once you've signed up and logged in, you'll land on the Canva Dashboard, or Homepage. This is your mission control. From here, you can start new designs, find existing projects, browse templates, and organize your work.
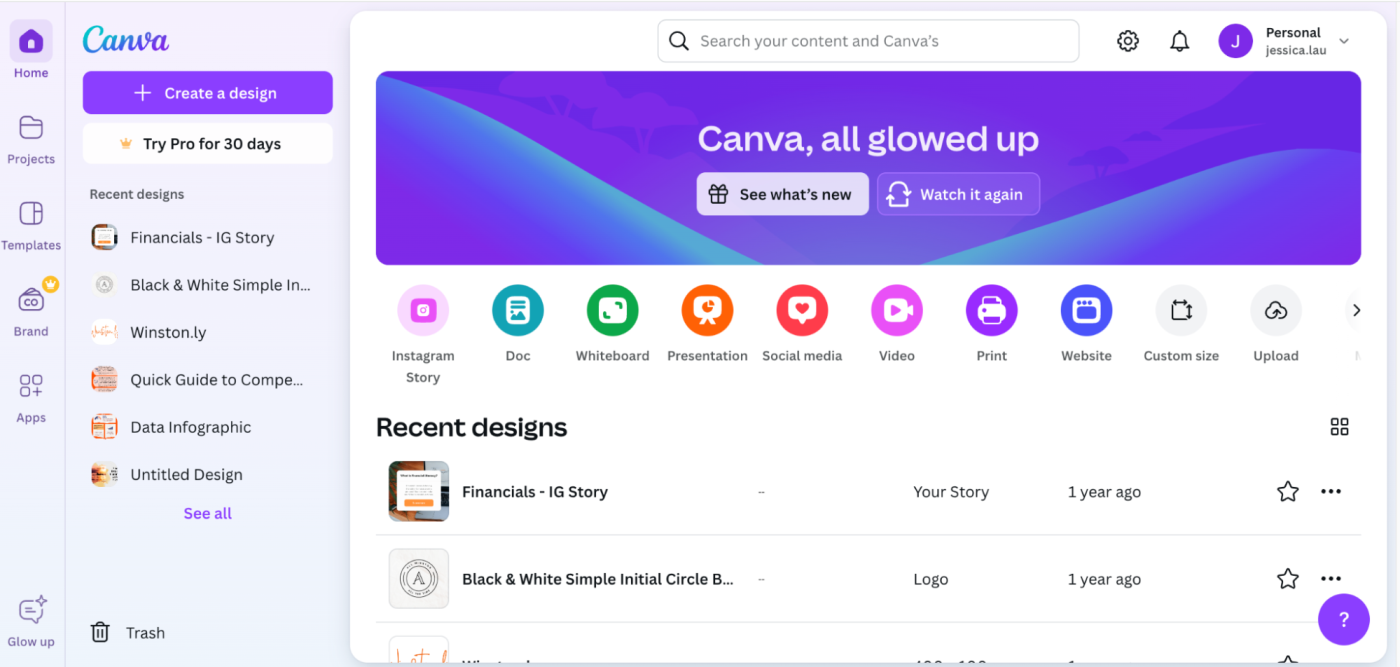
To get a feel for the layout, let's watch a short video that walks you through the key areas of the dashboard.
2024 Canva Tutorial | The Ultimate Guide for Beginners
The video "2024 Canva Tutorial" provides a clear and concise tour of the homepage. Pay attention to the main navigation areas the presenter points out.
Watch the segment from the tour of the homepage. The presenter will guide you through the top menu, the left-side panel (with links to Projects, Templates, etc.), and the central area where you can start a new design.
As you saw in the video, the dashboard is organized into a few key zones:
- Top Menu: Contains administrative links and account settings.
- Left Panel: Your primary navigation to find your Projects (your saved designs), browse Templates, and access other features.
- Central Area: This is where the action starts. You can use the search bar to look for templates, click on suggested design types (like "Instagram Story"), or see your Recent designs.
From the Dashboard to the Editor
The main purpose of the dashboard is to get you into the Editor, the workspace where you'll actually create your graphics. You can do this in two primary ways:
- Using a Template: You can search for a pre-made design and customize it.
- Starting from Scratch: You can open a blank document with the right dimensions.
For your goal of creating social media posts, starting with templates is a fantastic way to learn. Let's see how you can find a template and open it in the editor.
2024 Canva Tutorial | The Ultimate Guide for Beginners
This next segment of the same video demonstrates how to find templates and start a new design, which is the perfect bridge from the dashboard to the editor.
Please watch from searching for templates. You'll see how to use the search bar, browse categories like "Social Media," and open a template in the editor. Notice the mention of "Pro" templates (marked with a crown icon)—as a beginner on the free plan, you'll want to stick to the free ones.
Your Workspace: The Canva Editor
When you open a template or create a blank design, you enter the Canva Editor. This is your creative canvas. It might look like there's a lot going on, but the interface is quite intuitive.
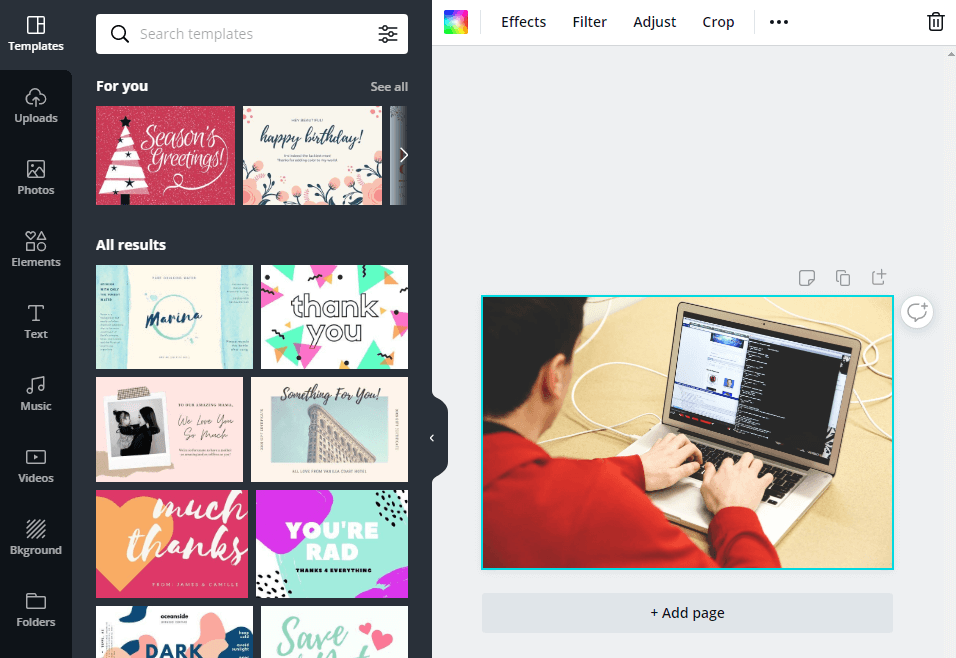
The editor is primarily made of three parts:
- The Canvas: The large area in the center. This is your actual design, where you'll arrange your text and images.
- The Side Panel: The dark menu on the far left. This is your toolbox. It holds tabs like Design (for templates), Elements (for shapes, graphics, and photos), Text, and Uploads (for your own images).
- The Top Toolbar: The white bar above the canvas. This is a contextual menu, meaning its options change depending on what you've selected on your canvas. For example, if you select a text box, it will show you options for changing the font, size, and color.
This contextual toolbar is a fundamental concept in Canva. Let's watch a very short clip that illustrates this perfectly.
2024 Canva Tutorial | The Ultimate Guide for Beginners
In this final video clip, notice how the options in the top toolbar change when different parts of the design are selected.
Watch the brief demonstration from how the toolbar changes. See how the menu adapts when the presenter clicks on a text box, then an image, and then a shape.
To finish our tour, let's get a quick look at the most important tabs in the Side Panel: Elements and Text. The following video provides a clear walkthrough. Don't worry about memorizing every detail; just focus on understanding what each tab is for.
Canva Tutorial for Beginners (How to use Canva step by step)
In this "Canva Tutorial for Beginners" by Kate Hayes, we'll focus on the part that explains the main tools you'll be using in the side panel.
Watch the section from the Elements tab to see where you can find shapes, graphics, and photos. Then, skip ahead and watch from the Text tab to see how you can add headings and other text to your design.
Conclusion
Great work today! You've taken the essential first step of familiarizing yourself with your new design environment. You now know your way around Canva's core interfaces and understand their purpose.
Here are the key takeaways from our first lesson:
- The Canva Dashboard is your starting point for managing projects and finding templates.
- The Canva Editor is your creative workspace, consisting of the central Canvas, the Side Panel with your tools (like Elements and Text), and the Top Toolbar that changes based on what you select.
- You can start a new design either by choosing a pre-made template or by creating a blank canvas.
Now that you know the layout of the "kitchen," you're ready to learn about the "ingredients." In our next lesson, we'll dive into the fundamental building blocks of any design—line, shape, color, and texture—and learn how to spot them in the wild on social media.