Hello! Welcome to the final lesson in our Arduino foundations module.
In the previous lesson, we established a vital communication link between the Arduino and your computer using the Serial library. You learned how to send debugging information and receive commands, a skill that is indispensable for troubleshooting.
Today, we'll leverage that skill as we tackle more complex hardware. This lesson will show you how to integrate an external library to control a component. This is a cornerstone of modern embedded development, allowing you to stand on the shoulders of giants by using pre-written, community-vetted code to get sophisticated hardware running quickly.
We'll demystify what libraries are, how to manage them, and how to use them to control a common component in robotics and automation: a servo motor. This lesson completes your foundational toolkit for building Arduino projects.
1. What Are Arduino Libraries?
In your experience with Python, Java, or TypeScript, you've certainly used external packages or modules to add functionality without reinventing the wheel. Arduino libraries serve the exact same purpose. They are collections of C++ code, typically organized into a class, that provide a simplified interface for controlling a specific piece of hardware (like a sensor or motor) or performing a software task (like advanced math or communication protocols).
A library abstracts away the complex, low-level details. For example, instead of manually crafting precise timing signals (PWM) to move a servo motor to a 90-degree angle, you can simply call a function like myServo.write(90).
Arduino MASTERCLASS | How to Use Arduino Libraries PART 7
To get a clear idea of this concept, watch the first part of this video from Programming Electronics Academy. It uses a great analogy to explain the power of abstraction that libraries provide.
Watch from 01:13 to 03:59. Focus on the core idea: a library is pre-packaged code that hides complexity, giving you simple commands to achieve complex results.
2. Finding, Installing, and Managing Libraries
The Arduino ecosystem is supported by a vast collection of libraries. There are three primary ways you'll add them to your development environment.
Method 1: The Library Manager (Recommended)
The Arduino IDE includes a built-in Library Manager that connects to a large repository of official and community-contributed libraries. This is the easiest and safest way to install new libraries.
Arduino MASTERCLASS | How to Use Arduino Libraries PART 7
The following clip demonstrates how to find and install a library using the Library Manager in both Arduino IDE 1.x and 2.x.
Watch from 03:59 to 07:31. Observe the process of searching for a library by name and installing it with a single click. The video also shows you where the library files are physically stored on your computer.
Method 2: Installing from a .ZIP File
Sometimes, a library might be hosted on a site like GitHub and not yet be in the Library Manager. These are typically available for download as a .zip file. The IDE has a simple feature to install these.
The Ultimate Arduino Library Installation Tutorial - All-in-one Video!
For libraries you find online, you'll often download a ZIP file. This video shows how to install a library from a downloaded ZIP archive.
Watch the segment from 14:14 to 17:34. This covers finding a library on GitHub, downloading it as a ZIP file, and using the IDE's 'Add .ZIP Library' feature.
"Under the Hood": Library Structure
Since you appreciate understanding the underlying mechanics, let's look at what makes up a library. When you install a library, a new folder is created in your Arduino libraries directory. Inside this folder, you'll typically find:
- A header file (
.h): This file declares the library's class, its member variables, and its methods (functions). This is what you#includein your sketch. - A source file (
.cpp): This contains the actual C++ implementation of the methods declared in the header file. This is where the low-level work happens. - An
examplesfolder: Contains complete, working sketches that demonstrate how to use the library. This is often the best place to start when using new hardware. - A
keywords.txtfile: This file tells the Arduino IDE which words from your library to highlight with special colors in the editor. - A
library.propertiesfile: Contains metadata about the library, like its name, version, and author.
This structure should feel familiar, as it mirrors how modules and packages are organized in other programming environments.
3. Practical Integration: Controlling a Servo Motor
Let's put this into practice by controlling a standard hobby servo motor. Servos are essential in robotics for tasks like moving a robot arm, steering a car, or positioning a sensor.
The Servo.h Library
For this task, we'll use the Servo.h library. This is a "core" library, meaning it comes pre-installed with the Arduino IDE, so you don't need to install it.
The basic workflow for using any library is:
- Include the library's header file at the top of your sketch:
#include <Servo.h> - Instantiate an object of the library's class:
Servo myServo; - Configure the object in
setup(), linking it to a physical pin:myServo.attach(9); - Use the object's methods in
loop()to perform actions:myServo.write(angle);
Wiring the Circuit
You will need:
- An Arduino Uno
- A servo motor (like an SG90)
- A potentiometer
- A breadboard and jumper wires
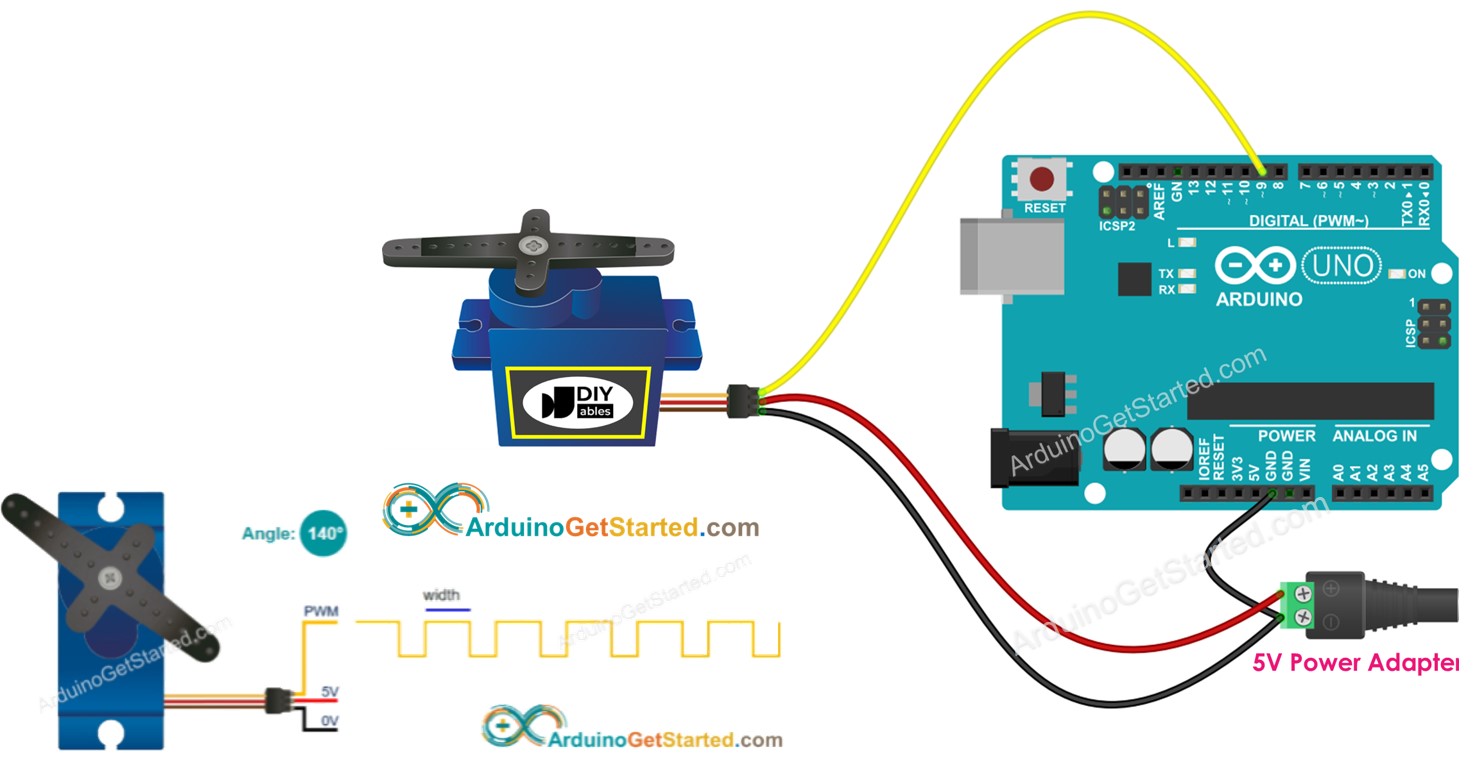
- An external 5V-6V power source for the servo.
Important: Servo motors can draw significant current, far more than an Arduino's 5V pin can safely supply. Attempting to power a servo directly from the Arduino can damage the board or cause erratic behavior ("brownouts"). Always use a separate power supply for your motors.
Use this diagram to wire your circuit. Note how the servo's power and ground connect to the external supply, but the external supply's ground is also connected to the Arduino's ground (a "common ground").
Writing the Code and Demonstration
The following video provides an excellent walkthrough of building this exact circuit and using the "Knob" example sketch to control the servo's position with the potentiometer.
Arduino MASTERCLASS | How to Use Arduino Libraries PART 7
Follow this practical demonstration to wire your circuit and write the code. It brings together concepts from previous lessons (analogRead, map) with our new library skills.
First, watch from 07:31 to 09:39 to see the power of using the example sketches that come with libraries. Then, continue from 09:39 to 12:53 to build the servo-potentiometer circuit and understand the code line by line.
Here is the code from the "Knob" example for your reference. Upload this to your Arduino after wiring the circuit.
#include <Servo.h>

// Create a servo object to control a servo
Servo myServo;

// Variable to store the potentiometer value
int potPin = A0;
int val;

void setup() {
  // Attaches the servo on pin 9 to the servo object
  myServo.attach(9);
}

void loop() {
  // Reads the value of the potentiometer (value between 0 and 1023)
  val = analogRead(potPin);

  // Scale it to use it with the servo (value between 0 and 180)
  val = map(val, 0, 1023, 0, 180);

  // Sets the servo position according to the scaled value
  myServo.write(val);

  // Wait for 15ms for the servo to reach the position
  delay(15);
}
When you turn the potentiometer, the value read on pin A0 changes. We map() this value from its original range of 0-1023 to the servo's angle range of 0-180 degrees. Finally, myServo.write(val) sends the command to the servo object, which handles all the low-level PWM signal generation for you.
Conclusion
Congratulations on completing the Arduino foundations module! You've learned how to leverage external libraries to quickly and easily control complex components. This skill exponentially expands what you can build.
Key Takeaways:
- Libraries are packages of C++ code that abstract away complex hardware control and software tasks.
- The Arduino IDE Library Manager is the primary tool for finding and installing libraries. You can also install from a
.zipfile. - The typical workflow for using a library is to
#includethe header, create an object, attach/initialize it insetup(), and call its methods inloop(). - Example sketches included with libraries are your best starting point for learning to use a new component.
- Components like motors often require an external power supply to avoid damaging your Arduino.
Next Up
You now have a solid foundation in the C++ dialect used by Arduino, covering everything from basic I/O to serial communication and libraries. This concludes the "Introduction to Embedded Systems with Arduino" module.
In our next module, we will shift contexts and begin working toward your other goal: building desktop applications. We will start by exploring the event-driven programming model used in GUI applications and set up our first project using the powerful Qt framework.