Hello! Welcome back.
In our last lesson, we explored the power of function templates, which allow us to write generic functions that can operate on any data type. We saw how the compiler uses these templates as blueprints to generate specific function versions at compile-time.
Today, we'll take that concept to the next level. Our goal is to write class templates to create generic data structures. This is where templates truly shine and form the backbone of the C++ Standard Template Library (STL). By the end of this lesson, you'll understand how containers like std::vector are designed and be able to build your own type-safe, reusable data structures—a fundamental skill for building the robust desktop and embedded applications you're interested in.
1. From Generic Functions to Generic Classes
Just as with functions, you often find yourself needing the same class logic for different data types. Imagine creating a simple class to hold a pair of values. You might start with one for integers:
class IntPair {
private:
    int first;
    int second;
public:
    IntPair(int a, int b) : first(a), second(b) {}
    // ... getters, etc.
};
But what if you need a pair of doubles, or a std::string and an int? You'd have to create DoublePair, StringIntPair, and so on. This is the same code duplication problem we saw with functions.
Class templates solve this by letting us parameterize the class itself with one or more types.
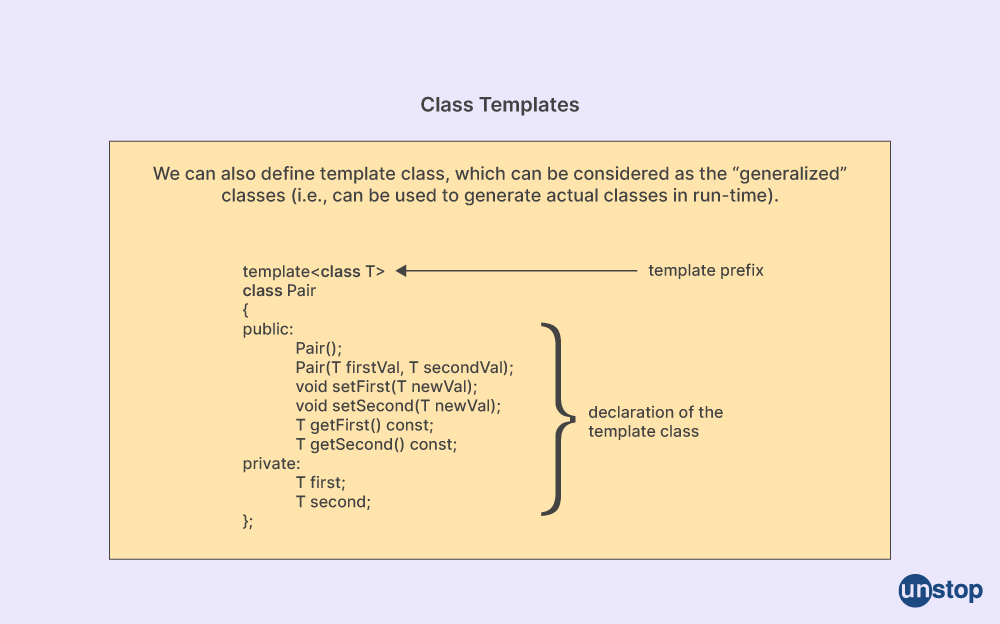
The syntax is very similar to function templates. You start with the template keyword and then define the class.
To formalize this, let's quickly review the declaration and object creation syntax. This article from Programiz provides a concise overview.
Read the sections 'Class Template Declaration' and 'Creating a Class Template Object'. Pay close attention to the syntax for creating an object, as it differs slightly from function templates.
A key difference from function templates is that the compiler generally does not perform template argument deduction for classes (prior to C++17's introduction of class template argument deduction, or CTAD). You must explicitly tell the compiler which type you want to use when you create an object:
// Correct instantiation of a class template
Pair<int> myIntPair(1, 2);
Pair<std::string> myStringPair("hello", "world");

// Incorrect - compiler doesn't know what T should be
// Pair myPair(1, 2); // This will cause a compile error
2. Building a Generic Array Class
Let's build a practical data structure. One powerful feature of templates is their ability to accept not just types (typename T), but also constant values known at compile time, called non-type template parameters. This is perfect for creating a generic, stack-allocated array where both the type and the size are defined by the user.
The C++ standard library's std::array works exactly this way. The video below shows how to build a simplified version from scratch.
This video from The Cherno's C++ series demonstrates how to create a generic array class. It's a great example of combining type and non-type template parameters.
Watch from 09:22 to 13:34. The first part introduces a class template using just a size parameter (int N). The second, more important part adds a type parameter (typename T), creating a fully generic, fixed-size array.
This gives you a generic Array<T, N> class. For example, Array<int, 10> creates a class containing an array of 10 integers, while Array<double, 50> creates one for 50 doubles. This is compile-time polymorphism in action.
3. A More Complete Example: A Generic Stack
The fixed-size array is a good start, but many data structures need to manage memory dynamically on the heap. Let's look at a more complete example: a generic Stack that can hold any type of element.
This involves making the internal data store, the push parameter, and the pop return value all dependent on the template type T.
Implementing Stack Using Class Templates in C++
The following article from GeeksforGeeks provides a full, self-contained implementation of a Stack class template.
Please read through the provided C++ code in the article. Focus on these key points: How the template parameter T is used in the member variable T st[SIZE]. How the push method takes a T k as its parameter. How the pop method returns a value of type T. How the main function creates two different stacks: Stack<int> and Stack<string>.
As you can see from the example, converting a single-type class to a template involves a few consistent changes:
- Replace the concrete type (e.g.,
int) with the template parameter (T) for member variables. - Update member function signatures to use
Tfor parameters and return values where appropriate. - If you are using dynamic memory, ensure you allocate memory for the correct type (
new T[size]instead ofnew int[size]). - Instantiate objects by providing the specific type you want to use (e.g.,
Stack<double>).
4. The Header Problem: A Critical "Under the Hood" Detail
Here we come to one of the most common stumbling blocks for C++ developers new to templates. In your previous work, you've learned to separate class declarations into header files (.h) and definitions into source files (.cpp). With templates, this model breaks.
The reason goes back to the core nature of templates: they are blueprints, not code. The compiler needs to see the entire blueprint (the full definition of the class and its methods) at the exact moment it needs to generate a concrete class, like Stack<int>.
If the definitions are hidden away in a separate .cpp file, the compiler sees your request in main.cpp (Stack<int> myStack;) but doesn't have the implementation details to build the class. This results in linker errors, not compiler errors, because the linker can't find the definitions for the functions you're trying to call.
templates | class templates | stack as template class | C++ Programming
This is a non-obvious but vital concept. This video provides an excellent demonstration of the problem and explains the standard solution.
First, watch from 13:03 to 14:01 to see the syntax for defining template member functions outside the class body. Then, watch the crucial part from 17:26 to 21:31. The instructor takes a working template program, separates it into .h and .cpp files, and shows the resulting linker errors. Pay close attention to the explanation of why this happens and the common solution.
The Solution: The standard practice is to place both the declaration and the definition of your template class inside a header file (e.g., .h or .hpp). This ensures that any source file that includes the header gets the complete blueprint, allowing the compiler to instantiate it for any type as needed.
While you can define member functions outside the class body for better organization, they must still be in the same header file. The syntax for this, as shown briefly in the video, is:
// In MyClass.hpp

template <typename T>
class MyClass {
public:
    void myMethod();
};

// Definition is also in MyClass.hpp
template <typename T>
void MyClass<T>::myMethod() {
    // ... implementation ...
}
Notice that you must repeat the template <typename T> prefix and specify the class scope with MyClass<T>.
Conclusion
You have now learned how to create your own generic data structures using class templates, a cornerstone of modern C++ development. This powerful feature enables you to write highly reusable, type-safe, and efficient code.
Key Takeaways:
- Class templates allow you to write generic blueprints for classes that can work with any data type.
- The syntax begins with
template <typename T>(orclass T) before the class definition. - Unlike function templates, you must explicitly specify the type when creating a class template object:
MyClass<int> obj;. - Templates can accept non-type parameters (e.g.,
size_t N), which are compile-time constants. - Crucially, template definitions must be visible to the compiler at the point of instantiation. This means you should place both declarations and definitions in header files.
Next Up
We've now covered both function and class templates, the building blocks of generic programming in C++. The Standard Template Library is built almost entirely on these concepts. In our next lesson, we'll explore lambda expressions, which are modern C++'s way of creating anonymous, on-the-fly functions. Lambdas work seamlessly with STL containers and algorithms, allowing you to write incredibly concise and expressive code.