Welcome back. In our previous lessons, we built a two-part framework for evaluating a negative's tonal qualities: first by judging its overall density, and then by assessing its internal contrast range. This allows you to understand a negative's potential for creating a full-toned print and to anticipate the contrast filtration you'll need. Today, we add the third and final pillar of negative assessment: sharpness.
This lesson focuses on using a loupe to critically examine a negative for fine detail and focus. No matter how perfect the density and contrast are, a negative that is not sharp will never produce a compelling print. Mastering this skill is essential for selecting only your best work to bring into the darkroom, saving you time, effort, and materials. This completes our module on negative assessment and fully prepares you to choose a candidate negative for your first refined print.
The Loupe: Your Magnifying Glass for Quality Control
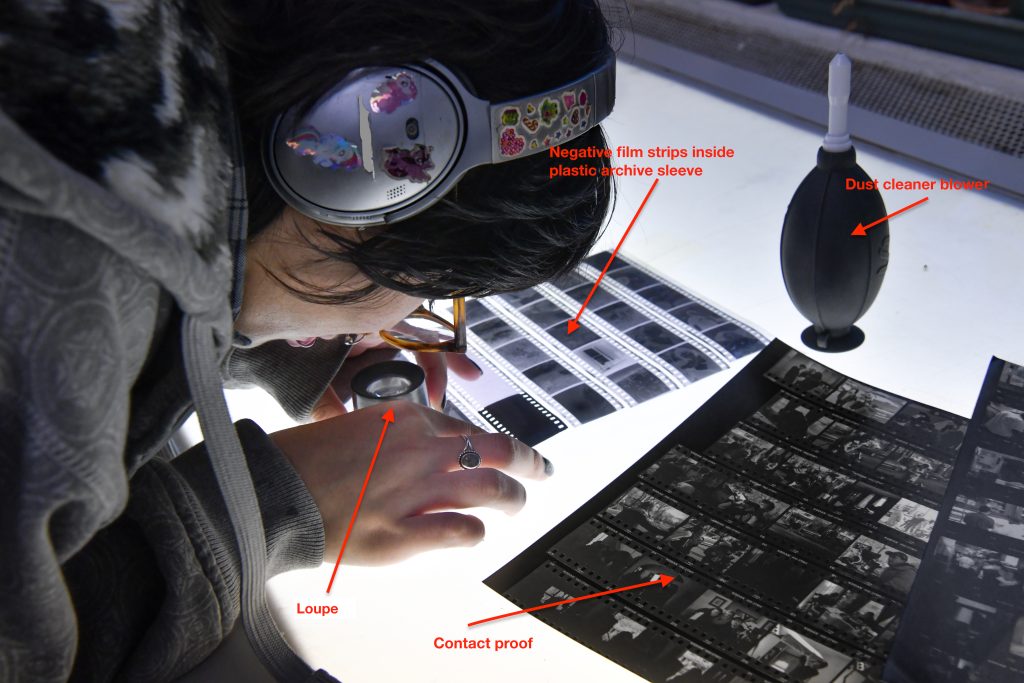
When evaluating a negative, you need to see details that are invisible to the naked eye, such as the film's grain structure and the fine textures that indicate critical focus. For this, you need a specialized tool: a photographer's loupe.
A loupe is far more than a simple magnifying glass. It is a high-quality, corrected optical instrument designed to provide a flat, distortion-free field of view, allowing for precise examination of flat objects like film.
To understand the role of the loupe and how it fits into your workflow, let's start with a brief video demonstration.
Viewing & Storing Negatives - Film Tip!
This clip from Matt Day's YouTube channel shows the basic tools and process for viewing negatives, including the use of a light pad and a loupe.
Watch from the beginning of the clip to see how a loupe is used to get a closer look at negatives on a light source. Pay attention to his comment that it's an "easy way to get a good look at your negatives, look at your sharpness." This section provides a perfect visual introduction to the process we'll be detailing.
As the video suggests, the primary purpose of the loupe at this stage is to confirm sharpness. This simple act is the final gatekeeper that determines whether a negative is worth printing.
Types of Loupes and Their Applications
Not all loupes are created equal; they are designed for different tasks. Understanding the two main categories will help you select and use the right tool for the job.
Going all loopy about loupes - Fazal Majid's low-intensity blog
This blog post by Fazal Majid provides an excellent overview of loupe basics, which will ground our discussion.
Please read the introductory section titled Loupe basics. Focus on the two primary ways a loupe is used: High-Power (10x or higher): Used to check for critical focus. By highly magnifying a small portion of the negative, you can see the film's grain structure. If the grain appears as sharp, distinct points, the image is in focus. If it looks mushy or blurred, the image is soft. This is the most important application for our purposes. Medium-Power (3x to 6x): Used to evaluate an entire frame at once, especially for medium and large format negatives. This is more for assessing composition and overall impression than for critical focus.
For now, our concern is with checking critical focus, so a high-power loupe (typically 8x or 10x) is the most valuable tool. When you look through it, you should be asking one question: Is the most important part of my subject perfectly sharp? In a portrait, this might be the eyes. In a landscape, it could be the texture of a foreground rock or the fine detail of distant trees.
Why a High-Quality Loupe Matters
Given your engineering background, you'll appreciate that the quality of your measurement tool limits the precision of your results. The same principle applies here. A low-quality loupe may not have the resolving power to show you the true sharpness of your negative. It can suffer from optical problems like chromatic aberration (color fringing) or poor edge-to-edge sharpness, potentially misleading you into thinking a sharp negative is soft, or worse, failing to reveal that a soft negative is unusable.
The following reading explains why investing in a quality optical tool can make a real difference.
Going all loopy about loupes - Fazal Majid's low-intensity blog
We return to the same article to see a real-world example of this principle in action.
Read the section on this topic. The author describes how high-quality loupes (Schneider, Zeiss) could resolve the fine suspension cables on a slide of the Golden Gate Bridge, while a cheaper 10x loupe could not. This led him to mistakenly believe his photograph was blurry for years. This is a perfect illustration of how your assessment tool can be the limiting factor.
High-quality loupe manufacturers like Schneider, Rodenstock, and Zeiss are known for their precision optics, much like high-end camera lens makers. While you don't need the most expensive model, it's crucial to use a tool that is at least as capable as the film and lenses you are using.
From Negative Assessment to Print Sharpness: The Grain Focuser
The loupe helps you verify sharpness on the negative itself. But how do you ensure that sharpness is perfectly transferred to your photographic paper during printing? For this, we use a related but distinct tool: the grain focus finder (or grain focuser).
A grain focuser is essentially a high-magnification microscope designed to be placed directly on the enlarger's baseboard. It uses a mirror to reflect the projected image up into a magnifying eyepiece, allowing you to see the individual grains of the film, magnified many times over. By adjusting the enlarger's focus until those grains are perfectly sharp in the focuser, you guarantee the sharpest possible print.
What is a Focus Finder? - Lens Notes - The Camera World Explained
This article from Lens Notes clearly explains what a grain focus finder is and how it works.
Please read the first two main sections: The introduction explains that a grain focuser is an optical device used to verify the correct focus of the image projected by the enlarger. Notice its components: a mirror and a magnifying eyepiece. The next section highlights the connection to our current topic. It explains that a grain focuser can be used to inspect negatives at a microscopic level, essentially serving as a very high-power film loupe.
Think of the process in two stages:
- Assessment (on the light table): Use a loupe to confirm the negative is sharp.
- Execution (in the darkroom): Use a grain focuser to ensure the projected image is printed sharp.
We will cover the detailed use of the grain focuser when we get to making our first work print, but it's important to understand its role now as the logical continuation of our quest for sharpness.
Conclusion
This lesson completes your toolkit for negative assessment. You are now equipped to analyze a negative not just for its tonal properties, but also for its technical quality. Before you decide to spend time printing a negative, you should be able to confidently answer "yes" to all three of these questions:
- Density: Is the negative dense enough to print easily, with detail in the shadows? (Lesson 2.1)
- Contrast: Does the negative have a manageable contrast range that can be handled by standard paper grades? (Lesson 2.2)
- Sharpness: Is the critical part of the image in focus, with clearly resolved detail and grain? (This lesson)
Key Takeaways:
- A loupe is a precision magnifier used to check negatives for critical focus, grain sharpness, and fine detail on a light table.
- High-power loupes (8x or more) are essential for resolving the film grain, which is the ultimate indicator of focus.
- The optical quality of your loupe is important; a poor tool can give you a misleading assessment of your negative's sharpness.
- A grain focus finder is a similar tool used in the darkroom to magnify the projected image, allowing you to focus the enlarger on the film grain for maximum print sharpness.
Now that you can select a negative that is technically sound—with good density, contrast, and sharpness—you are ready to move into the darkroom and begin the process of translation: turning that negative into a beautiful print.
In our next lesson, we will begin Module 3 by taking our chosen negative to the enlarger. We'll start with the foundational technique of making a test strip to determine the correct base exposure for our print.