Welcome to the final lesson of your course on black and white darkroom printing. In our last session, you learned how to critically evaluate a final print, moving from the role of a craftsman to that of a discerning critic. This ability to judge technical excellence, tonal balance, and impact allows you to decide when a print is a success—a "master print" worth preserving.
But what happens when you want to create another copy of that master print a week, a month, or even a year later? Or what if you want to create the same print at a larger size for an exhibition? Starting the entire process of test strips and adjustments from scratch would be incredibly inefficient. This lesson provides the solution by teaching you how to document your printing process, turning your artistic success into a repeatable, engineered procedure. This is the final skill that ties everything you've learned together, ensuring your hard-won results are never lost to memory.
The Foundation: Why and What to Record
Even the world's most renowned printers don't rely on memory alone. A systematic approach to note-taking is a hallmark of professionalism and a cornerstone of efficient darkroom work. To begin, let's hear from a master printer at one of the world's most prestigious photo agencies.
In the Darkroom with Pablo Inirio: Dodging and Burning
This short video from Magnum Photos features Pablo Inirio, a printer for many legendary photographers. He explains why he takes notes and what information he considers essential.
Watch the segment from the beginning to the one-minute mark. Pay attention to his reasoning for note-taking and the specific variables he lists.
As Pablo Inirio explains, notes provide a starting point, saving you from having to reinvent the wheel for every printing session. Your goal is to capture every variable that influences the final look of the print. Given your background in industrial engineering, you can think of this as defining the process parameters required for consistent manufacturing of a product—in this case, your photograph.
Based on Inirio's advice and the techniques you've learned throughout this course, a complete print record should include:
- Identification: Negative number/ID, date.
- Enlarger Setup:
- Enlarger and lens model.
- Enlarger height (for a specific print size).
- Lens aperture (f-stop).
- Exposure & Contrast:
- Paper type, size, and batch/box number (emulsions can have slight variations between batches).
- Base exposure time.
- Contrast filtration used (e.g., Grade 2, or the specific settings for a split-grade print).
- Chemistry: Developer, dilution, temperature, and development time.
To make this process straightforward, many photographers use a dedicated sheet for their notes. Here is an example of a simple, effective template.

You can print out sheets like this or create your own in a notebook. The key is consistency. This sheet becomes the "spec sheet" for your final print.
Documenting Local Adjustments: The Print Map
The data sheet above captures the global settings for the print, but a refined print often involves local adjustments like dodging and burning. These too must be documented. The most effective way to do this is by creating a print map. A print map is a visual guide, usually drawn on a scrap print or a sketch, that outlines where and for how long you dodged and burned.
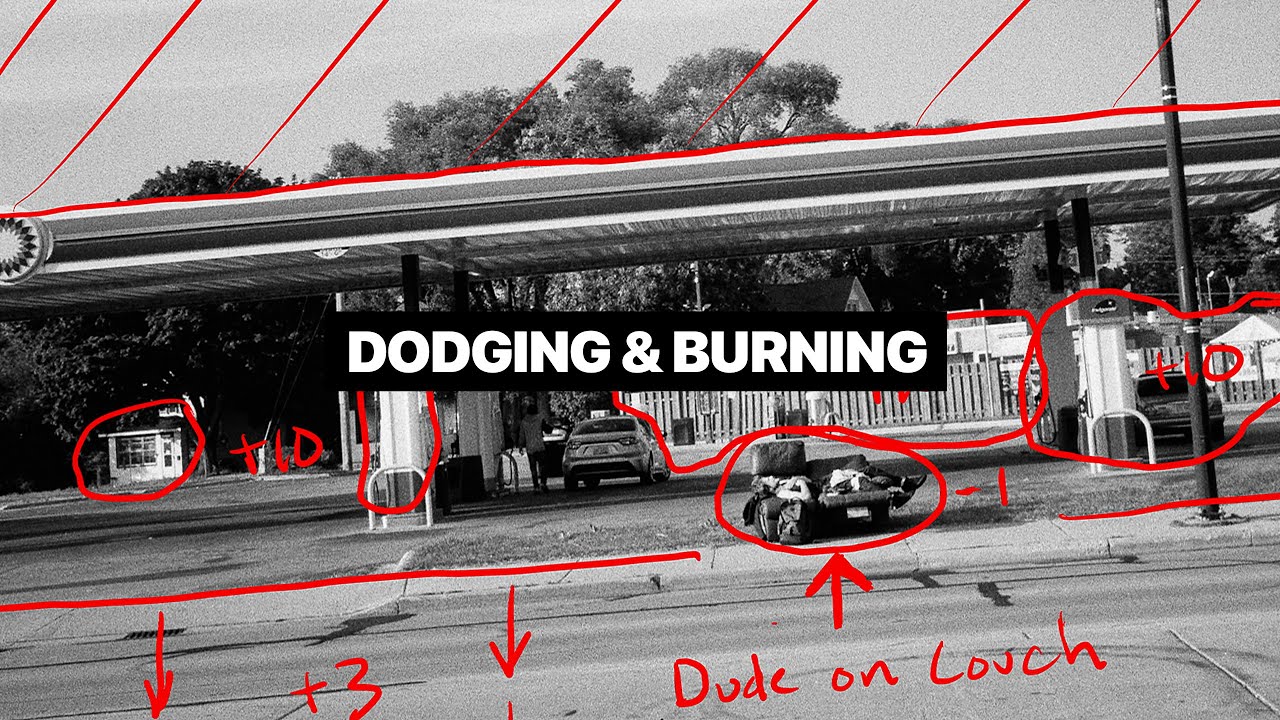
The article "Dodge, Burn and Other Heresies" provides excellent, practical examples of how to create and use these maps.
Dodge, Burn and Other Heresies – Darkroom Technique ...
This article by Sroyon Mukherjee offers a masterclass in local adjustments. We will focus on the section about planning and the excellent examples of print maps.
Please read the subsection titled "Dodge/burn map" to understand the two main methods of creating a map. Then, browse through the five print examples that follow. For each one, compare the "straight print" with the corresponding "dodge/burn map." Notice how the author annotates the map with specific times and filter grades. Print 1: A simple same-grade map. Prints 3, 4, and 5: More complex maps for split-grade printing, using circles and squares to differentiate between soft and hard grade exposures.
As you can see, the map doesn't need to be a work of art. A simple sketch with clear annotations is all that's required. You combine this visual map with your data sheet to create a complete, reproducible recipe for your photograph.
For Ultimate Precision: Thinking in F-Stops
Your print maps so far likely have notes like "+5 seconds" or "-3 seconds." This is simple and effective, but it has a limitation. A 5-second burn on a 10-second base exposure is a +50% increase in light (a significant darkening), while a 5-second burn on a 40-second base exposure is only a +12.5% increase (a very subtle change). The absolute time value is not a consistent measure of effect.
To solve this, we can borrow a concept from how your camera's exposure works: f-stops. Just as moving from f/8 to f/5.6 doubles the amount of light, we can think about our printing exposures in terms of stops. This provides a relative, logarithmic scale that is consistent and scalable.
F-Stop Printing in the Darkroom - 35mmc
This article from 35mmc clearly explains the principle and advantages of f-stop printing, a method that will appeal to your analytical mindset.
Read the sections "What is F-stop printing?" and "Why Those Numbers?". The mathematical basis, rooted in powers of 2, provides the kind of technical "why" you appreciate. Finally, read the section "Advantages of F-stop Printing". This directly addresses our goal of reproducibility and scalability.
The core idea is to express your dodging and burning times not in seconds, but in stops relative to the base exposure. For example, instead of "burn sky for 10 seconds" on a 20-second base exposure, your note becomes "burn sky +1/2 stop."
Why is this so powerful? Imagine you want to make a larger print. You raise the enlarger head, and your new base exposure for the larger size is now 33.6 seconds. If your note just said "+10 seconds," that burn would now be far too weak. But because your note says "+1/2 stop," you know exactly what to do. You look at an f-stop chart (or use a calculator) and find that a +1/2 stop burn on a 33.6-second base exposure is an additional 14.7 seconds, for a total of 48.3 seconds.
Your print map remains identical in terms of f-stops; you only need to recalculate the times based on the new base exposure. This makes reproducing a print at any size a matter of simple calculation rather than tedious re-testing.
The Complete Workflow for Reproducibility and Scaling
Now, let's combine everything into a cohesive workflow, incorporating your Ilford EM10 meter for maximum efficiency.
Darkroom Printing Tips - (How To) Easily Scale Your Black and White Prints
This video from DistPhoto, which you've seen before, demonstrates the practical application of these ideas for scaling prints. It's the perfect synthesis of note-taking, metering, and f-stop principles.
Review the process by watching from the initial setup to the completion of the larger print. The presenter's goal is to keep the light intensity on the paper constant across different sizes.
Here is the complete, systematic process:
- Create Your Master Print: Make your first print (e.g., an 8x10) and refine it with dodging and burning until you're satisfied, as you learned in the previous lesson.
- Document Everything:
- Fill out your data sheet with all the base parameters (enlarger height, aperture, filter, base exposure time, etc.).
- Create a print map annotating your dodge and burn locations. Critically, record the adjustments in f-stops (e.g., "+3/4 stop," "-1/2 stop"). You can also write the corresponding seconds for that specific print size.
- Use your Ilford EM10 meter to measure the light in a key mid-tone area of the projected image (with the negative in place). Record this meter setting (e.g., "20 on the dial"). This reading is the fingerprint of your print's brightness level.
- Reproduce at a New Size:
- Set up your easel for the new, larger print size.
- Raise the enlarger head and refocus.
- Place the EM10 meter on the same key mid-tone area you measured before.
- Adjust the lens aperture (or use ND filters, as in the video) until the EM10 gives you the exact same reading as your master print.
- By matching the light level, you have ensured the light intensity falling on the paper is identical to your original print.
- Print with Confidence: Because the light intensity is the same, you can now use the exact same base exposure time and the exact same dodge/burn times in seconds from your original notes. No new test strips are needed. The result will be a larger, but tonally identical, print.
This combination of a detailed data sheet, an f-stop-based print map, and a calibrated light meter reading forms a robust, near-foolproof system for perfect reproducibility and scaling.
Conclusion
You have reached the end of your formal instruction in black and white printing. This final lesson has equipped you with perhaps the most powerful tool of all: a system. By meticulously documenting your work, you transform each successful print from a happy accident into a repeatable formula. This practice saves time, materials, and frustration, but more importantly, it builds a library of your personal creative decisions that you can return to and learn from for years to come.
Key Takeaways:
- Systematic Documentation is Key: All master printers rely on notes. Create a consistent system using a data sheet and a print map for every final print.
- Record All Parameters: Capture every variable, from enlarger height and aperture to developer dilution and temperature.
- Use a Print Map for Local Adjustments: Visually document your dodging and burning on a sketch or work print.
- Think in F-Stops for Scalability: Recording adjustments in f-stops (e.g., +1/2 stop) rather than absolute seconds allows you to easily recalculate times for different print sizes or base exposures.
- Combine Notes with Metering: Using your EM10 to record a key brightness value allows you to quickly replicate the exact lighting conditions, making reproduction incredibly fast and accurate.
Congratulations on completing this course. The darkroom is a place of lifelong learning and discovery. You now possess the foundational knowledge and the advanced techniques to pursue your own vision, solve creative problems, and produce truly refined photographic prints. Happy printing