Welcome to the third lesson in our course. In our first two sessions, we built the foundation for algorithmic analysis. We learned how to calculate the time and space complexity of an algorithm using Big-O notation and then how to compare and rank these complexities to understand what makes a solution "good" or "bad" in terms of scalability.
This knowledge tells you what an optimal solution looks like. Today, we focus on how to systematically arrive at such a solution. We will cover a structured, repeatable problem-solving framework that you can apply to any coding question you encounter, especially under the pressure of an interview. This methodical approach is what top companies look for; it demonstrates clarity of thought and engineering maturity far more than simply memorizing answers. Our goal is to internalize this process so it becomes second nature.
The Problem with "Just Coding"
When faced with a new problem, the instinct is often to start typing immediately. However, this is one of the most common mistakes candidates make. It can lead to solving the wrong problem, missing crucial edge cases, writing messy and unmaintainable code, or getting hopelessly stuck without a clear path forward.
As a full-stack developer, you already apply a structured process in your daily work: you clarify requirements with a product manager, discuss technical approaches with your team, implement the feature, and then write tests to verify it. A coding interview is a condensed version of this same professional workflow.
Various frameworks exist to guide this process, but they all share a common core. Take a look at these two diagrams.
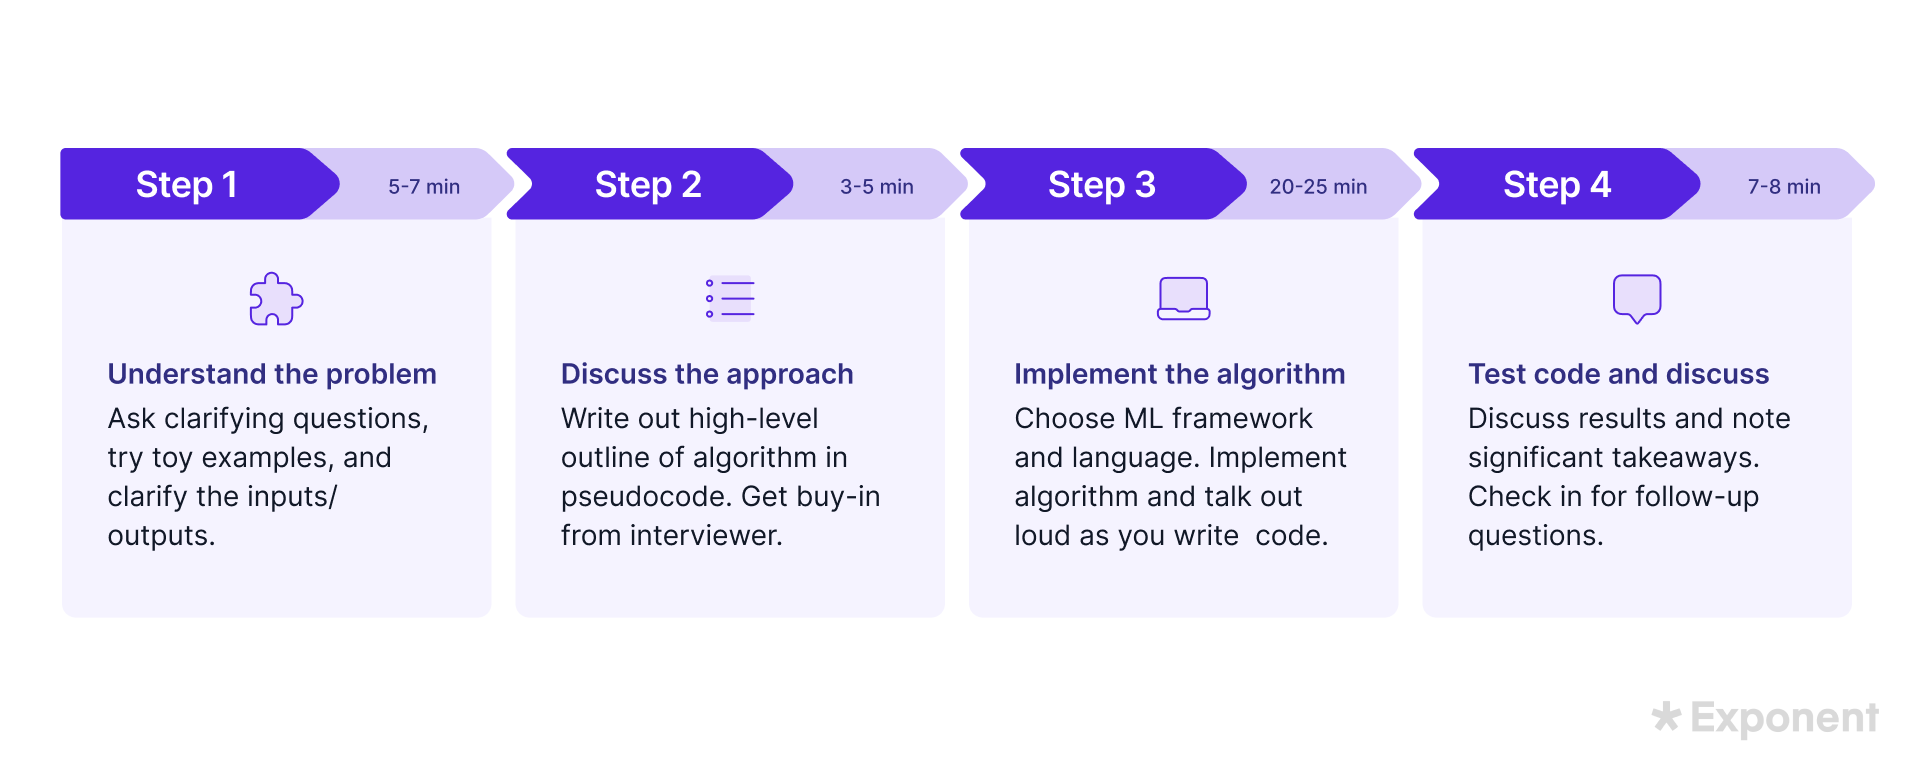
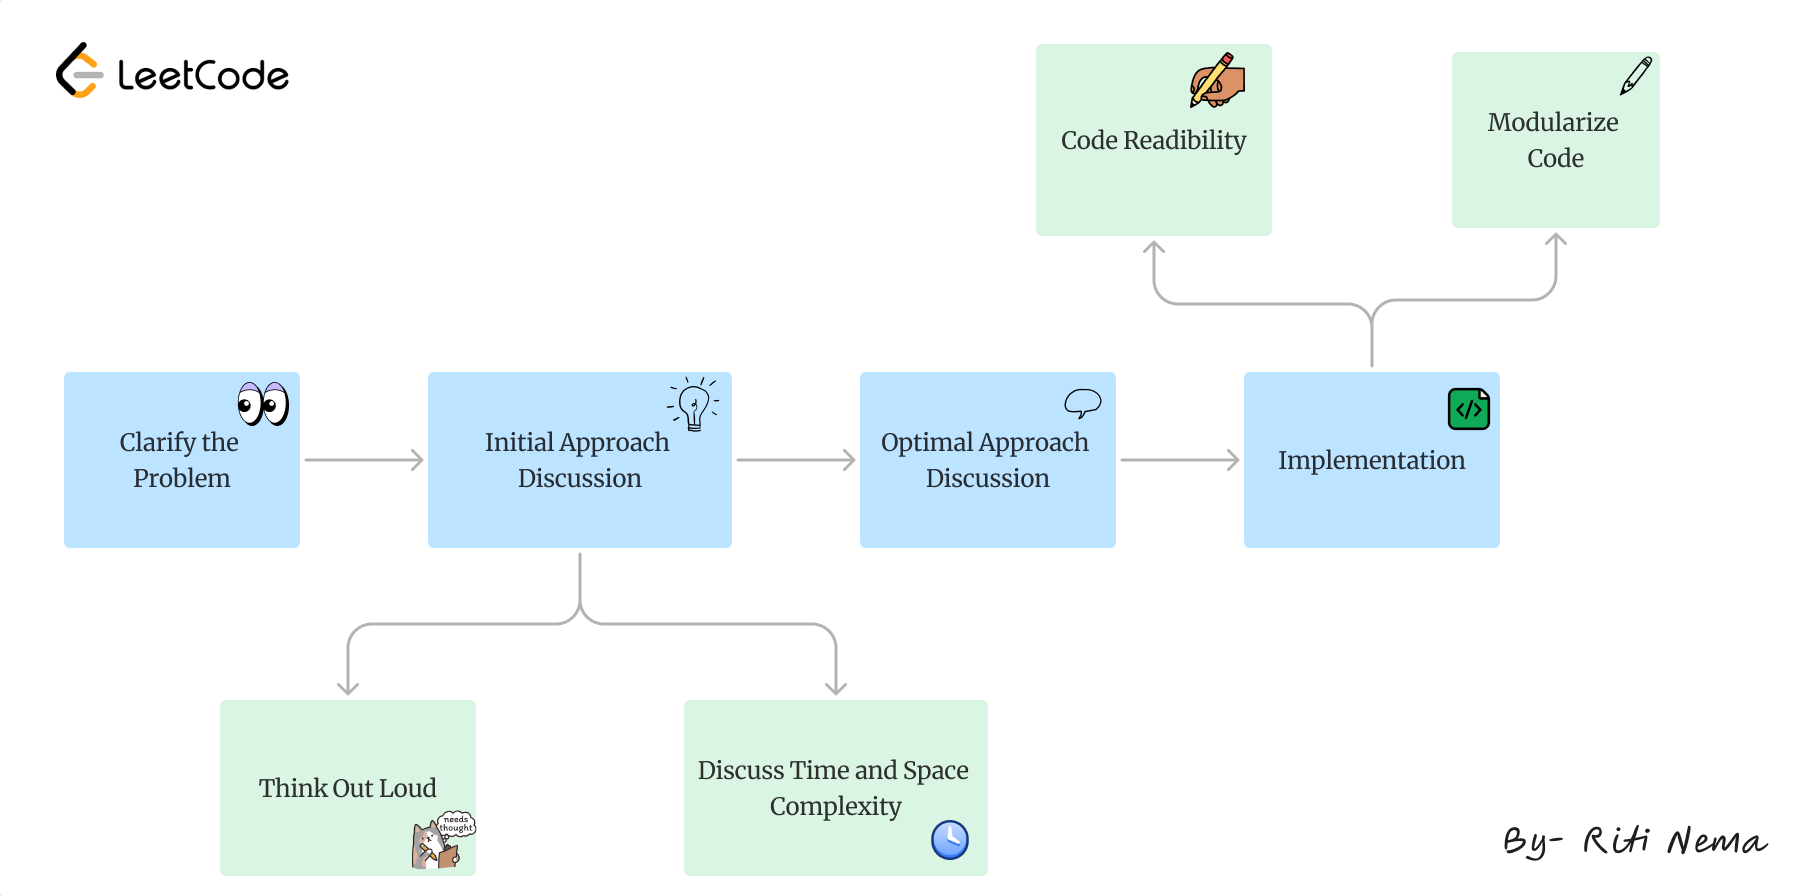
Both diagrams, despite their differences, emphasize a deliberate, multi-stage process that begins long before any code is written. Today, we will formalize this into a four-step framework that you can own: Clarify, Plan, Implement, and Verify.
A Four-Step Framework for Success
We will walk through each step in detail. To ground this in the practical reality of an interview, we will primarily use the "Coding interview cheatsheet" from the Tech Interview Handbook, a fantastic resource created by an ex-FAANG engineer.
Coding interview cheatsheet: Best practices before, during ...
First, let's get a high-level overview of the entire interview process. This will provide context for the four steps we're about to dissect.
Read the section titled What to do during your coding interview. Pay attention to the main headings (Clarifications, Work out and optimize, Code out your solution, After coding) as these form the basis of our framework.
Now, let's break down each of those stages.
Step 1: Clarify (Understand the Problem)
Before you write a single line of code, you must be absolutely certain you understand the problem. Interview questions are often intentionally vague to see if you'll seek clarity or make incorrect assumptions. Your goal here is to become the expert on the problem statement.
Key actions for this step include:
- Restate the problem in your own words. This confirms your understanding and, as noted by former Google interviewer Anthony Mays, gives you a moment to think. Watch this short clip where he explains the benefits.
How to Solve ANY Coding Interview Question in 6 Steps
In this video, Anthony Mays explains why simply repeating the question is a powerful first move.
Watch the segment from Step one: repeat the question to understand the tactical advantages this gives you.
- Ask clarifying questions. This is the most critical part of this step. You need to probe the boundaries of the problem.
- Work through small examples by hand. Take a simple input and manually derive the expected output. This solidifies your understanding and can reveal nuances you might have missed.
Coding interview cheatsheet: Best practices before, during ...
The Tech Interview Handbook provides an excellent checklist of questions to ask during this phase.
In the article you just skimmed, now focus on the subsection Upon receiving the question. Pay close attention to the lists of questions regarding inputs, values, and data structures. These are your tools for this step.
Step 2: Plan (Discuss the Approach)
Once the problem is crystal clear, you can start devising a solution. Resist the urge to jump to the most optimal approach. The goal here is to have a collaborative discussion with the interviewer.
Key actions for this step include:
- Start with a brute-force solution. This is your safety net. It demonstrates you can solve the problem correctly, even if inefficiently. A common example is using nested loops to check all pairs in an array.
- Analyze its complexity. This is where you connect to our previous lessons. You should explicitly state, "This brute-force approach works, but it has a time complexity of because of the nested loops. For a large input, this would be too slow. I think we can do better."
- Brainstorm optimized approaches. This is your chance to shine. Discuss potential strategies. "Since the input array is sorted, we could probably use a two-pointer approach to achieve an solution." Or, "We could use a hash map to store values we've seen, which would cost us space but improve the time complexity to ."
- Agree on a plan. Settle on the approach you will implement. A quick verbal outline or a few lines of pseudocode is perfect.
This planning phase is so important that other frameworks, like the popular UMPIRE method, break it into two parts: Match (identifying a known pattern like "Two Pointers" or "Sliding Window") and Plan (developing the algorithm).
Coding interview cheatsheet: Best practices before, during ...
Let's dive into the specifics of planning and discussing your approach.
Read the subsection Work out and optimize your approach. The key takeaways are to explain multiple approaches, discuss trade-offs (time vs. space), and state the Big-O complexity before getting the green light to code.
Step 3: Implement (Code the Solution)
With an agreed-upon plan, you can now translate it into code. Your main focus here is on clarity and communication. The interviewer is evaluating your ability to write clean, understandable code while articulating your thought process.
Key actions for this step include:
- Talk as you code. Explain each logical block. "First, I'll initialize my two pointers, one at the beginning of the array and one at the end."
- Use clean code practices. Your experience as a developer is an asset here. Use meaningful variable names (
result_listinstead ofres), and if the logic gets complex, break it into helper functions. - Write the actual code. While pseudocode is great for planning, the implementation step requires syntactically correct code in your chosen language (Python for us).
Coding interview cheatsheet: Best practices before, during ...
This section of the handbook provides excellent tips for the implementation phase.
Read the subsection Code out your solution. Focus on the advice regarding variable names and breaking down the problem into functions.
Step 4: Verify (Test and Evaluate)
Once your function is written, do not simply state, "I'm done." This is a red flag for interviewers. The final step is to demonstrate that your code is correct and to re-affirm its performance characteristics.
Key actions for this step include:
- Test with your examples. Use the simple examples you created in Step 1 and manually trace them through your code, variable by variable. "Okay, let's test this with the input
[1, 2, 3, 4, 6]andtarget = 6.leftis 0,rightis 4..." - Consider edge cases. Now, trace your code with the tricky inputs you identified earlier: an empty array, a null input, an array with one element, an array where no solution exists.
- State the final complexity. Conclude by confidently stating the time and space complexity of your final, implemented solution. "This two-pointer solution correctly finds the pair in time, as we only pass through the array once, and it uses extra space."
Coding interview cheatsheet: Best practices before, during ...
Let's look at the best practices for this final, crucial step.
Read the subsection After coding, check your code. The most important idea here is to take initiative and start verifying your own work without being prompted.
The UMPIRE Mnemonic
Another popular way to remember a similar process is the UMPIRE acronym, which stands for:
- Understand
- Match
- Plan
- Implement
- Review
- Evaluate
This maps very closely to our four-step framework. 'Match' and 'Plan' are part of our Plan step, while 'Review' and 'Evaluate' are what we do in our Verify step. The underlying process is the same. If you'd like a detailed walkthrough of UMPIRE with a concrete code example, the article from Design Gurus is an excellent follow-up read.
Mastering the UMPIRE Interview Strategy in Coding
This article provides a full, end-to-end example of applying the UMPIRE method to a classic interview problem. It's a great way to see the framework in action.
Feel free to read from the 'Understand' section through to 'Evaluate'. This will reinforce everything we've discussed today by applying it to the "Pair with Target Sum" problem.
Conclusion
Today, we've outlined a robust, professional framework for tackling coding problems. By consistently practicing this Clarify -> Plan -> Implement -> Verify loop, you will build the habits necessary to perform well under pressure. You will appear more senior, more thoughtful, and more collaborative to your interviewers.
Key Takeaways:
- Never jump straight to coding. A methodical approach is essential.
- The four key stages are Clarify, Plan, Implement, and Verify.
- Clarify by restating, asking questions, and creating examples.
- Plan by discussing brute-force vs. optimal solutions and their complexities.
- Implement by writing clean, modular code while communicating your thought process.
- Verify by testing with both normal and edge cases, and re-stating the final complexity.
In our "Plan" step, we discussed the idea of matching a problem to a known pattern. To make that step effective, you need a toolbox of patterns. In our next lesson, we will begin building that toolbox by learning our first major algorithmic pattern: the Two-Pointer Technique.