Hello! Welcome to the third lesson in our "Advanced Security and Self-Custody" module.
In our last lesson, we focused on the most critical aspect of self-custody: securing your wallet's seed phrase. You learned why it must be kept offline and protected from physical damage, and we explored professional-grade methods like steel backups to ensure its long-term safety.
Now that you have a secure, independent wallet, it's time to connect it to your Binance account. Today's lesson is about adding a powerful layer of security inside Binance that protects your funds before they are ever sent out. We will focus on adding your new non-custodial wallet address to your Binance account's whitelist. This ensures that even if someone were to gain unauthorized access to your account, they couldn't drain your funds to an unknown address.
1. What is a Withdrawal Whitelist?
Before we jump into the practical steps, it's important to understand what a withdrawal whitelist is and why it's such a critical security feature.
In simple terms, a withdrawal whitelist is a list of pre-approved cryptocurrency addresses that you have designated as "safe" to send funds to. When this feature is enabled, your Binance account can only make withdrawals to addresses on this list. Any attempt to withdraw to an unknown address will be blocked.
Think of it as setting up a list of approved payees for your bank account. You can only send money to people or companies you've already added, which prevents fraudulent transfers to strangers.
How to Secure Your Binance Account on Binance Web (2FA, Whitelist): Beginner Tutorial (2026)
The official Binance channel offers a brief introduction to this concept. This will give you a quick, high-level understanding of the feature's purpose.
Watch the segment from 00:56 to 01:24. The speaker explains how whitelisting adds an extra layer of protection against unauthorized transfers.
2. How to Enable the Withdrawal Whitelist
Your first step is to turn this feature on in your Binance security settings.
- Log in to your Binance account on the website.
- Navigate to your Profile Icon in the top-right corner, then go to [Security].
- Scroll down to the "Advanced Security" section and find [Address Management]. Click it.
- You will see a setting for [Withdrawal Whitelist]. Click the toggle to enable it.

As with most security changes on Binance, you will be prompted to complete a security verification (likely using your 2FA Authenticator app and email) to confirm this change. This ensures that only you can enable or disable this crucial feature.
3. Adding Your Wallet Address to the Whitelist
With the whitelist function enabled, you now need to add the address of the non-custodial wallet you created in our previous lessons. This is a practical process that requires careful attention to detail.
We will use your non-custodial wallet (like Trust Wallet or MetaMask) as the destination for this example.
3 ways to secure your Binance account
The best way to learn this is by seeing it done. This video from Binance provides a complete, step-by-step walkthrough of enabling the whitelist and adding a new address. It's a perfect practical guide.
Watch the video from 07:24 to 10:04. It covers enabling the whitelist, navigating to address management, and adding a new address with all the required security checks.
For your convenience, here are the steps in written form, which you can follow along with the video.
How to Deposit/Withdraw Cryptocurrency on Binance?
This official guide from Binance support provides a clear, text-based reference for the steps involved. It's useful to have open as you follow the process.
Please review the section titled '3. How to add a withdrawal address to my address book?' This section contains numbered steps and screenshots that perfectly match the process of adding and whitelisting a new address.
Step-by-Step Breakdown:
- Get Your Receiving Address: Open your non-custodial wallet (e.g., Trust Wallet) and find the "Receive" address for the specific coin and network you plan to withdraw. For example, if you plan to withdraw BNB, you need your BNB address on the BNB Smart Chain (BEP20) network. This is the most critical step. Sending funds to the wrong address or network will result in a permanent loss of funds.
- Navigate to Address Management: In Binance, go to [Security] -> [Address Management] and click [+ Add Address].
- Fill in the Address Details:
- Address Label: Give the address a memorable name, like "My Trust Wallet - BNB".
- Coin: Select the cryptocurrency that matches the address (e.g., BNB).
- Address: Carefully paste the receiving address you copied from your non-custodial wallet.
- Network: Select the correct network that matches your wallet's address (e.g., BNB Smart Chain (BEP20)). Binance often auto-selects this, but you must double-check that it is correct.
- Address Origin: Select "Wallet" and then choose the wallet provider (e.g., "Trust Wallet").
- Add to Whitelist: This is the key step. Check the box that says [Add Address to Whitelist].
- Save and Verify: Click [Save] and complete the multi-factor security verification (email and 2FA Authenticator codes).
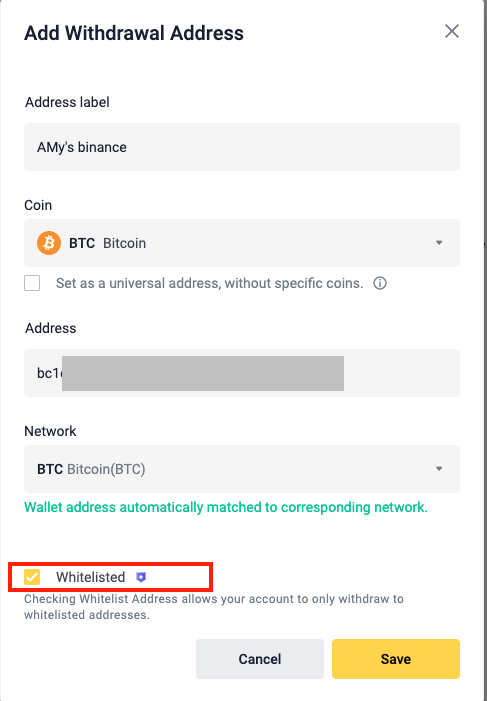
Once verified, the new address will be added to your whitelist. By default, Binance may impose a 24-hour cooling-off period where you cannot withdraw to this new address. This is a final security measure to protect you in case a hacker added an address without your knowledge.
Conclusion
Congratulations! You have just activated one of the most effective security features on Binance and linked your account to your personal, self-custody wallet. This puts a powerful barrier in place against unauthorized withdrawals and is a fundamental step toward managing your crypto securely.
Key Takeaways:
- The Withdrawal Whitelist is a security feature that restricts withdrawals to only pre-approved addresses.
- Enabling the whitelist and adding a new address requires multi-factor security verification, ensuring only you can make these changes.
- The most critical part of adding an address is ensuring the Coin and Network perfectly match between Binance and your receiving wallet.
- Always give your addresses a clear label so you can easily identify them later.
What's Next?
You've set up the connection; now it's time to test it. In the next lesson, we will put this into practice by performing a test withdrawal of a small amount of cryptocurrency from Binance to your newly whitelisted external wallet. This will confirm that everything is working correctly before you ever move larger amounts.