Welcome back! Over the past few lessons, we've methodically built the lower layers of our Clean Architecture, establishing the domain logic with entities and use cases, and implementing the data layer with repositories and data sources. We now have a robust system for fetching and caching data, completely independent of the UI.
Today, we will build the crucial bridge connecting our business logic to the presentation layer. You'll learn how to connect use cases to BLoC/Cubit classes, which are responsible for managing the UI's state. By the end of this lesson, you will be able to take a UI event, trigger the corresponding business logic via a use case, and transform the result into a state that the UI can display to the user. This is the final and most visible step in making our application's features come to life.
1. The Role of BLoC in Clean Architecture
In our architecture, the BLoC (or Cubit) is a Presentation Logic Holder. Its job is to act as a middleman between the raw user interactions happening in the widgets and the pure business logic encapsulated in the use cases.
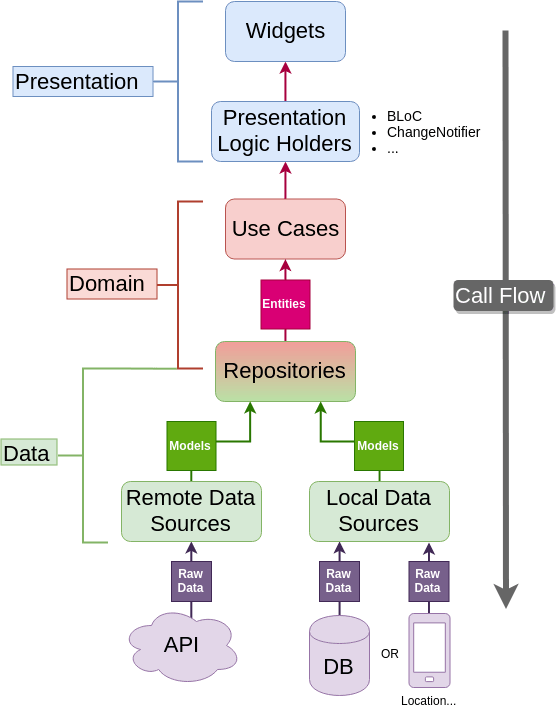
The flow is as follows:
- A Widget dispatches an Event (e.g.,
GetTriviaForConcreteNumberEventwhen a button is pressed). - The BLoC receives the event.
- The BLoC calls the corresponding UseCase (e.g.,
GetConcreteNumberTrivia). It knows nothing about how the use case gets the data. - The UseCase returns an
Either<Failure, NumberTriviaEntity>. - The BLoC processes this result and emits a new State (e.g.,
Loading,Loaded, orError). - The Widget, listening to the BLoC's state stream, rebuilds itself to reflect the new state (e.g., shows a progress indicator, displays the trivia, or shows an error message).
This separation ensures that our business logic remains pure and testable, and our UI logic is concerned only with displaying states, not fetching data.
2. Defining BLoC Events and States
Before implementing the BLoC itself, we must define its communication contract: the events it accepts and the states it emits. Since you're familiar with BLoC, this should be a straightforward review.
- Events: Represent user actions or intentions from the UI. For our
NumberTriviafeature, we might have events likeGetTriviaForConcreteNumberandGetRandomTrivia. - States: Represent the different snapshots of the UI. A standard set includes an initial state, a loading state, a success state (with data), and an error state (with a message).
The video below provides a clear, concise example of defining events and states for an authentication feature. The principles are identical for any feature.
Flutter Authentication with Go Router & Bloc – Full Tutorial (Clean Architecture)
This clip from DevVibe's "Flutter Authentication" tutorial clearly demonstrates how to set up the BLoC's event and state files.
Watch from Events and States. Notice how each event corresponds to a user action and each state represents a distinct UI condition.
3. Implementing the BLoC: The Bridge to the Domain Layer
Now for the core of today's lesson. The BLoC class connects to the domain layer by depending on use cases. These dependencies are provided through the constructor, allowing us to easily mock them in tests and maintain loose coupling.
Inside the BLoC, we register event handlers. When an event comes in, the handler orchestrates the call to the use case and the emission of new states. The key steps within an event handler are:
- Emit a
Loadingstate immediately to give the user feedback. - Call the use case. Since the use case returns a
Future<Either<Failure, Data>>, weawaitits result. - Use
foldto handle the result. Thefoldmethod on theEithertype is perfect for this. It takes two functions: one for theleft(Failure) case and one for theright(Success) case. - Emit the final state. Based on the outcome, you'll emit either an
Errorstate with a descriptive message or aLoadedstate containing the data.
The following video demonstrates this process perfectly. It's the most critical part of this lesson.
Flutter Authentication with Go Router & Bloc – Full Tutorial (Clean Architecture)
This section shows the full implementation of an AuthBloc, including injecting use cases and using fold to handle results.
Pay close attention to the AuthBloc implementation from BLoC Implementation. Specifically, focus on: How the use cases are passed into the constructor. How the on<AuthLoginRequested> handler is structured. The elegant use of result.fold() to map the Failure and Success cases to AuthError and AuthAuthenticated states, respectively.
Here is what a simplified version for our NumberTriviaBloc would look like, based on this pattern:
// presentation/bloc/number_trivia_bloc.dart

class NumberTriviaBloc extends Bloc<NumberTriviaEvent, NumberTriviaState> {
  final GetConcreteNumberTrivia getConcreteNumberTrivia;
  final GetRandomNumberTrivia getRandomNumberTrivia;

  NumberTriviaBloc({
    required this.getConcreteNumberTrivia,
    required this.getRandomNumberTrivia,
  }) : super(Empty()) {
    on<GetTriviaForConcreteNumber>(_onGetTriviaForConcreteNumber);
    // on<GetTriviaForRandomNumber>(...);
  }

  void _onGetTriviaForConcreteNumber(
    GetTriviaForConcreteNumber event,
    Emitter<NumberTriviaState> emit,
  ) async {
    emit(Loading());
    final failureOrTrivia = await getConcreteNumberTrivia(
      Params(number: event.number),
    );
    failureOrTrivia.fold(
      (failure) => emit(Error(message: _mapFailureToMessage(failure))),
      (trivia) => emit(Loaded(trivia: trivia)),
    );
  }

  String _mapFailureToMessage(Failure failure) {
    // Logic to convert different Failure types to user-friendly messages
    switch (failure.runtimeType) {
      case ServerFailure:
        return 'Server Failure';
      case CacheFailure:
        return 'Cache Failure';
      default:
        return 'Unexpected Error';
    }
  }
}
A Note on Cubit
As you know, Cubit is a simpler alternative to BLoC that omits the explicit Event classes. The core logic of connecting to a use case remains identical. A Cubit would have public methods that the UI can call directly. Inside these methods, you would still call the use case and use fold to emit new states.
The article below provides an excellent example of a PostsCubit that does exactly this.
This article shows a clean implementation of a Cubit that interacts with a use case.
Focus on the code snippet under the heading posts_cubit.dart. Cubit implemation. You'll see that the getPosts method calls the getPostUsecase, awaits the result, and uses fold to emit either a PostError or LoadedPosts state. The principle is the same as with BLoC, just structured slightly differently.
Choosing between BLoC and Cubit is a matter of complexity and preference. For complex screens with many possible user interactions, BLoC's explicit events can be clearer. For simpler cases, Cubit's conciseness is often preferable. A mid-level developer should be comfortable with both.
4. Consuming the BLoC in the UI
With the BLoC now ready to emit states, the final step is to connect it to the UI. While a deep dive into UI is for another day, it's important to see the full loop.
You would typically use a BlocProvider to make an instance of your BLoC available to the widget tree. Then, a widget like BlocBuilder or BlocConsumer listens for state changes and rebuilds the UI accordingly.
Flutter Clean Architecture - Learn By A Project | Full Beginner's Tutorial
This video from Flutter Guys demonstrates how to use BlocProvider and BlocBuilder to display data from a BLoC.
Watch the section on UI Integration. The key takeaway is how the BlocBuilder's builder function receives the state and uses if/else if conditions to return different widgets for Loading, Error, and Done states. This is how the BLoC's logic gets translated into a visible user interface.
Conclusion
Congratulations on completing this module! You have now followed the entire flow of logic through a Clean Architecture application, from the deepest data layer right up to the presentation layer.
Key Takeaways:
- BLoC/Cubit is the bridge: It connects the UI to the domain layer, ensuring the dependency rule is respected.
- Dependencies are injected: The BLoC depends on use case abstractions, which are provided via its constructor.
- Events trigger use cases: The BLoC maps incoming UI events to calls on the appropriate use case.
- Results are mapped to states: The
Either<Failure, Success>result from a use case is elegantly handled usingfoldto produce distinctErrorandLoadedstates for the UI. - This pattern creates a clear separation of concerns, leading to code that is more testable, maintainable, and scalable.
In our next module, Professional Project Structuring, we'll take a step back from feature implementation. Now that you understand how to build a full feature slice, we'll focus on how to organize all these files and folders in a clean, scalable, and professional way.