Hello and welcome back!
In our last lesson, you successfully installed and launched a production-grade PostgreSQL server on your Fedora system. Your database server is running, but it's currently an empty canvas.
Today, we'll take the next crucial step in preparing the database for your Django project. Our goal is to create a dedicated database and a user role with the right privileges for your application, all using the psql command-line interface. This practice of creating separate databases and users for each application is fundamental for security and organization in a real-world server environment.
1. Understanding Roles and Connecting to PostgreSQL
Before we start creating things, it's important to understand how PostgreSQL manages permissions. Unlike some other systems that have distinct "users" and "groups," PostgreSQL uses a single concept called a role. A role can be a user, a group, or both. A role that is allowed to log in is what we typically think of as a "user."
To learn more about this core concept and see how we'll connect to the database, please read the following sections from a detailed DigitalOcean tutorial.
Use Roles and Permissions in PostgreSQL on a VPS | DigitalOcean
This article explains the concept of roles in PostgreSQL and shows how to access the psql command-line shell. Understanding this is the first step to managing your database.
Please read the sections "Understanding PostgreSQL Roles" and "Accessing the PostgreSQL Interface". Focus on the distinction between roles with and without LOGIN privilege, and the sudo -i -u postgres command, which is key to how we will get started.
As the article explains, the default installation on Fedora uses "peer authentication" for local connections. This means to log in as the PostgreSQL superuser role (postgres), you first need to become the postgres system user.
2. Your Turn: Create the Django Database and User
Now it's time for the hands-on part. Open your terminal and follow these steps to create the necessary database and user for a hypothetical Django project we'll call myproject.
Step 1: Connect to PostgreSQL
Switch to the postgres user account and launch the psql interactive terminal.
# Switch to the postgres system user
sudo -i -u postgres


# Launch the PostgreSQL interactive shell
psql
You should now see a new prompt: postgres=#. This indicates you are connected to the PostgreSQL server as the postgres superuser and can run SQL commands.
Step 2: Create a User Role for Django
We'll create a new role named myproject_user. This role will be used exclusively by your Django application to interact with the database.
Run the following SQL command inside the psql prompt. Remember to replace 'your_strong_password_here' with a strong, unique password.
CREATE USER myproject_user WITH PASSWORD 'your_strong_password_here';
This command creates a new role and, because we used CREATE USER, it automatically has the LOGIN privilege.
Step 3: Create the Database
Next, create the database itself, which we'll call myproject_db. A great practice is to assign the user we just created as the owner of the database.
CREATE DATABASE myproject_db WITH OWNER myproject_user;
By making myproject_user the owner, you grant it a default set of powerful permissions over that specific database, which simplifies management.
Step 4: Set Django-Recommended User Attributes
For optimal compatibility with Django, it's best to configure a few session defaults for your new user role. These commands ensure proper character encoding and transaction handling.
ALTER ROLE myproject_user SET client_encoding TO 'utf8';
ALTER ROLE myproject_user SET default_transaction_isolation TO 'read committed';
ALTER ROLE myproject_user SET timezone TO 'UTC';
These are the exact commands you would find in a production Django deployment guide. They prevent common issues with character sets and time zones.
Step 5: Verify Your Work
You can check that your database and user were created correctly using psql's built-in meta-commands (commands that start with a \).
To list all databases, type:\l

To list all roles, type:\du
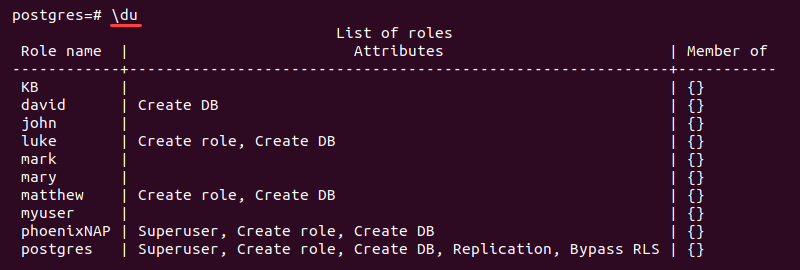
When you're finished, you can exit the psql shell by typing:\q
Then, to return to your normal user account from the postgres user's shell, type:exit
The video below provides a quick visual walkthrough of a very similar process, demonstrating the creation of a user and a database.
Django with PostgreSQL in under 15 Minutes + PSQL Tips 🔥 Including how to backup & restore
This short clip from Pyplane demonstrates the core SQL commands for creating a user and a database. It's a great way to see the commands you just typed in action.
Watch from 03:34 to 04:10 to see the CREATE USER command, and from 05:09 to 05:55 to see the CREATE DATABASE command.
3. Understanding Privileges and Best Practices
Simply creating a user and a database is not enough; you must grant the user the correct privileges to act on that database. Since we made myproject_user the owner of myproject_db, it already has broad permissions. However, understanding how to grant permissions more granularly is a key skill.
This is where the Principle of Least Privilege comes in: a role should only have the exact permissions it needs to do its job, and no more. For a web application, this typically means the ability to perform SELECT, INSERT, UPDATE, and DELETE operations on tables.
The following resource provides a fantastic overview of granting privileges and includes a complete, secure example for setting up a web application role.
Use Roles and Permissions in PostgreSQL on a VPS | DigitalOcean
To deepen your understanding of database security, read these sections from the DigitalOcean guide. They cover how to grant specific permissions and provide a best-practice example for web applications.
Read the sections "Granting and Revoking Privileges," "Example: Setting Up a Web Application Role," and the FAQ entry "What are the best practices for managing PostgreSQL roles on a VPS?". This will solidify your understanding of why we grant permissions the way we do for applications like Django.
Because we set myproject_user as the owner of myproject_db, it already has the necessary rights to create tables (when you run Django migrations) and perform all CRUD (Create, Read, Update, Delete) operations on them. The approach in the article—creating a non-owner user and granting specific privileges—is an even more secure, fine-grained method you will encounter in environments with stricter security requirements.
Conclusion
You have now successfully created a secure and isolated environment within PostgreSQL for your Django application. This is a major step up from using a simple SQLite file and is standard practice for any production-level web service.
Key Takeaways:
- PostgreSQL uses roles to manage permissions. A "user" is simply a role with the
LOGINattribute. - You can connect to the PostgreSQL superuser account on Fedora using
sudo -i -u postgresfollowed bypsql. - The essential SQL commands for this task are
CREATE USER ... WITH PASSWORD ...,CREATE DATABASE ... WITH OWNER ..., andALTER ROLE ... SET .... - Assigning an owner to a database at creation is a clean way to manage permissions for a single application.
- The Principle of Least Privilege is a critical security concept in system and database administration.
Preview of the Next Lesson:
You've prepared the database; now it's time to tell your application how to find it. In the next lesson, you will take the database name (myproject_db), username (myproject_user), and the password you created today and use them to configure your Django project's settings.py file, finally connecting your application to its new, robust PostgreSQL backend.