Welcome to the next lesson in our journey to master API security with Spring. In our last session, we took control of Spring Security by defining a custom SecurityFilterChain to protect our API endpoints. While this gave us fine-grained control over who can access what, our authentication relied on temporary, in-memory users. This was great for a quick start, but it's not a solution for a real-world application.
Today, we will bridge that gap. This lesson focuses on connecting Spring Security to your database. You will implement a custom UserDetailsService, a core Spring Security component responsible for loading user-specific data from any data source you choose—in our case, the MySQL database we configured earlier. By the end of this lesson, you will have replaced the temporary in-memory user setup with a robust, persistent authentication mechanism, a critical step toward building a production-ready backend.
The Authentication Flow and the Role of UserDetailsService
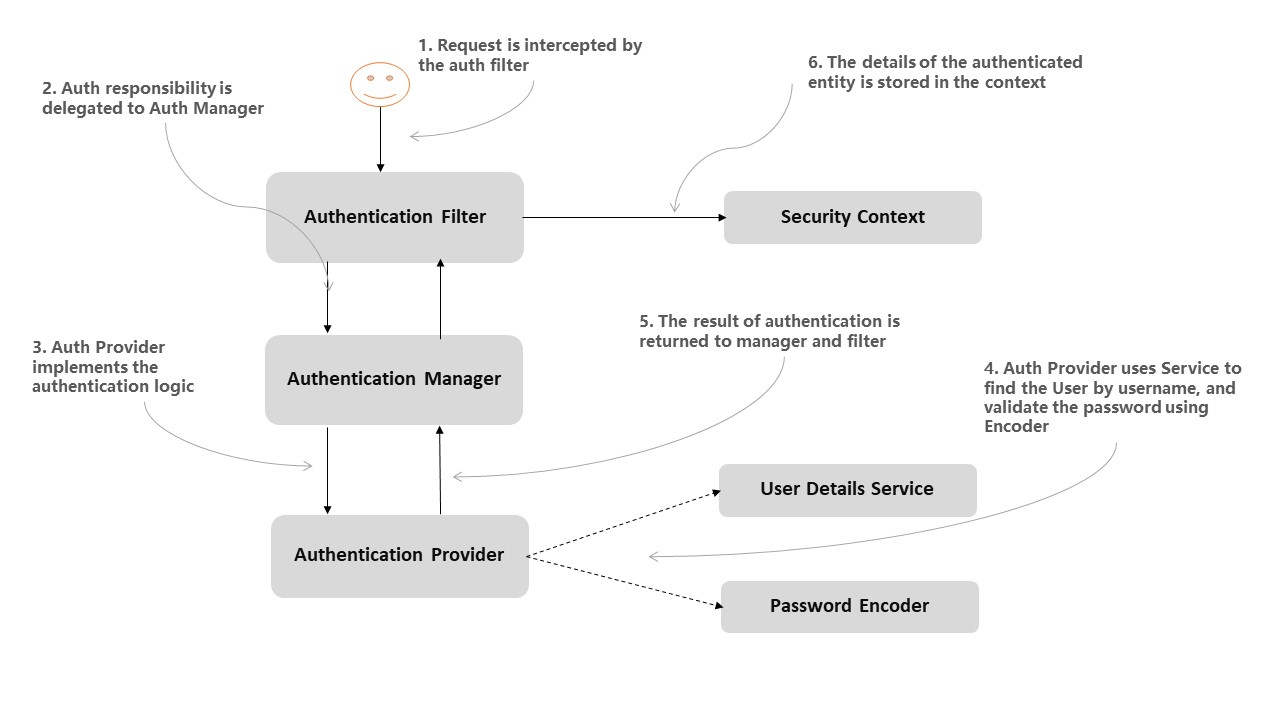
Before we dive into the code, let's visualize where our new component fits into the Spring Security architecture. When a user tries to log in, Spring Security needs to verify their credentials. The DaoAuthenticationProvider is the component that handles this for database-backed authentication. It doesn't know how to talk to your database directly; instead, it delegates this responsibility to two key interfaces:
UserDetailsService: Its only job is to find a user by their username.PasswordEncoder: Its job is to compare the submitted password with the stored, hashed password.
The diagram below illustrates this flow. The AuthenticationProvider uses the UserDetailsService to fetch the user's data and the PasswordEncoder to validate the password.
Understanding UserDetailsService and UserDetails
To integrate our database, we need to implement the UserDetailsService interface. It's a simple yet powerful interface with just one method: loadUserByUsername(String username).
Spring Security: Database-backed UserDetailsService
The Baeldung article provides a concise explanation of the UserDetailsService interface.
Read the short section titled "UserDetailsService". It clearly defines the purpose of this interface and its single method, which you are about to implement.
The loadUserByUsername method is expected to return an object that implements the UserDetails interface. UserDetails is the contract Spring Security uses to get all the necessary information about a user, such as their password, their roles (authorities), and whether their account is enabled or locked.
There are two common ways to provide a UserDetails implementation:
- Have your JPA entity (
User) implement theUserDetailsinterface directly. - Create a separate wrapper class that implements
UserDetailsand contains an instance of yourUserentity.
We will use the second approach because it promotes better separation of concerns. Your User entity's job is to model database data (persistence), while the wrapper's job is to represent security-specific information for the framework.
The following video provides an excellent walkthrough of creating this wrapper class and the UserDetailsService implementation.
Spring Security : User Authentication for Java Spring Boot REST API with Database #springsecurity
This video by Think Constructive provides a step-by-step guide to implementing database authentication. We will focus on the creation of the UserDetailsService and the UserDetails wrapper.
First, watch the segment from here, where the instructor introduces the UserDetailsService and begins implementing the loadUserByUsername method. Next, watch from this point to see how a custom mapper class (UserInfoUserDetailsMapper in the video) is created to implement the UserDetails interface. Pay close attention to how the getAuthorities method is implemented by converting a string of roles into a list of GrantedAuthority objects. This is exactly what we will do to map our User's roles for Spring Security.
Hands-On: Implementing Database Authentication
Now, let's apply these concepts to your group-manager project.
Step 1: Create the UserDetails Wrapper
First, we'll create a class that adapts our User entity to the UserDetails interface.
- Create a new package named
com.example.groupmanager.security. - Inside this package, create a new class named
CustomUserDetails. - This class will implement the
UserDetailsinterface.
package com.example.groupmanager.security;

import com.example.groupmanager.model.User;
import org.springframework.security.core.GrantedAuthority;
import org.springframework.security.core.authority.SimpleGrantedAuthority;
import org.springframework.security.core.userdetails.UserDetails;

import java.util.Collection;
import java.util.stream.Collectors;

public class CustomUserDetails implements UserDetails {

    private final User user;

    public CustomUserDetails(User user) {
        this.user = user;
    }

    @Override
    public Collection<? extends GrantedAuthority> getAuthorities() {
        // We assume your User entity has a getRoles() method that returns a Collection of Role entities
        // Each Role entity should have a getName() method that returns the role name (e.g., "ADMIN").
        // We must prefix the role name with "ROLE_" for Spring Security's role-based authorization to work.
        return user.getRoles().stream()
                .map(role -> new SimpleGrantedAuthority("ROLE_" + role.getName()))
                .collect(Collectors.toList());
    }

    @Override
    public String getPassword() {
        return user.getPassword();
    }

    @Override
    public String getUsername() {
        return user.getUsername();
    }

    // For simplicity, we'll return true for these.
    // In a real application, you might have columns in your User table for these states.
    @Override
    public boolean isAccountNonExpired() {
        return true;
    }

    @Override
    public boolean isAccountNonLocked() {
        return true;
    }

    @Override
    public boolean isCredentialsNonExpired() {
        return true;
    }

    @Override
    public boolean isEnabled() {
        return true;
    }
}
Note: Make sure your User entity has a getRoles() method that returns a Collection of your Role entities, and that your Role entity has a getName() method.
Step 2: Implement the UserDetailsService
Next, create the service that uses your UserRepository to find a user and wrap it in CustomUserDetails.
- Create a new class named
CustomUserDetailsServicein thecom.example.groupmanager.servicepackage. - This class will implement the
UserDetailsServiceinterface and should be annotated with@Service.
package com.example.groupmanager.service;

import com.example.groupmanager.model.User;
import com.example.groupmanager.repository.UserRepository;
import com.example.groupmanager.security.CustomUserDetails;
import org.springframework.beans.factory.annotation.Autowired;
import org.springframework.security.core.userdetails.UserDetails;
import org.springframework.security.core.userdetails.UserDetailsService;
import org.springframework.security.core.userdetails.UsernameNotFoundException;
import org.springframework.stereotype.Service;

@Service
public class CustomUserDetailsService implements UserDetailsService {

    @Autowired
    private UserRepository userRepository;

    @Override
    public UserDetails loadUserByUsername(String username) throws UsernameNotFoundException {
        User user = userRepository.findByUsername(username)
                .orElseThrow(() -> new UsernameNotFoundException("User not found with username: " + username));

        return new CustomUserDetails(user);
    }
}
By annotating this class with @Service, you make it a Spring bean. Spring Security is smart enough to automatically find any bean of type UserDetailsService in the application context and use it for authentication.
Step 3: Update the Security Configuration
Now, let's update SecurityConfig.java to use our new components and remove the old in-memory setup.
-
Remove the In-Memory
UserDetailsService: Delete theuserDetailsService()bean method that created theInMemoryUserDetailsManager. Spring will now automatically use yourCustomUserDetailsService. -
Add a
PasswordEncoderBean: TheUser.withDefaultPasswordEncoder()method we used is deprecated and insecure. Real applications must use a strong, one-way hashing algorithm for passwords.BCryptis the industry standard and Spring Security's recommended choice.Add the following bean to your
SecurityConfig.javaclass:import org.springframework.security.crypto.bcrypt.BCryptPasswordEncoder; import org.springframework.security.crypto.password.PasswordEncoder; // Inside the SecurityConfig class @Bean public PasswordEncoder passwordEncoder() { return new BCryptPasswordEncoder(); }Just like with the
UserDetailsService, Spring Security will automatically detect and use thisPasswordEncoderbean.
Step 4: Seed the Database with a Test User
Your database is likely empty, so there's no user to log in with. We need to add at least one user with an encoded password. A great way to do this during development is with a CommandLineRunner, which executes code on application startup.
Let's use this technique to create an "admin" user if one doesn't already exist.
🔐 Spring Security Basic Authentication Explained – Step by Step
The CodeSnippet video demonstrates a very practical way to initialize data when an application starts.
Watch the segment from here. The instructor creates a CommandLineRunner bean to check for and create an admin user on startup, including encoding the password. We will implement this exact pattern.
In your main application class (GroupManagerApplication.java), add the following bean. This will create an admin user with the password "password" and an ADMIN role the first time you run the application.
// In GroupManagerApplication.java

import com.example.groupmanager.model.Role;
import com.example.groupmanager.model.User;
import com.example.groupmanager.repository.RoleRepository;
import com.example.groupmanager.repository.UserRepository;
import org.springframework.boot.CommandLineRunner;
import org.springframework.context.annotation.Bean;
import org.springframework.security.crypto.password.PasswordEncoder;
import java.util.Set;

// Add this bean method inside the main application class
@Bean
CommandLineRunner run(UserRepository userRepository, RoleRepository roleRepository, PasswordEncoder passwordEncoder) {
    return args -> {
        // Only run this logic if you want to create a default admin and role
        // For example, you might check if the admin user already exists
        if (roleRepository.findByName("ADMIN").isEmpty()) {
            Role adminRole = roleRepository.save(new Role("ADMIN"));
            roleRepository.save(new Role("USER")); // Also create a USER role

            User adminUser = new User();
            adminUser.setUsername("admin");
            adminUser.setPassword(passwordEncoder.encode("password"));
            adminUser.setRoles(Set.of(adminRole));
            userRepository.save(adminUser);
        }
    };
}
Note: This assumes you have a Role entity and a corresponding RoleRepository. If you don't, you'll need to create them first based on our lessons from the Spring Data JPA module.
Step 5: Test Your Implementation
You're all set! Restart your application.
- The
CommandLineRunnerwill execute, creating theADMINandUSERroles, and anadminuser with an encrypted password in your database. You can verify this using your MySQL client. - Open Postman and try to access a protected endpoint from the previous lesson, for example,
POST /users. - In the "Authorization" tab, select "Basic Auth" and enter the username
adminand passwordpassword. - The request should now succeed because Spring Security authenticated your credentials against the data stored in your MySQL database. If you try with incorrect credentials or as a user without the
ADMINrole, you should receive a401 Unauthorizedor403 Forbiddenerror, respectively.
Conclusion
Congratulations! You have successfully transitioned your application's security from a fragile, in-memory setup to a robust, database-driven authentication system. This is a fundamental skill for any backend developer.
Key Takeaways:
- The
UserDetailsServiceinterface is the central component for loading user data from any source. - The
UserDetailsinterface provides a standard contract for Spring Security to access user credentials, authorities, and account status. - Using a wrapper class to implement
UserDetailsis a clean pattern that separates persistence concerns from security concerns. - Spring Boot's auto-configuration simplifies the process: just provide a
UserDetailsServicebean and aPasswordEncoderbean, and Spring Security will wire them up. - Using
BCryptPasswordEncoderis essential for securely storing passwords. - A
CommandLineRunneris a convenient tool for seeding your database with initial data during development.
We are now authenticating users against our database using HTTP Basic. However, this method requires sending credentials with every request and is not ideal for modern stateless APIs. In our next lesson, we will address this by building a dedicated login endpoint that generates a JSON Web Token (JWT), paving the way for a secure, token-based authentication scheme.