Welcome back! In our last session, you successfully built a login endpoint that issues a JSON Web Token upon successful authentication. We now have a way for clients to obtain a token, but our protected API endpoints don't yet know how to validate or use it. If you try to access a protected resource like GET /users, the request will still be denied because the server has no memory of the user's login.
This lesson will bridge that gap. We will implement a custom Spring Security filter that intercepts every incoming request. This filter will act as a gatekeeper: it will look for a JWT in the Authorization header, validate it, and if the token is legitimate, it will establish the user's identity for the duration of that request. Your experience with JWT middleware in your MERN stack project will be helpful here; the concept is identical—intercepting a request to perform authentication before it reaches the controller.
By the end of this lesson, you will have a fully functional, stateless authentication system where a valid JWT is the key to accessing protected resources.
The Anatomy of a JWT Request Flow
Before we write any code, let's visualize the process. When a client makes a request to a protected endpoint, it includes the JWT in the Authorization header, typically prefixed with "Bearer ". Our application needs to:
- Intercept the request.
- Extract the token from the header.
- Validate the token's signature and check if it has expired.
- Extract the user's identity (username) from the token.
- Load the user's details from the database to confirm they exist and get their roles/permissions.
- If all checks pass, inform Spring Security that the user is authenticated for this request.
- Allow the request to proceed to the controller.
The diagram below provides a detailed illustration of this entire flow, including both success and failure paths.
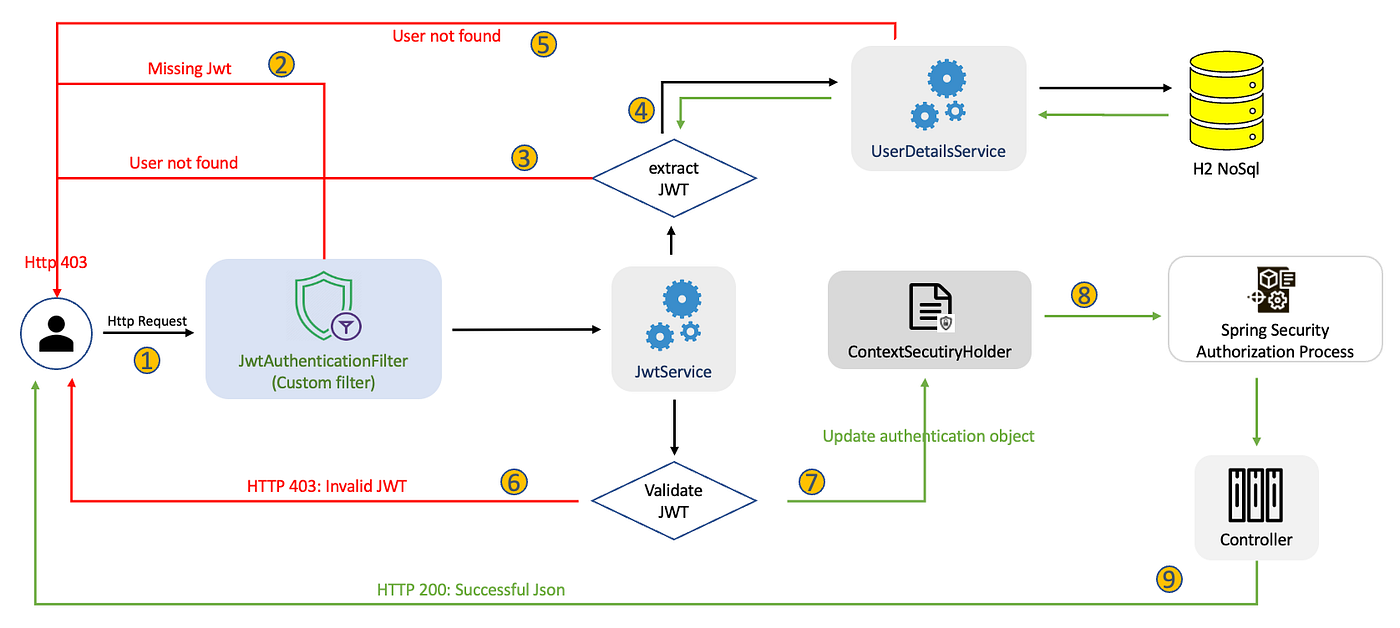
To implement this, we need to create a custom filter and integrate it into Spring Security's filter chain.
Step 1: Creating the JWT Authentication Filter
The heart of our solution is a custom filter class. Spring Security provides a convenient base class, OncePerRequestFilter, which ensures our filter logic is executed exactly once for each incoming request.
We will create a class named JwtAuthenticationFilter that extends OncePerRequestFilter and implements its core logic in the doFilterInternal method. This video from Teddy Smith provides a great walkthrough of the initial setup.
Spring Boot Security - JWT Filter
This video demonstrates how to create the JWT filter class and a helper method for extracting the token from the request.
Watch the first segment where the JwtAuthenticationFilter class is created, extending OncePerRequestFilter (class creation). Then, pay close attention to the implementation of the helper method to extract the JWT from the "Authorization" header, which handles the "Bearer " prefix (token extraction).
Now, let's create this class in your project.
- Create a new package named
com.example.groupmanager.config. - Inside this package, create a new Java class named
JwtAuthenticationFilter. - This class needs access to our
JwtService(to validate the token) andUserDetailsService(to load user data). We'll inject these using@Autowired.
Here is the complete code for JwtAuthenticationFilter.java. We'll break down the doFilterInternal method right after.
package com.example.groupmanager.config;

import com.example.groupmanager.service.JwtService;
import jakarta.servlet.FilterChain;
import jakarta.servlet.ServletException;
import jakarta.servlet.http.HttpServletRequest;
import jakarta.servlet.http.HttpServletResponse;
import org.springframework.beans.factory.annotation.Autowired;
import org.springframework.lang.NonNull;
import org.springframework.security.authentication.UsernamePasswordAuthenticationToken;
import org.springframework.security.core.context.SecurityContextHolder;
import org.springframework.security.core.userdetails.UserDetails;
import org.springframework.security.core.userdetails.UserDetailsService;
import org.springframework.security.web.authentication.WebAuthenticationDetailsSource;
import org.springframework.stereotype.Component;
import org.springframework.web.filter.OncePerRequestFilter;

import java.io.IOException;

@Component
public class JwtAuthenticationFilter extends OncePerRequestFilter {

    @Autowired
    private JwtService jwtService;
    @Autowired
    private UserDetailsService userDetailsService;

    @Override
    protected void doFilterInternal(
            @NonNull HttpServletRequest request,
            @NonNull HttpServletResponse response,
            @NonNull FilterChain filterChain) throws ServletException, IOException {

        // 1. Get the Authorization header from the request
        final String authHeader = request.getHeader("Authorization");

        // 2. Check if the header is null or doesn't start with "Bearer "
        if (authHeader == null || !authHeader.startsWith("Bearer ")) {
            filterChain.doFilter(request, response); // Pass to the next filter
            return;
        }

        // 3. Extract the JWT from the header
        final String jwt = authHeader.substring(7); // "Bearer ".length() is 7

        // 4. Extract the username from the JWT
        final String username = jwtService.extractUsername(jwt);

        // 5. If username exists and user is not already authenticated
        if (username != null && SecurityContextHolder.getContext().getAuthentication() == null) {

            // 6. Load user details from the database
            UserDetails userDetails = this.userDetailsService.loadUserByUsername(username);

            // 7. If the token is valid for this user
            if (jwtService.isTokenValid(jwt, userDetails)) {

                // 8. Create an authentication token
                UsernamePasswordAuthenticationToken authToken = new UsernamePasswordAuthenticationToken(
                        userDetails,
                        null, // Credentials are not needed as we use JWT
                        userDetails.getAuthorities()
                );

                // 9. Set details from the request
                authToken.setDetails(new WebAuthenticationDetailsSource().buildDetails(request));

                // 10. Update the SecurityContextHolder
                SecurityContextHolder.getContext().setAuthentication(authToken);
            }
        }

        // 11. Pass the request to the next filter in the chain
        filterChain.doFilter(request, response);
    }
}
Breaking Down doFilterInternal
The logic might seem complex, but it's a clear, sequential process. The article from OneUptime provides a well-commented code block that mirrors what we just wrote.
How to Implement JWT Authentication with Spring Security
This article provides an excellent breakdown of the JwtAuthenticationFilter. Reading through this section will reinforce your understanding of the code we just implemented.
Please read the section titled "JWT Authentication Filter". Focus on the sequence of checks: extracting the header, parsing the JWT, loading user details, and finally, updating the SecurityContextHolder.
The most critical part of this logic is step #10:SecurityContextHolder.getContext().setAuthentication(authToken);
This single line is what tells Spring Security, "For this specific request, the user is authenticated." Once this is set, Spring's authorization mechanisms (like the @PreAuthorize annotations we'll cover later) can use the user's details and authorities to make access control decisions.
Step 2: Integrating the Filter into the Security Chain
We've created our filter, but Spring Security doesn't know about it yet. We need to explicitly add it to the security filter chain in our SecurityConfig class. The goal is to place our JwtAuthenticationFilter before the standard UsernamePasswordAuthenticationFilter. This ensures our token-based logic runs first for every request.
The following video from Telusko clearly explains the concept and the configuration change required.
#38 Spring Security | Validating JWT Token
This video from Telusko explains why and how to add a custom filter to the Spring Security chain.
Watch the segment from this timestamp. The explanation of placing a custom JWT filter before the default UsernamePasswordAuthenticationFilter is the key takeaway here.
Let's apply this to our SecurityConfig.java.
- First, inject the
JwtAuthenticationFilterbean intoSecurityConfig. - Then, in the
securityFilterChainmethod, use.addFilterBefore()to add it to the chain.
Update your SecurityConfig.java file:
// In SecurityConfig.java

// ... other imports
import com.example.groupmanager.config.JwtAuthenticationFilter;
import org.springframework.security.web.authentication.UsernamePasswordAuthenticationFilter;

@Configuration
@EnableWebSecurity
public class SecurityConfig {

    @Autowired
    private CustomUserDetailsService userDetailsService;

    // Inject the custom filter
    @Autowired
    private JwtAuthenticationFilter jwtAuthFilter;

    // ... your PasswordEncoder and AuthenticationManager beans are here ...

    @Bean
    public SecurityFilterChain securityFilterChain(HttpSecurity http) throws Exception {
        http
            .csrf(csrf -> csrf.disable())
            .authorizeHttpRequests(authz -> authz
                .requestMatchers("/auth/login").permitAll()
                .requestMatchers(HttpMethod.POST, "/users").hasRole("ADMIN")
                .requestMatchers(HttpMethod.GET, "/users").hasRole("ADMIN")
                .anyRequest().authenticated()
            )
            .sessionManagement(session -> session.sessionCreationPolicy(SessionCreationPolicy.STATELESS))
            // Add our custom JWT filter before the standard authentication filter
            .addFilterBefore(jwtAuthFilter, UsernamePasswordAuthenticationFilter.class);

        return http.build();
    }
}
With this change, every request will now pass through our JwtAuthenticationFilter before any other authentication processing.
Step 3: Testing the Complete Authentication Flow
This is where all the pieces come together. Let's verify that our filter is working correctly.
Restart your Spring Boot application.
-
Test without a token:
- Open Postman and create a
GETrequest to a protected endpoint, for example,http://localhost:8080/users. - Do not add any authorization.
- Send the request. You should receive a
403 Forbiddenresponse. This confirms the endpoint is protected.
- Open Postman and create a
-
Obtain a token:
- Use the
POST /auth/loginrequest you created in the last lesson. - Send the
adminuser's credentials ({"username": "admin", "password": "password"}). - You will receive a JWT in the response body. Copy this token string.
- Use the
-
Test with a valid token:
- Go back to your
GET /usersrequest in Postman. - Click on the "Authorization" tab.
- Select "Bearer Token" from the "Type" dropdown.
- Paste the copied JWT into the "Token" field.
- Send the request.
- Go back to your
This time, you should receive a 200 OK response with the list of users. Success! Your JwtAuthenticationFilter correctly validated the token and granted access.
Conclusion
Fantastic work! You have now implemented the most critical piece of a stateless JWT authentication system. You created a custom filter that validates tokens on every request, effectively making your API accessible to authenticated clients while keeping it secure from unauthorized access.
Key Takeaways:
- A custom filter extending
OncePerRequestFilteris the standard way to add request-processing logic to the Spring Security chain. - The filter is responsible for extracting the JWT from the
Authorization: Bearer <token>header. - The
SecurityContextHolderis used to store the authentication details for a successfully validated user for the scope of a single request. - The
.addFilterBefore(myFilter, UsernamePasswordAuthenticationFilter.class)configuration is used to insert your custom filter at the correct position in the chain.
In this lesson and the previous one, we configured our session management policy to STATELESS. In our next lesson, we will delve deeper into what this means, ensuring our application relies completely on the JWT for its security state and does not create or use any server-side HTTP sessions.