Welcome to the third lesson in our journey through Java's fundamentals. In our last session, you successfully brought your Riddle class to life by creating objects and calling their methods. We saw how an object bundles its own state (data) and behavior (methods). However, we briefly noted a potential issue: direct, uncontrolled access to an object's internal data.
This lesson addresses that issue head-on by introducing encapsulation, a cornerstone of Object-Oriented Programming. You will learn to use Java's access modifiers—public, private, protected, and default—to control the visibility of your class members. This practice is not just about following rules; it's about building robust, secure, and maintainable software. For your goal of building enterprise-grade backend systems, mastering encapsulation is non-negotiable. It's how you ensure that complex components interact in predictable ways without corrupting each other's state.
Encapsulation: Protecting Your Object's Integrity
At its heart, encapsulation is the practice of bundling an object's data (fields) and the methods that operate on that data into a single unit—a class. More importantly, it involves hiding the internal state and requiring all interaction to happen through an object's public methods.
Think of a well-designed object as a "black box." You don't need to know its internal wiring to use it. You only need to know its public interface—the buttons and levers it exposes. This principle simplifies development and makes your code more resilient to change.
The video below provides a fantastic, practical introduction to encapsulation. The instructor demonstrates why you'd want to hide attributes and how to provide controlled access using special methods called getters and setters.
This video from Bro Code clearly explains the 'what' and 'why' of encapsulation in Java, focusing on the use of private fields with public getter and setter methods.
Watch the entire video (it's short and to the point). Pay close attention to these key moments: The core idea of hiding attributes and making them private. The error that occurs when you try to access a private field from outside the class. The solution: creating public "getter" methods to safely retrieve the data. The other half: creating public "setter" methods to safely modify the data.
As the video showed, the primary mechanism for achieving encapsulation is by marking fields private and exposing public methods to get and set their values. This gives you, the class designer, complete control. For example, a setter method could validate input before assigning it to a field, preventing invalid data from corrupting your object's state.
Java's Four Access Modifiers
Java provides four levels of access control using keywords known as access modifiers. Let's explore each one, from most restrictive to least restrictive. The Baeldung article "Access Modifiers in Java" is an excellent, professional-grade reference for this topic.
This article provides a clear definition and code examples for each of Java's four access modifiers. It's a comprehensive guide that we will refer to throughout this section.
As we discuss each modifier, I'll direct you to the relevant section in this article. For now, just have it open and ready.
1. private
This is the most restrictive and most commonly used modifier for fields.
- Rule: A
privatemember is accessible only from within the same class. It is completely hidden from the outside world. - Purpose: To enforce data hiding. This is the heart of encapsulation.
Java Access Modifiers (With Examples)
The Programiz article provides a perfectly clear example of using private fields with public getters and setters.
Please read the section on the Private Access Modifier. Notice how direct access to the name variable fails and how the getName() and setName() methods solve the problem.
2. public
This is the least restrictive modifier.
- Rule: A
publicmember is accessible from anywhere—any other class in any package. - Purpose: To define the public "contract" or API of your class. Constructors, methods that define the object's essential behaviors, and getter/setter methods are usually
public.
Refer back to the Baeldung article and read Section 3, "Public" and Section 4, "Private" for a formal review of these two essential modifiers.
3. default (Package-Private)
This is what you get when you don't write any access modifier.
- Rule: A member with
defaultaccess is visible to any other class in the same package, but not to classes in different packages. - Purpose: Useful for helper classes or utility methods that are part of a feature's implementation but shouldn't be part of the public API. It allows classes that work closely together to share implementation details without exposing them to the entire application.
In the Baeldung article, read Section 2, "Default" to see this in action.
4. protected
This modifier's behavior is closely tied to inheritance, a topic we'll explore more deeply soon.
- Rule: A
protectedmember is accessible within its own package (likedefault) AND by subclasses in other packages. - Purpose: To allow a subclass to access and potentially modify or extend the behavior of its parent class, even if it's in a different part of the application.
Now, read Section 5, "Protected" in the Baeldung article.
This video from Telusko provides a great live-coding session that demonstrates how these modifiers behave across different packages, which can help solidify your understanding.
This video walks through creating classes in different packages and attempts to access members with different modifiers, showing you the compiler errors that arise.
Watch these segments to see the modifiers in action: public: Accessing a public method from another package. private: The effect of making a variable private, even within the same package. default: Demonstrating default access within the same package. protected: The tricky case, showing how a protected member is not accessible from a different package unless it's through a subclass.
Summary of Visibility
The rules can be a bit much to remember at first, so a summary table is extremely helpful.
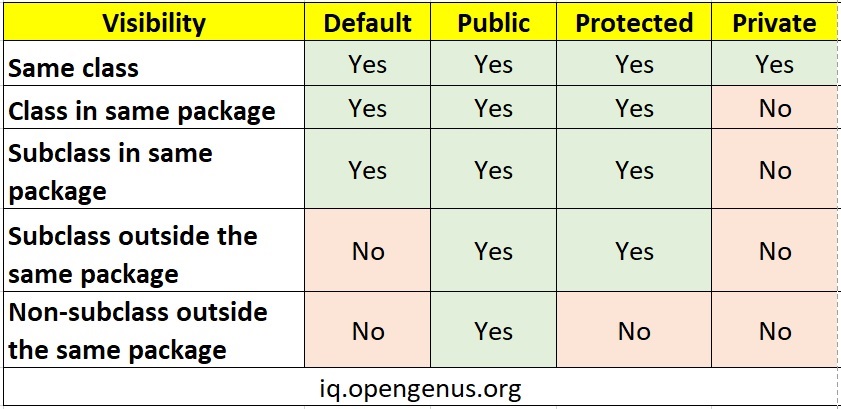
As you can see:
privateis only for the class itself.defaultadds visibility to the package.protectedadds visibility for subclasses anywhere.publicmakes it visible to the world.
The core principle, as stated in the conclusion of the Baeldung article, is this: "It’s good practice to use the most restrictive access level possible for any given member to prevent misuse. We should always use the private access modifier unless there’s a good reason not to."
Your Turn: Encapsulating the Riddle
It's time to apply these principles to the Riddle class you've been working on. Your task is to refactor it to be properly encapsulated.
Instructions:
- Open your
Riddle.javafile. - Change the access modifier for the
questionandanswerfields fromdefault(orpublic, if you had made them so) toprivate.private String question; private String answer; - In the previous lesson, you had a
printAnswer()method. This is okay, but it's more flexible and conventional to provide a "getter" method that returns the value, allowing the calling code to decide what to do with it (e.g., print it, store it, compare it).- Delete the
printAnswer()method. - Create a new
publicmethod calledgetAnswer()that takes no arguments and returns theStringvalue of theanswerfield.
public String getAnswer() { return this.answer; } - Delete the
- Your
printQuestion()method is fine as it is, as it's a behavior of the riddle itself. You don't need to change it. - Now, open your
Main.javafile. Your old code for printing the answer,riddle1.printAnswer(), will no longer compile! - Modify your
mainmethod to use the new getter. Instead of callingprintAnswer(), you will now get the string and print it yourself:// Old way (will cause an error now): // riddle1.printAnswer(); // New, encapsulated way: String retrievedAnswer = riddle1.getAnswer(); System.out.println(retrievedAnswer); // Or more concisely: System.out.println(riddle1.getAnswer()); - Run your
Mainclass. The output should be identical to the previous lesson's, but yourRiddleclass is now more secure, robust, and well-designed.
By completing this exercise, you have successfully used private and public modifiers to implement encapsulation, protecting your object's data while providing a controlled, public interface for interaction.
Key Takeaways
- Encapsulation is a core OOP principle of hiding an object's internal state and exposing functionality through a public interface.
- It's achieved in Java using access modifiers.
- Java has four access modifiers:
public,protected,default, andprivate. - The best practice is to make all fields
privateto protect data integrity. - Provide
public"getter" and "setter" methods to allow controlled access to private fields. - Always use the most restrictive access level that makes sense for a class member.
What's Next?
So far, every field and method we've discussed (question, answer, getAnswer()) has belonged to a specific instance of a class. riddle1 has its own question, and riddle2 has its own. But what if you need a field or method that is shared by all instances of a class?
In the next lesson, we will explore the static keyword. You'll learn the crucial difference between instance members (belonging to an object) and static members (belonging to the class itself), and we'll clarify the meaning of public static void main(...) once and for all.