Welcome back! In our previous lesson, you successfully created your first Spring Boot project using Spring Initializr, including the essential Spring Web dependency. You now have a clean, runnable application skeleton, and you understand its basic structure, including the role of the pom.xml file.
Today, we will bring that skeleton to life. This lesson directly addresses your goal of building backend systems by teaching you how to define REST endpoints for the fundamental CRUD (Create, Read, Update, Delete) operations. We will use a set of powerful Spring annotations to map incoming HTTP requests to specific Java methods, effectively creating the public-facing entry points for your API.
By the end of this lesson, you will be able to build a complete, albeit simple, REST controller that can manage a collection of resources entirely in memory.
The Role of the Controller in a REST API
Before we write any code, let's visualize where our work today fits into the larger application architecture. A Controller is the component responsible for receiving and handling incoming HTTP requests from a client (like a browser or your Postman application). It acts as the dispatcher, interpreting the request's URL and HTTP method (GET, POST, etc.) and invoking the appropriate business logic.
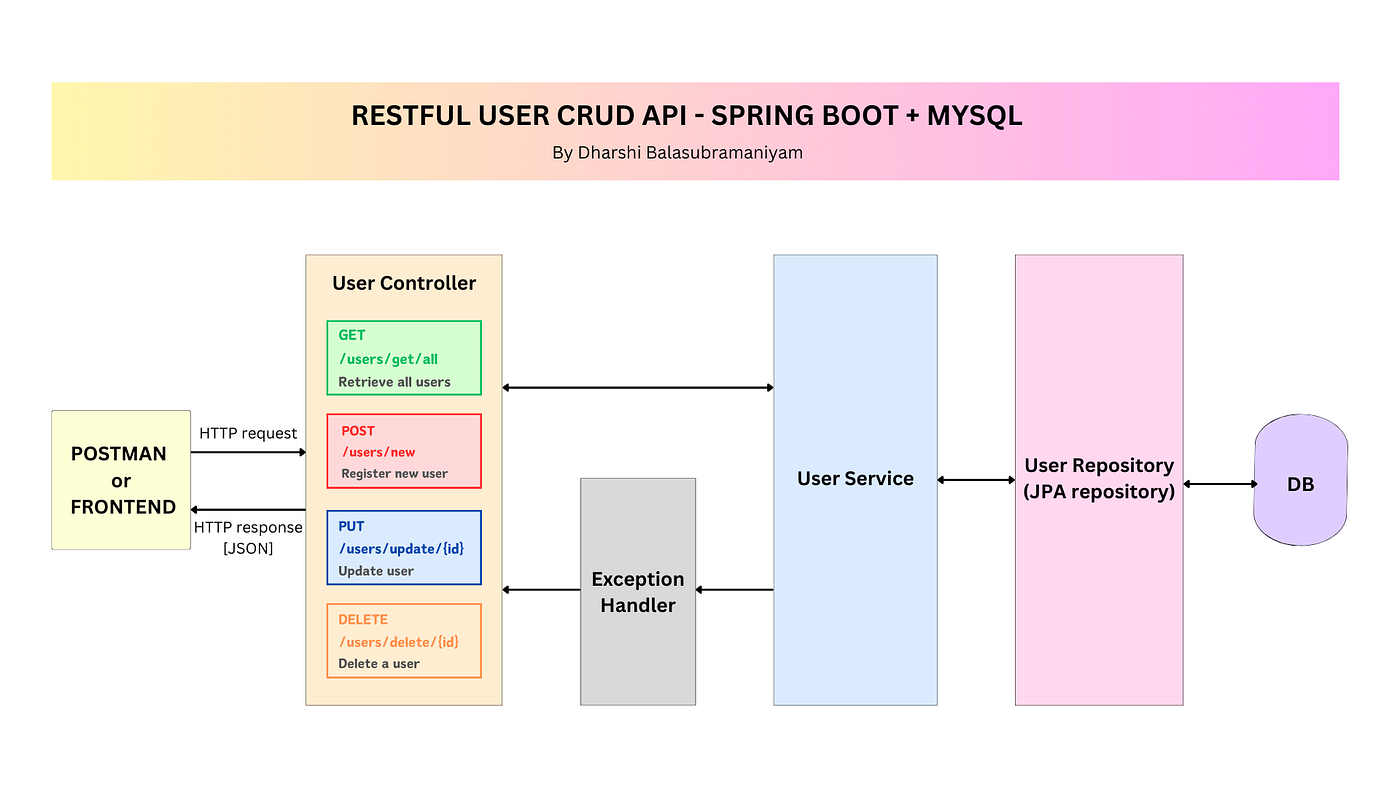
In Spring, we create a REST controller by annotating a Java class with @RestController. This special annotation tells Spring two things:
- This class is a Spring-managed component that should be scanned for request mappings.
- The return value of its methods should be automatically serialized (usually to JSON) and written directly into the HTTP response body. This is perfect for APIs.
The annotations we'll use today are central to building REST services in Spring.

Building Your First REST Controller
Let's start building. We'll create a controller to manage a collection of "meetup groups." To keep things focused on the controller, we will use a simple in-memory ArrayList as our data store. We will integrate a real database in Module 10.
The following article provides a clear, concise example of a complete CRUD controller. We will use its code as our foundation.
Building a Spring Boot 4 REST API the Fast Way - Dan Vega
This article by Dan Vega demonstrates how to build a full set of CRUD endpoints using an in-memory list, which perfectly isolates the controller logic we want to focus on.
First, open the project you created in the last lesson. Start by reading the section Defining the Data Model. Create the Group record in a new group package within your project (e.g., com.example.restdemo.group). A Java record is a modern, concise way to declare immutable data-carrier classes, making it ideal for our API's data model. Next, read through the code in the section Building the REST Controller. Create this GroupController class in the same group package. Finally, review the explanation of the annotations in the section Annotation Breakdown to solidify your understanding of what each one does.
Deconstructing the CRUD Endpoints
Now that you have the complete code in your project, let's walk through each CRUD operation to understand exactly what's happening.
1. Read (GET)
Retrieving data is the most common API operation. Our controller has two GET endpoints.
-
Get All Groups:
findAll()@GetMapping List<Group> findAll() { return groups; }The
@GetMappingannotation maps HTTPGETrequests to this method. Since it has no path specified, it defaults to the base path defined on the class:/api/groups. When a client sends aGETrequest tohttp://localhost:8080/api/groups, this method is executed, and the entiregroupslist is returned as a JSON array. -
Get One Group by ID:
findById()@GetMapping("/{id}") Group findById(@PathVariable Long id) { // ... logic to find group by id }This
@GetMappingincludes a path variable, denoted by{id}. The@PathVariableannotation on theidmethod parameter tells Spring to extract the value from that part of the URL and pass it into the method. AGETrequest to/api/groups/1will execute this method withidequal to1.
2. Create (POST)
To create a new resource, clients send a POST request.
@PostMapping
@ResponseStatus(HttpStatus.CREATED)
Group create(@RequestBody Group group) {
    // ... logic to create and add a new group
}
@PostMapping: Maps HTTPPOSTrequests to/api/groups.@RequestBody: This is a crucial annotation. It tells Spring to deserialize the JSON body of the incoming request into aGroupobject. Your experience with sending JSON payloads in Postman for your MERN projects is directly applicable here.@ResponseStatus(HttpStatus.CREATED): This is good practice. It changes the default HTTP status code for a successful response from200 OKto201 Created, which is the semantic standard for a successful resource creation.
3. Update (PUT)
To update an existing resource, clients use a PUT request.
@PutMapping("/{id}")
Group update(@PathVariable Long id, @RequestBody Group group) {
    // ... logic to find, update, and save the group
}
This endpoint combines concepts we've already seen. @PutMapping("/{id}") maps PUT requests for a specific resource. It uses @PathVariable to identify which group to update and @RequestBody to get the new data for that group.
4. Delete (DELETE)
Finally, to remove a resource, clients send a DELETE request.
@DeleteMapping("/{id}")
@ResponseStatus(HttpStatus.NO_CONTENT)
void delete(@PathVariable Long id) {
    // ... logic to find and remove the group
}
The @DeleteMapping("/{id}") annotation maps DELETE requests to a specific resource ID. The method uses @PathVariable to get the ID and then removes the corresponding group from the list. Notice the method returns void and we use @ResponseStatus(HttpStatus.NO_CONTENT) (204), which is the standard response for a successful deletion where there is no content to return.
Testing Your API with Postman
You now have a fully functional in-memory REST API. It's time to test it. Since you are already proficient with Postman, this is the perfect opportunity for hands-on practice.
Run your Spring Boot application. Then, open Postman and create requests for each of the endpoints you just built.
Building a Spring Boot 4 REST API the Fast Way - Dan Vega
This article provides curl commands for testing each endpoint. Your task is to replicate these tests using Postman.
Read the section Testing the API. For each curl example, create a corresponding request in Postman. For the POST and PUT requests, remember to set the body to "raw" and the type to "JSON", then paste in the example JSON payload. Follow a logical sequence: GET all (see initial data), POST a new group, GET all again (see the new group), PUT to update it, GET just that one to see the change, and finally DELETE it.
This hands-on exercise will solidify your understanding of how HTTP methods, URLs, path variables, and request bodies work together to form a RESTful API.
Conclusion
In this lesson, you've made a significant leap from a blank project to a functional REST API. You've learned how to use Spring's powerful annotations to define a controller and map HTTP requests for all four CRUD operations.
Key Takeaways:
- A
@RestControlleris a Spring component that handles HTTP requests and returns data directly in the response body. - Mapping annotations
@GetMapping,@PostMapping,@PutMapping, and@DeleteMappingbind HTTP methods and URL patterns to your Java methods. @PathVariableextracts values from the URL path (e.g.,/api/groups/{id}).@RequestBodydeserializes an incoming JSON payload into a Java object.@ResponseStatuscan be used to control the HTTP status code of the response.
You have now seen @PathVariable and @RequestBody in a practical context. In our next lesson, we will formalize our understanding of how to handle incoming HTTP data by exploring these annotations in more detail and introducing a third one: @RequestParam.