In our last session, we prepared the software foundation for our project by setting up a dedicated Python virtual environment and installing the necessary libraries for computer vision and IoT communication. Your system is now primed for the next major component: the communication backbone.
Today, we will install and configure the core messaging service for your IoT system: an MQTT broker. We will explore what MQTT is, install a popular broker called Mosquitto, and then configure your system's firewall to allow devices on your local network to communicate with it. This step is critical for bridging the gap between your gesture recognition application and the IoT devices it will control.
The MQTT Architecture
At the heart of many IoT systems is a messaging protocol designed for low-bandwidth, high-latency, or unreliable networks. The dominant protocol in this space is MQTT (Message Queuing Telemetry Transport). It operates on a publish-subscribe model, which decouples message producers (publishers) from message consumers (subscribers).
This architecture consists of three main components:
- Publisher: A client that sends messages. In our project, the gesture recognition script will be a publisher, sending commands like "swipe-left" or "fist-closed".
- Subscriber: A client that receives messages. Our simulated IoT device script will be a subscriber, listening for commands.
- Broker: A central server that receives all messages from publishers and routes them to the appropriate subscribers. This is the piece we will install today.
The diagram below illustrates this relationship. Your gesture recognition PC will host the MQTT Broker, and it will also run the gesture client (a publisher). A future device (or our simulated client script) will act as a subscriber.
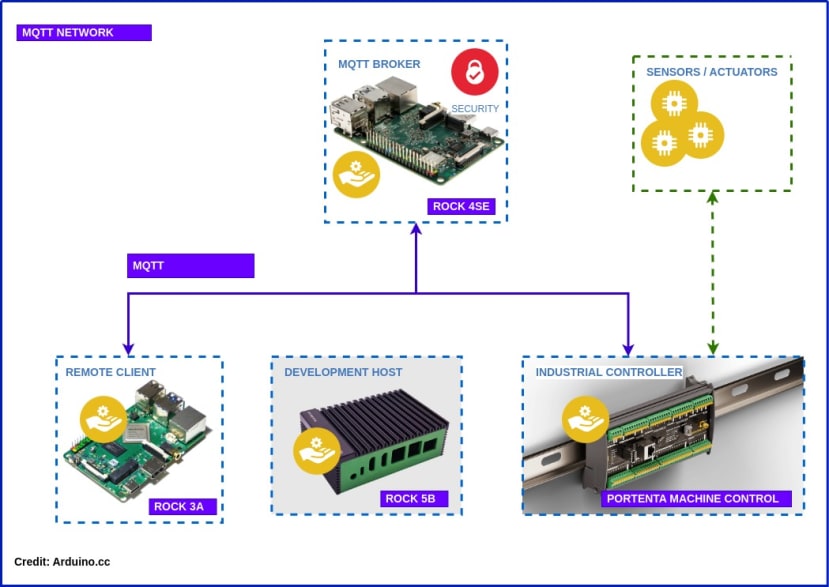
This diagram shows the relationship between an MQTT broker (running on a ROCK 4SE board), and various clients like a remote client, development host, and an industrial controller. The broker acts as a central hub for all MQTT communication.
We will be using Mosquitto, a lightweight and widely used open-source implementation of an MQTT broker.
1. Installing the Mosquitto Broker
On Rocky Linux, Mosquitto is available through the EPEL (Extra Packages for Enterprise Linux) repository. We'll first enable this repository and then install the mosquitto package.
The following resource provides the exact commands for this process.
This guide shows the straightforward process of installing Mosquitto on Rocky Linux 9 and setting it up as a system service.
Please open a terminal on your Rocky Linux machine and follow these steps: In the Installation section, find the commands to install EPEL and Mosquitto. You can combine them into a single command: sudo dnf -y install epel-release mosquitto. You can skip the dnf -y upgrade command, as we've done this in a previous lesson. Next, in the Enable/Start Mosquitto section, execute the command shown to enable and start the Mosquitto service.
Let's break down that last command: sudo systemctl enable --now mosquitto.
systemctlis the standard tool for managingsystemdservices in modern Linux distributions.enableensures the service will start automatically when you boot your system.--nowstarts the service immediately in the current session.
You can verify that the service is running with the command: sudo systemctl status mosquitto. You should see output indicating it is active (running).
2. Allowing Network Connections
Simply installing and running the broker isn't enough. By default, Mosquitto may only listen for connections on localhost (the machine itself), and the system's firewall will block incoming connections from other devices on your network. To build a true IoT system, the broker must be accessible over the local network.
The following video demonstrates this exact problem on a different Linux distribution. The presenter discovers that they can connect using localhost, but connecting via the machine's IP address results in a "connection refused" error.
Install Mosquitto Mqtt Broker on Ubuntu 20.04
This video by ADTechKnow provides a clear, practical demonstration of why a default broker setup often fails for network connections and how to fix it.
Watch the segment from testing with an IP address. Observe how the connection fails when using the computer's IP address and how the presenter solves it by creating a configuration file that explicitly tells Mosquitto to listen for external connections.
The video's solution involves creating a custom configuration file. While this works, the more standard and secure approach on a system like Rocky Linux is to use its built-in firewall manager, firewalld, to open the necessary port. This is what we will do next.
3. Configuring the Firewall with firewalld
firewalld is the default tool for managing firewall rules on Rocky Linux. It uses the concept of "zones" (like public, home, work) to apply different rule sets depending on the network environment. For our purposes, we will add a rule to the default public zone to allow traffic on the standard MQTT port, which is 1883/tcp.
The DigitalOcean guide below is an excellent, detailed resource for firewalld. We'll use it to perform the specific steps needed.
How To Set Up a Firewall Using firewalld on Rocky Linux 9 | DigitalOcean
This guide covers the fundamentals of firewalld. We will use it to ensure the service is running and then to open the port for our MQTT broker.
First, read the section Installing and Enabling firewalld. You don't need to install it, as it's included with your 'Server with GUI' installation, but run the sudo firewall-cmd --state command to confirm it's running. Next, it's important to understand rule permanence. Read the brief introduction to this concept. By default, changes are temporary. We must use the --permanent flag to make our new rule survive a reboot. Finally, we will add the rule. Navigate to the subsection Opening a Port. Based on the examples there, run the following command in your terminal to open the standard MQTT port (1883) for TCP traffic. The --permanent flag ensures the change is saved.
sudo firewall-cmd --zone=public --add-port=1883/tcp --permanent
After adding a permanent rule, you must reload the firewall for the changes to take effect in the current session.
sudo firewall-cmd --reload
You can now verify that the port is open in your permanent configuration by running:
sudo firewall-cmd --list-ports --permanent
You should see 1883/tcp in the output. Your MQTT broker is now installed, running as an automated service, and accessible to other devices on your local network.
Conclusion
In this lesson, you established the central communication hub for your IoT project. You installed the Mosquitto MQTT broker, configured it to run automatically as a system service, and crucially, you configured the system firewall to allow network traffic to reach it. This moves us from setting up a standalone machine to building a networked system.
Key Takeaways:
- MQTT is a lightweight publish-subscribe protocol ideal for IoT, consisting of publishers, subscribers, and a central broker.
- Mosquitto is a popular open-source MQTT broker installed from the EPEL repository on Rocky Linux.
- System services are managed with
systemctl, allowing them to be enabled at boot and started immediately. firewalldis the tool used to manage network security on Rocky Linux. By default, it blocks incoming connections.- To allow network access to a service, you must open its specific port (e.g.,
1883/tcpfor MQTT) usingfirewall-cmdand make the rule--permanent.
Now that the broker is running and accessible, the next logical step is to ensure it works as expected. In our next lesson, we will perform an end-to-end test by using command-line tools to publish a message from one terminal and see it received in another, confirming that our communication backbone is solid.