Hello! Welcome back to our module on dialogue cleanup.
In the last lesson, we focused on the first crucial step of audio post-production: removing unwanted sounds. You learned how to use tools like noise reduction, notch filters, and noise gates to get a clean audio track, free from distracting hums and hisses.
Now that our audio is clean, we can move on to the second step: shaping the sound of the dialogue itself. Our goal today is to make the voice sound not just clean, but also clear, full, and professional. This is where Equalization, or EQ, comes in. Think of it like this: noise reduction was like cleaning a dusty window. EQ is like adjusting the focus on your camera to make the subject sharp and perfectly defined.
By the end of this lesson, you will be able to apply equalization (EQ) to enhance clarity and reduce muddiness in dialogue.
1. What is EQ and Why Isn't There a "Magic Preset"?
You may have seen tutorials or plugins that promise a "perfect vocal EQ" with a single click, often using a "V-shaped" curve that boosts the bass and treble. While tempting, this one-size-fits-all approach rarely works in the real world.
To understand why, let's start with a video that challenges this idea and explains why a thoughtful approach to EQ is necessary.
You Are Ruining Your Audio! - How to EQ voice properly
The video 'You Are Ruining Your Audio! - How to EQ voice properly' from Julian Krause provides an excellent explanation of why you can't rely on EQ presets. It highlights how different voices, microphones, and recording environments all require unique adjustments.
Watch the first 3 minutes of the video (from 00:00 to 03:00). Pay close attention to the examples showing how the same EQ curve sounds drastically different on various microphones.
As you saw, the effectiveness of any EQ adjustment depends entirely on the source audio. An Equalizer is simply a tool that allows you to adjust the volume of specific frequency ranges within the audio spectrum. To use it well, you first need to learn what those frequency ranges sound like.
2. The Language of Frequencies: From "Mud" to "Air"
To effectively EQ dialogue, you need to translate what you're hearing (e.g., "this sounds muddy") into a specific frequency range you can adjust. The following video provides a clear, practical vocabulary for describing the key frequencies of the human voice.
How To EQ Dialogue Like A Pro in DaVinci Resolve
The video 'How To EQ Dialogue Like A Pro' by Thom Lyons is a fantastic, comprehensive guide. We will use it as the backbone for this lesson. Let's start by learning the essential frequency zones for dialogue.
Watch from the beginning to 03:17. This section explains what EQ is and then defines the different frequency bands and the character they give to a voice (e.g., rumble, boom, muddiness, presence, air).
Here is a summary of those key frequency ranges. Think of this as your EQ cheat sheet:
| Frequency Range | Description | Impact on Dialogue |
|---|---|---|
| Below 80-100 Hz | Rumble | Not part of the voice. Just noise from traffic, mic handling, or AC. |
| 100 - 250 Hz | Boom / Body | The fundamental frequency of the voice. Gives it weight and fullness. Too much sounds "boomy." |
| 250 - 600 Hz | Muddiness / Boxiness | The most common problem area. Too much makes a voice sound muffled and unclear. |
| 600 Hz - 1.5 kHz | Nasality / Honk | Can make a speaker sound like they're talking through their nose. |
| 1.5 - 5 kHz | Presence / Clarity | The magic zone for intelligibility. Makes a voice cut through. Too much can sound harsh. |
| 5 - 8 kHz | Sibilance | The sharp "s" and "t" sounds. Boosting here can be painful to listen to. |
| 8 - 20 kHz | Air / Sparkle | Adds a sense of openness and detail, like lifting a blanket off the sound. |
This image provides a great visual summary of where to make adjustments for vocal clarity.

3. The Professional Workflow: Surgeon and Sculptor
Amateurs often randomly tweak EQ knobs until something sounds different. Professionals use a system. The video from Thom Lyons introduces a powerful two-phase approach that we will adopt.
How To EQ Dialogue Like A Pro in DaVinci Resolve
Let's return to the 'How To EQ Dialogue Like A Pro' video to learn about this systematic workflow.
Watch the segment from 04:37 to 06:00. Focus on understanding the two phases (Corrective vs. Enhancement) and the critical advice about mixing in context (i.e., not using the 'solo' button for final decisions).
The process is simple and repeatable:
- Phase 1: Be a Surgeon (Corrective EQ). First, we clean up the audio by surgically cutting problematic frequencies like rumble, muddiness, and annoying resonances. The goal is to remove the bad stuff.
- Phase 2: Be a Sculptor (Enhancement EQ). Once the audio is clean, we can shape the tone by using broad, gentle boosts to enhance desirable qualities like clarity, presence, and warmth. The goal is to bring out the good stuff.
Now, let's put this workflow into practice.
4. Phase 1 in Practice: Corrective EQ
Our first job is to remove the frequencies that are cluttering up the dialogue.
Step 1: The High-Pass Filter (HPF)
This is the first move you should make on almost every dialogue track. A high-pass filter (also called a low-cut) does exactly what its name says: it lets the high frequencies pass through while cutting the low frequencies. Since the human voice doesn't contain useful information below 80-100 Hz, we can safely cut this area to eliminate low-end rumble without negatively affecting the voice.
How To EQ Dialogue Like A Pro in DaVinci Resolve
Let's see how to apply a high-pass filter in practice.
Watch the short clip from 06:29 to 06:52 to see a demonstration of applying a high-pass filter.
Step 2: Removing Mud and Nasality
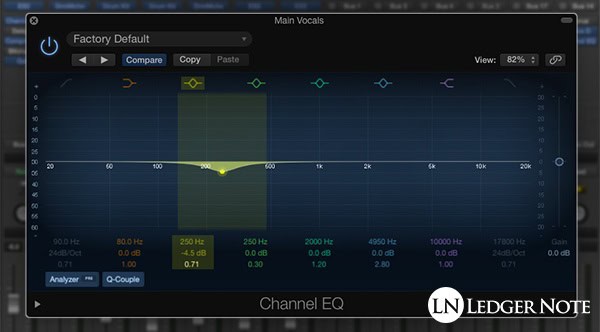
This is where we address the most common problem in dialogue: a "muddy" or "boxy" sound, typically living in the 250-600 Hz range. To find and fix these problem areas, we'll use a technique called Boost, Sweep, and Cut.
How To EQ Dialogue Like A Pro in DaVinci Resolve
This technique is a core skill in audio engineering. Watch how it's done.
Watch from 07:20 to 08:16. The presenter demonstrates how to use a narrow, boosted EQ band to 'sweep' through the frequencies and find the exact spot that sounds worst, and then cut it.
The "Boost, Sweep, Cut" method is as follows:
- Select an EQ band (a "bell" filter).
- Boost the gain way up (e.g., +10 dB).
- Make the bandwidth (or "Q factor") very narrow.
- Sweep the frequency control slowly through the low-mids (250 Hz) up to the high-mids (1.5 kHz).
- Listen for a frequency that suddenly jumps out, resonates, or sounds particularly ugly.
- When you find it, Cut that frequency by changing the gain from a big boost to a gentle cut (e.g., -3 to -5 dB). You can also widen the Q factor slightly after finding the frequency.
5. Phase 2 in Practice: Enhancement EQ
With the problem frequencies removed, our audio is clean but might sound a bit thin or dull. Now we can act as a sculptor, adding broad, gentle boosts to bring out the best qualities of the voice.
The golden rule of enhancement is: use wide bandwidths (low Q) and subtle boosts (1-3 dB). Narrow boosts sound unnatural and weird.
How To EQ Dialogue Like A Pro in DaVinci Resolve
Now for the fun part: making the dialogue shine. Let's see how to add body, clarity, and air.
Watch from 08:35 to 10:03. This section covers how to use wide, gentle boosts to add weight back, enhance clarity in the crucial 2-5 kHz range, and add 'air' with a high-shelf boost.
The key enhancement moves are:
- Add Body/Weight: If the high-pass filter made the voice too thin, a very gentle, wide boost around 120-250 Hz can add some fullness back.
- Add Clarity/Presence: A wide boost of 1-3 dB somewhere in the 2-5 kHz range is the key to making dialogue cut through a mix and sound intelligible. Find the "sweet spot" that adds clarity without sounding harsh.
- Add Air/Sparkle: A "high-shelf" boost, which lifts all frequencies above a certain point (e.g., 8-12 kHz), can add a sense of openness and professional polish.
Test your understanding!
You are editing dialogue for a short film. The audio was recorded in a small, untreated room. The voice sounds clean (no hum or hiss), but it's difficult to understand and sounds like it was recorded in a cardboard box.
Based on the two-phase workflow, what are the first two EQ adjustments you would try to make, and what is your reasoning for each?
Show answer
- First Adjustment (Corrective): Apply a high-pass filter at around 80-100 Hz. This is always the first step to remove any inaudible low-frequency rumble that might be cluttering the sound.
- Second Adjustment (Corrective): Use the "Boost, Sweep, Cut" technique to find and reduce the "boxy" or "muddy" frequencies, which are likely in the 250-600 Hz range. The description "recorded in a cardboard box" is a classic sign of too much energy in this specific frequency range.
After these corrective steps, you would then move to the enhancement phase to boost for clarity.
Conclusion
Mastering EQ is a skill that blends technical knowledge with critical listening. It's one of the most powerful tools you have to elevate your audio from amateur to professional. By thinking of it as a two-step process—first surgery, then sculpting—you can approach any dialogue track with a clear, repeatable workflow.
Key Takeaways:
- There is no "one-size-fits-all" EQ. Every voice and recording is unique.
- Learn the vocabulary of frequencies to translate what you hear into actionable adjustments (e.g., "muddiness" is ~250-600 Hz).
- Follow the two-phase workflow: Corrective EQ first (high-pass filter, narrow cuts) to clean up problems, then Enhancement EQ second (wide, gentle boosts) to shape the tone.
- The "Boost, Sweep, Cut" technique is the best way to find and remove ugly resonances.
- The 2-5 kHz range is key for clarity, but be careful not to make the voice sound harsh.
- Always compare your changes to the original audio (A/B testing) to make sure you're actually improving it. The best EQ is often the EQ you don't notice.
Next Lesson Preview:
We've now cleaned our dialogue (removing noise) and shaped its tone (using EQ). The voice is clear and pleasant. However, in any natural performance, some words will be louder and others quieter. If you set the volume for the quiet words, the loud ones might be jarring. If you set it for the loud words, the quiet ones might get lost.
In our next lesson, we will solve this problem by learning to use compression to balance the dynamic range of recorded audio, ensuring every word is heard clearly and consistently.