Hello! Welcome to the first lesson in our new module, "The Editor's Craft: Pacing and Continuity."
In the previous module, we focused entirely on capturing high-quality sound on set. You learned how to record clean dialogue, capture ambient room tone, and even hunt for specific "wild sounds" to build your film's sonic world. This leaves us with a common and crucial situation in filmmaking: video files from your camera and high-quality audio files from a separate recorder. Our first job in post-production is to bring them together.
Today's lesson addresses exactly that. Your goal is to learn how to sync separately recorded audio with video footage using a slate or waveform analysis. This is a fundamental technical skill that bridges the gap between production and post-production, ensuring the sights and sounds of your story are perfectly aligned.
Why We Sync and What You Need
First, let's quickly recap why we go to the trouble of recording audio separately. It allows us to place the best microphone in the ideal position for sound quality, independent of the camera's position. But this creates the challenge of syncing.
Perfectly synced audio is an invisible art; when it's right, the audience is simply immersed in the story. When it's wrong, even by a few frames, it's jarring and immediately signals an amateur production.
To make syncing easy, there are a few simple habits that can save you hours of frustration.
How to Sync Audio to Video A Practical Guide
This article, 'How to Sync Audio to Video A Practical Guide,' explains the importance of setting yourself up for success before you even start editing. It introduces three key concepts that form the foundation of a smooth syncing workflow.
Read the section titled 'Setting Up Your Files for an Easy Sync.' Pay close attention to the three core ideas discussed: organizing your files, creating a clear sync point, and the power of 'scratch audio.'
As the article highlights, there are two key ingredients for an easy sync:
- A Sync Point: A specific moment that creates both a sharp visual cue and a loud, distinct sound.
- Scratch Audio: The (often low-quality) audio recorded by the camera's internal microphone. This isn't for your final film, but it serves as an essential reference track for the software.
Now, let's look at the primary methods for creating and using these sync points.
Method 1: The Slate (Manual Syncing)
The most iconic tool for syncing is the clapperboard, also known as a slate. It’s not just a prop for behind-the-scenes photos; it's a professional tool designed to solve this exact problem. The closing of the sticks provides a single frame where the visual and audio align perfectly.
The video below explains the function of a slate and the professional practices for using one on set.
How To Slate On Set | Clapperboard Tutorial for 2nd ACs
This tutorial from Deity Microphones, 'How To Slate On Set,' breaks down what a slate is and how it's used. Understanding this will give you insight into professional workflows, even if you use a simpler method for your own projects.
Watch the following sections: What is a Slate? (00:33 - 00:50): This explains the core purpose of the slate for syncing. How to Mark a Scene (03:05 - 04:48): This section demonstrates the practical use of a slate and introduces important terminology like 'head sticks' (at the start of a take), 'tail sticks' (at the end), and 'MOS' (for a shot with no sound).
If you don't have a slate, don't worry! A single, sharp hand clap in front of the camera achieves the exact same goal.
The Technique in Practice
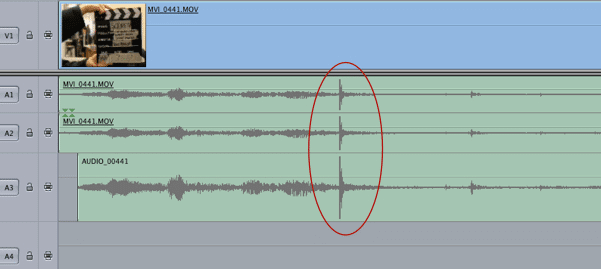
In your editing software, this sync point becomes your guide. The sharp sound of the slate or clap creates a distinct "spike" in the audio waveform. Your job is to align the spike from your high-quality external audio with the spike from your camera's scratch audio, at the exact frame where you see the visual impact.

The process is straightforward:
- Place your video clip (with its scratch audio) and your external audio clip on separate tracks in your timeline.
- Zoom in on the timeline to clearly see the audio waveforms.
- Locate the audio spike from the clap on both your scratch audio and your external audio.
- Slide the external audio clip left or right until its spike lines up perfectly with the scratch audio's spike.
- Play back the clip. The audio should sound unified, with no echo.
- Once aligned, you can mute or delete the scratch audio track.
Method 2: Waveform Analysis (Automated Syncing)
While manual syncing is a vital skill, modern editing software can automate this process with incredible accuracy. This feature analyzes the scratch audio waveform from your video file and compares it to the waveform of your external audio file, automatically aligning them.
Since you have experience with CapCut, let's see exactly how this works in that program. The following tutorial demonstrates both the automated feature and the manual method within CapCut.
How To Sync Audio And Video In CapCut PC (Automatic And Manual Methods - 2025 Tutorial)
This tutorial, 'How To Sync Audio And Video In CapCut PC,' will walk you through the practical steps for both automatic and manual syncing. This directly applies the concepts we've discussed to software you're already familiar with.
Please watch the full tutorial, paying close attention to the two distinct workflows: Automatic Sync (00:36 - 06:28): Follow the process of importing clips, highlighting them, and using the 'Sync video to audio' feature. Notice the important cleanup steps he takes afterward. Manual Sync (06:28 - 10:42): This section provides a great practical demonstration of the manual method we just discussed, showing you the specific tools in CapCut for adjusting track height and zooming in to align the waveforms from a clap.
As you can see, the automated tool is a massive time-saver. It's the method you'll likely use most often. However, it relies on having reasonably clear scratch audio. If the camera was too far from the sound source or in a very noisy environment, the software might fail, which is why knowing how to sync manually is essential.
Troubleshooting Common Problems
Even with these powerful tools, you can run into issues. Here are two common ones:
- What if I forgot to clap or slate? All is not lost. You have to find a different sync point. Look for any other action that creates a sharp, visible sound—a door closing, a character putting a glass down on a table. As a last resort, you can painstakingly sync to the speaker's lip movements, matching plosive sounds like "P" and "B" to the waveform.
- What is audio drift? If you sync a long clip (e.g., a 15-minute interview), you might notice it's perfect at the start but out of sync by the end. This is audio drift. It happens because the camera and audio recorder have separate internal clocks that run at infinitesimally different speeds. Over a long take, this difference adds up. The fix is to use a "rate stretch" tool in your editor to slightly speed up or slow down the audio clip to match the video's length perfectly.
Test your understanding!
You're editing a short film scene. The automatic sync feature in your software fails because the on-camera scratch audio is very noisy from wind. However, you remembered to do a hand clap at the start of the take.
Briefly describe the manual steps you would take to sync the clip.
Show answer
- Place the video clip and the high-quality external audio clip on separate tracks in the timeline.
- Scrub through the video to find the exact frame where your hands make contact.
- Zoom in on the external audio track's waveform to find the sharp spike created by the clap.
- Drag the external audio clip until that audio spike is perfectly aligned with the visual frame of the clap.
- Play the scene back to confirm the sync, then mute or delete the noisy scratch audio track.
Conclusion
Congratulations! You've just learned one of the most essential and frequently performed tasks in video editing. Properly syncing your audio is the first major step in post-production and the foundation upon which the rest of your edit is built.
Key Takeaways:
- Recording audio separately from the camera allows for superior sound quality but requires syncing in post-production.
- A slate or a simple hand clap creates a clear visual and audible sync point, which is the basis for the reliable manual sync method.
- Scratch audio (the sound recorded by the camera) is a crucial reference for automated waveform analysis, which is the fastest way to sync clips.
- Being proficient in both manual and automated syncing makes you a versatile editor who can handle any situation.
Next Lesson Preview:
Now that our video and audio are locked together as a single, cohesive unit, we can begin the creative work of editing: choosing which shots to use and when. In our next lesson, we will explore one of the most important principles of cinematic grammar, the 180-degree rule. Mastering this rule is key to ensuring your scenes are clear, coherent, and don't disorient your audience.