Hello! Welcome to your next lesson in the "Foundations of Visual Storytelling" module.
In our last session, you learned how to use the rule of thirds to compose your shots, focusing on where to place subjects within the frame to create balance and dynamism. Now, we're going to address the equally important question of how much of your subject and their environment to include in the frame.
Today's learning outcome is to select appropriate shot sizes (wide, medium, close-up) to convey information and emotion. This is the language of cinematography. Mastering shot sizes will allow you to consciously guide your audience's experience, telling them what to feel and where to look. This skill is fundamental to transforming a simple recording into a piece of visual storytelling, which is central to your goal of creating compelling short films and YouTube content.
The Filmmaker's Toolbox: An Overview of Shot Sizes
Shot size refers to how large or small a subject appears in the frame, which is determined by the distance between the camera and the subject, as well as the lens choice. Each shot size has a different purpose and psychological effect. Broadly, we can group them into three families:
- Wide Shots: Excellent for providing information and establishing context.
- Medium Shots: Great for showing interaction and body language.
- Close-Up Shots: Perfect for conveying emotion and focusing on detail.
To get a comprehensive overview, we'll watch a fantastic video that breaks down the essential shot sizes used by filmmakers.
Ultimate Guide to Camera Shots: Every Shot Size Explained [The Shot List, Ep 1]
The video 'Ultimate Guide to Camera Shots' from the StudioBinder channel is a clear, well-structured guide that walks through the spectrum of shot sizes, from the widest to the tightest, with excellent examples from well-known films.
Watch the entire video (up to 11:55). As you watch, notice how the shots are categorized and think about the function each one serves—is it setting a scene, showing an action, or revealing an emotion? We will break this down further in the lesson.
Now that you have a sense of the different shots, let's organize them and dive deeper into their narrative functions.
A Visual Guide to Shot Sizes
To help you remember these shots, it's useful to have a visual reference. The article from StudioBinder, which the video was based on, includes a helpful chart.
Guide to Camera Shots: Every Shot Size Explained
The article 'Guide to Camera Shots: Every Shot Size Explained' provides a static reference for what you just learned in the video. We will use it to pull out some key definitions and images.
Scroll down to the 'Camera Shot Size Cheat-Sheet' section. Take a moment to look at the 'Camera Shots' chart. It visually lays out the different framings from Extreme Wide to Extreme Close-Up. Keep this mental image in mind as we proceed.
This chart is your quick-reference guide.
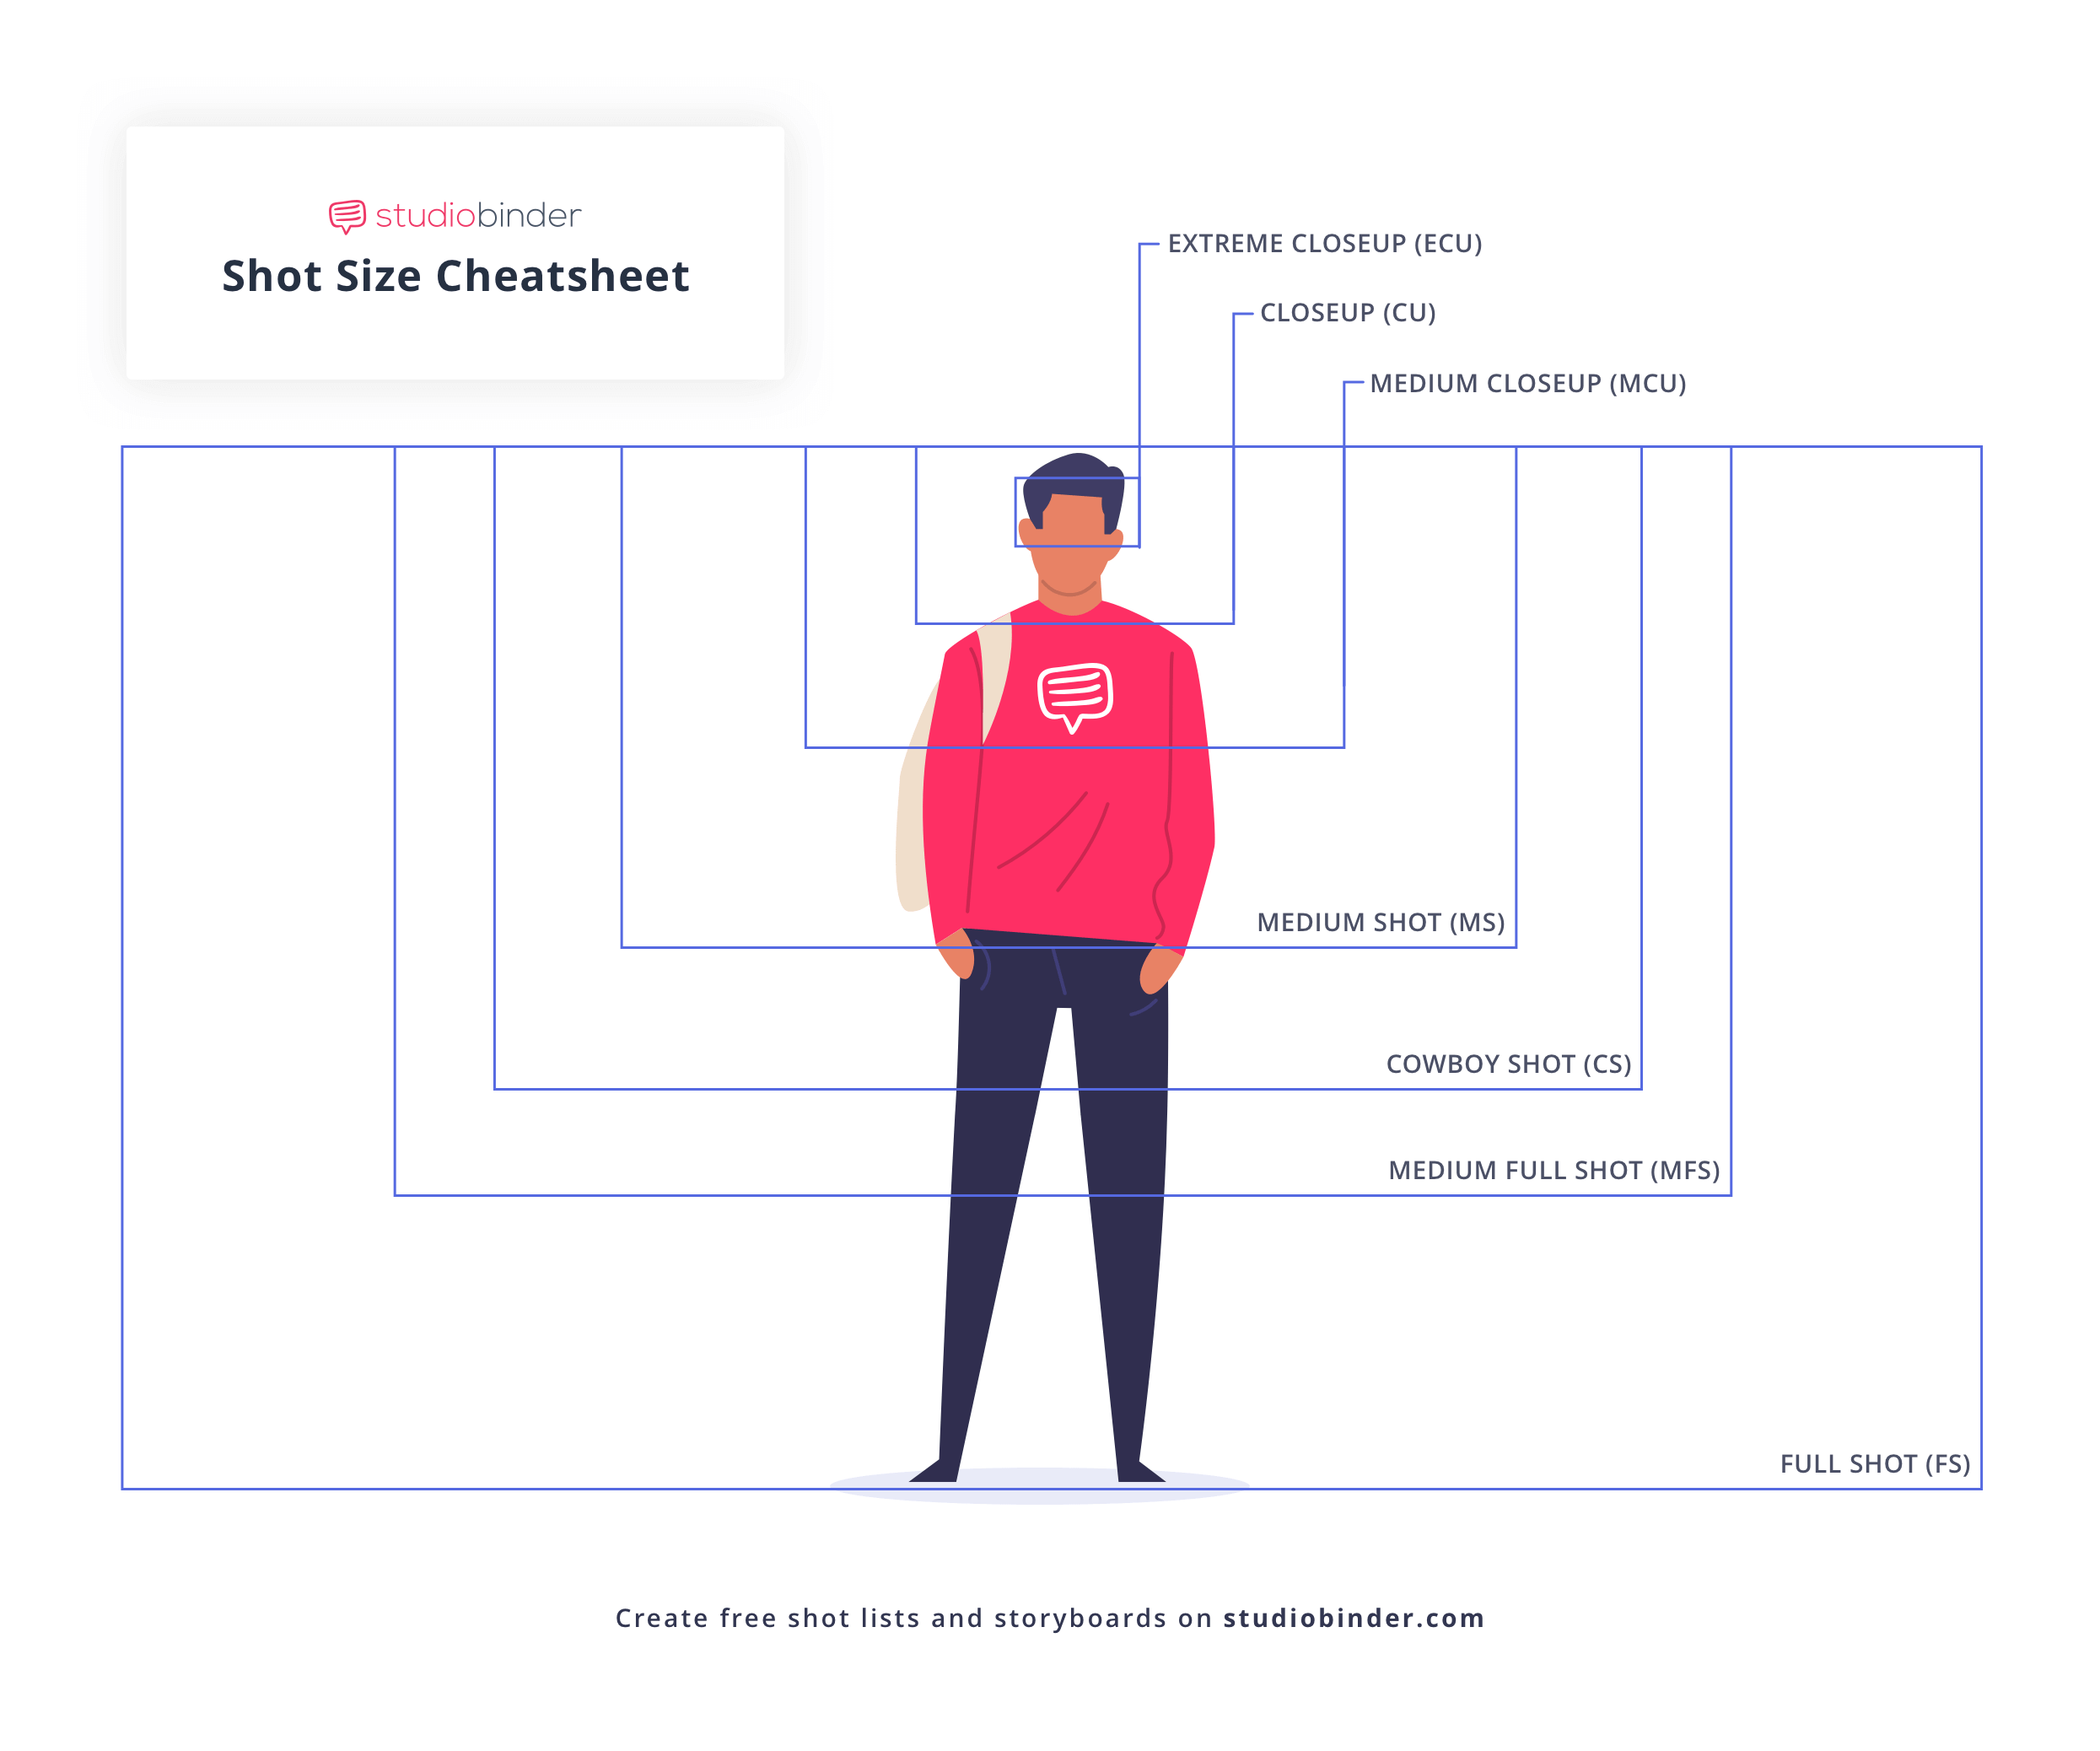
This chart from StudioBinder visually defines the main shot sizes, showing how much of the character and environment is included in each. From left to right: Extreme Wide, Wide, Full, Medium Wide, Cowboy, Medium, Medium Close-Up, Close-Up, Extreme Close-Up.
The Three Families of Shots
Let's analyze the narrative power of each shot family.
1. Wide Shots: Establishing Context and Scale
Wide shots (also called long shots) are primarily used to show the setting and your subject's relationship to it. They answer the question, "Where are we?"
- Extreme Wide Shot (EWS): The subject is a small part of the frame, often dwarfed by the environment. This is perfect for establishing geography (a cityscape, a vast desert) and can evoke feelings of isolation or epic scale.
- Wide Shot (WS) / Long Shot (LS): The subject is visible from head to toe but still small enough that the environment dominates. It shows the character and their context. Think of a character walking down a city street.
- Full Shot (FS): The subject fills the frame from head to toe. The focus shifts more to the character's physicality—their costume, their posture, their actions—while still keeping them grounded in the scene.
These shots are informational. You use them to orient the viewer. Cutting to a wide shot can give the audience a "breath" and remind them of the overall spatial relationships in a scene.
2. Medium Shots: The Conversational Frame
Medium shots are the workhorses of cinema. They feel natural and are less stylistically overt than very wide or very tight shots, often mimicking how we see people in real life.
- Medium Wide Shot (MWS) / American Shot: Frames from the knees up. It gives a bit more detail on the character than a full shot while still showing their physicality.
- Cowboy Shot: A variation of the MWS, framing from mid-thigh up. As the name suggests, it was used in Westerns to keep a gunslinger's holster in the shot. It often conveys a sense of confidence or readiness for action.
- Medium Shot (MS): Frames from the waist up. This is the most common shot in film. It balances the character's facial expressions with their body language and gives a bit of context. It's the standard for much dialogue.
Use medium shots to follow conversations and to show the interplay between characters.
3. Close-Ups: Revealing Emotion and Detail
Close-ups are your most powerful tool for creating intimacy and highlighting emotion. They remove distractions and direct the audience's attention to precisely what you want them to see and feel.
- Medium Close-Up (MCU): Frames from the chest up. It tightens in on the character, prioritizing their face and emotions while still capturing some body language.
- Close-Up (CU): Fills the frame with the subject's face (or another specific object). This is a window into a character's soul. It's used for key emotional beats: a moment of realization, fear, or joy.
- Extreme Close-Up (ECU): Isolates a single feature, like the eyes, mouth, or a trigger finger. It creates intense drama, suspense, or highlights a tiny, crucial detail. An Insert Shot is similar; it's a close-up of an object (like a ticking clock or a letter) that is essential to the narrative.
Use close-ups sparingly and with purpose. Their power comes from the contrast with wider shots. If your entire film is close-ups, they lose their impact.
Test your understanding!
You are filming a tense negotiation between two characters. You want to show that one character is gaining the upper hand and becoming more confident and confrontational. You are currently in a medium shot showing both characters. What shot size might you cut to for the confident character, and why?
Show answer
A Cowboy Shot would be an excellent choice. By framing from the mid-thighs up, it gives the character a powerful, grounded stance. It feels more confrontational and assertive than a standard medium shot. Alternatively, a Medium Close-Up could also work to emphasize their determined facial expression, but the Cowboy Shot adds that element of physical confidence.
Making Intentional Choices
The key is not just knowing the names of the shots, but knowing why you're choosing one over another. Every shot must serve the story. Adding a shot just for variety can confuse the audience.
This next video offers a practical perspective on this, emphasizing that your choices should always be motivated by the story and emotion you're trying to convey.
12 CAMERA ANGLES to Enhance Your Films
The video '12 CAMERA ANGLES to Enhance Your Films' from Full Time Filmmaker, while also discussing angles, has a fantastic section on making purposeful choices. It shows how using a single shot can be more powerful than using many.
Please watch from 04:19 to 07:41. Pay close attention to the two examples. First, see how a variety of shots creates an intense, busy feeling. Then, notice how using just one wide shot effectively conveys loneliness. The final point about not adding unnecessary detail shots is crucial.
As the video highlights, ask yourself: "Does this shot add to the story and emotion I'm trying to convey?" If the answer is no, reconsider. A close-up on a character's shoes is distracting unless those shoes are important to the plot (e.g., they are untied and will cause the character to trip).
Practical Exercise: Refining Your Shot List
Let's apply this thinking to your own project. In an earlier lesson, you created a shot list for your short film idea. Now, you're going to revisit it with a more critical eye.
Your Task (15-20 minutes):
- Open the shot list you created in lesson 2.
- Review each shot you planned. For each one, ask yourself if the shot size you chose is the most effective choice to communicate the necessary information or the desired emotion at that moment in the story.
- Identify at least 5 shots in your list that could be improved.
- Rewrite those 5 entries, changing the shot size. Next to each revised shot, add a brief justification for your new choice.
Example:
- Original Shot:
Medium Shot of David looking at the old photograph. - Revised Shot:
Close-Up on David's face as he looks at the photograph. - Justification:
The close-up will better capture his subtle expression of sadness and nostalgia, creating a more intimate moment for the audience.
This exercise will train you to think like a director, ensuring every shot has a clear purpose in your visual narrative.
Conclusion
Today you've learned the fundamental vocabulary of cinematographic framing. You can now identify different shot sizes and, more importantly, understand their narrative function. This moves you from simply capturing action to actively shaping your audience's emotional journey.
Key Takeaways:
- Shot sizes can be grouped into three families: Wide (for context), Medium (for interaction), and Close-Up (for emotion).
- Each shot size has a specific purpose, from establishing a location with an Extreme Wide Shot to revealing a character's inner thoughts with a Close-Up.
- The most important principle is intention. Every shot choice should be motivated by the story and the desired emotional impact on the viewer.
In our next lesson, we will continue to build your compositional toolkit. We'll explore how to use leading lines and depth to guide viewer attention, adding another layer of sophistication to how you construct your frames.