Hello! Welcome back to our module on "The Final Mix."
In our last lesson, we focused on the art of selecting music, learning how to analyze a scene's emotional arc and choose a track that tells a compelling story. We learned to think like a composer, identifying turning points and using a specific vocabulary to find music that supports the narrative.
But as you'll quickly discover, the perfect track rarely has the perfect timing. A 3-minute song won't magically fit a 45-second scene. That's where this lesson comes in. Today, we'll dive into the editor's craft. Your learning outcome is to edit music tracks to fit scene duration and emphasize key moments.
You'll learn the practical, hands-on techniques to take that "almost perfect" music track and custom-fit it to your video, making it seem as if it were scored specifically for your project.
1. The Editor's Mindset: Making Music Perfect
The most common mistake beginners make with music is letting the song dictate the edit. They'll cut their footage to match the beats of a song, which can be a valid stylistic choice for a music video, but for narrative or YouTube content, it's often a creative straitjacket.
Professional editors work the other way around: the story dictates the edit, and the music is manipulated to serve the story. This means you don't need to spend hours searching for that one "perfect" track that happens to be the exact right length and has a beat drop at the precise second you need it. You can take a good track and make it perfect.
How Professional Hollywood Editors Cut Their Music (TUTORIAL)
The video 'How Professional Hollywood Editors Cut Their Music' from Film Editing Pro introduces this powerful concept. It explains that an editor's job isn't just to find music, but to shape it.
Watch the final section from 12:23 to 13:17. Absorb the key takeaway: if you know how to work with music, you can make an 'imperfect' cue perfect for your cut through editing.
This simple shift in mindset is liberating. It turns music editing from a frustrating search into a creative, problem-solving process.
2. Identifying Musical Events to Emphasize Your Story
Before you start cutting, you need a plan. Just as we "spotted" scenes for emotional turning points in the last lesson, we now need to spot our scenes for specific, time-based key moments or "hits." These are the points you want your music to acknowledge.
A key moment could be:
- A cut to a new, dramatic location.
- A character delivering a powerful line of dialogue.
- A sudden action (a slap, a jump, a car crash).
- A subtle emotional reaction (a knowing glance, a tear).
- The start or end of a montage sequence.
Once you have your key moments, you need to find or create corresponding musical events to align with them.
How Professional Hollywood Editors Cut Their Music (TUTORIAL)
Let's return to the 'How Professional Hollywood Editors Cut Their Music' video. It provides a fantastic vocabulary for the types of musical events you can use.
Watch from 01:29 to 08:03. This section introduces three ways music can behave to support a cut: Swell: The music grows in intensity. Perfect for building to a climax or revealing something epic. Shrink: The music decreases in intensity, often by removing instruments. This is incredibly useful for letting dialogue take focus without the music disappearing entirely. Shift: The music changes tone without a major change in intensity. Good for subtler emotional changes.
As you edit, you'll start to see your scenes as a series of moments that could be enhanced by a swell, shrink, or shift in the music. Your job is to make those alignments happen.
3. Practical Techniques for Adjusting Music
Now for the "how." Let's say your scene is 45 seconds long, but your chosen music is 2 minutes long. Or your scene is 2 minutes, and the music is 90 seconds. Here are the fundamental techniques to solve these common problems.
Technique 1: Rearranging and Shortening ("Frankensteining")
Most songs have a structure (e.g., intro, verse, chorus, verse, chorus, bridge, outro). You don't have to use the song in its original order. You can cut out a verse, shorten an intro, or jump straight from the first chorus to the outro. This is the most common and powerful technique for making a song fit.
The key to making this work is to hide your edits:
- Cut on the beat: Make your cuts on a clear downbeat or at the very start of a new musical phrase. This makes the transition feel natural.
- Use crossfades: When you join two separate parts of the music track, a short audio crossfade will smooth over the cut, preventing any jarring clicks or pops.
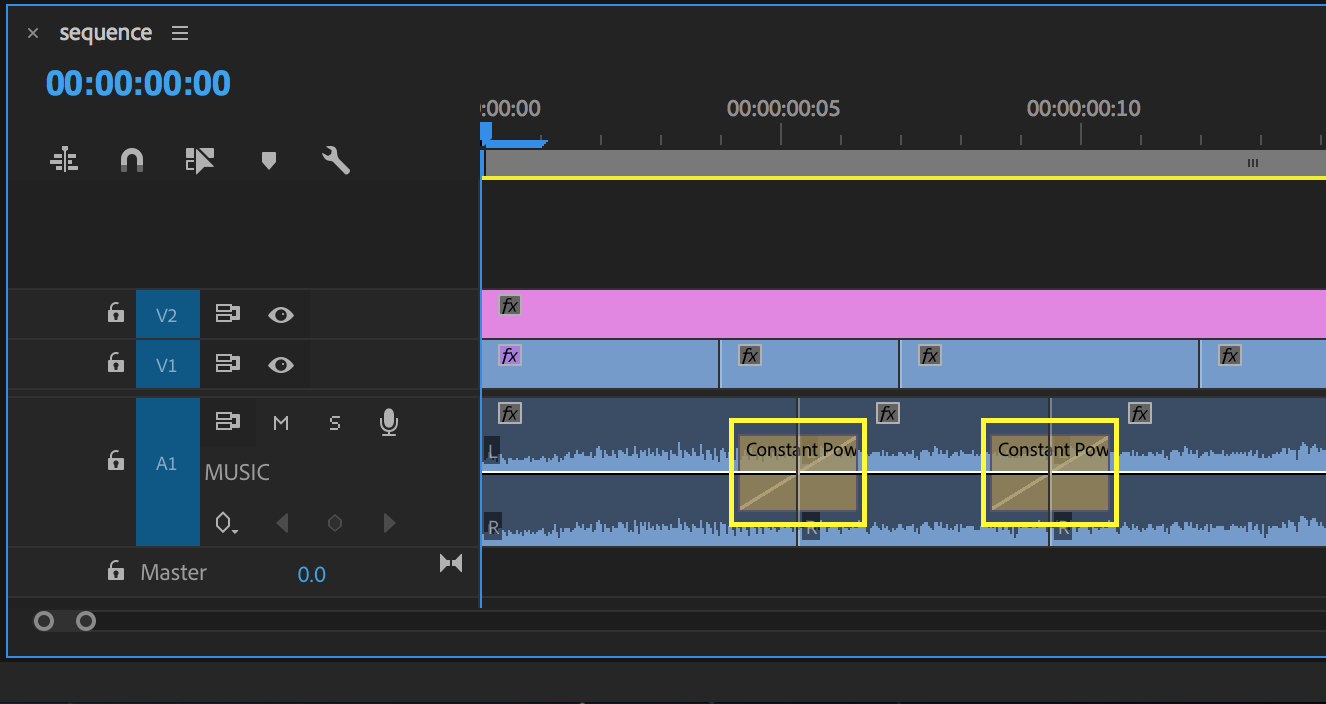
The article below shows a perfect, simple example of this. The editor needs a musical "hit" to align with a staple being pulled. The original track doesn't provide it, so they cut the track up and move a musical hit from the end of the cue to the exact moment they need it.
How to Sound Design a Video | Step-By-Step Tutorial
The article 'How to Sound Design a Video' from Film Editing Pro has a fantastic visual breakdown of this technique.
Read the section 'Improving the Score.' Look closely at the timeline image comparing the unedited and edited score. Notice how they cut the cue into pieces and rearranged them to create an accent on the staple-pulling moment.
Technique 2: Extending Music with Looping
What if the music is too short? The answer is looping. Find a section of the music that is relatively repetitive (often a rhythmic instrumental section without a strong melody) and loop it to fill time.
How video editors cut MUSIC for perfect timing.
The video 'How video editors cut MUSIC for perfect timing' by Standard Story Company provides a clear, practical demonstration of these core techniques. Let's start with looping.
Watch from 03:21 to 04:21. The presenter shows how to find a single bar of music, duplicate it, and blend it with a crossfade to seamlessly extend a track's intro.
The trick is to find a section that loops cleanly without being obvious. A one or two-bar instrumental phrase is often a perfect candidate.
4. Practical Techniques for Emphasizing Key Moments
Beyond just changing the length, you can edit music to create powerful, specific accents.
Technique 3: Creating Space with a "Drop Out"
Sometimes the most powerful thing music can do is stop. Dropping the music out completely can emphasize a line of dialogue, create a moment of tension, or provide a dramatic pause before the action kicks back in.
How video editors cut MUSIC for perfect timing.
Let's return to the Standard Story Company video to see how to use a music 'drop out' for timing and dramatic effect.
Watch from 04:21 to 06:15. Notice how the editor drops the music to silence under his dialogue, then brings it back in just in time to hit a specific beat. This is far more effective than just lowering the music volume.
Technique 4: Finishing with a "Ring Out"
How do you end a piece of music that you've cut short? You could just fade it out, but a more stylish technique is a "ring out." This involves cutting the music on a final beat and letting that last note echo out using a reverb effect. It provides a clean, professional, and definitive end to a scene.
How video editors cut MUSIC for perfect timing.
The same video demonstrates this 'ring out' technique beautifully.
Watch from 07:05 to 09:07. Pay attention to how he adds a reverb effect to the very last beat of the music, allowing it to fade out naturally with an echo, creating a much more polished finish than a simple fade.
Test your understanding!
You are editing a 30-second promotional video for a travel vlog. You have a music track that is 2 minutes long. Your video has three parts:
- (0-10s) A slow, beautiful montage of sunrise landscapes.
- (10-25s) A fast-paced, high-energy montage of exciting activities (hiking, surfing, etc.).
- (25-30s) A final shot of the vlogger smiling at the camera, with the channel's title card appearing.
The music track has a slow intro (30s), a high-energy chorus (60s), and a soft outro. How would you use the techniques from this lesson to score this video?
Show answer
Here's one possible approach:
- For the intro (0-10s): Use the first 10 seconds of the song's slow intro to match the sunrise montage.
- For the action (10-25s): You can't wait for the chorus to start, so you'll "Frankenstein" the music. Cut from the 10-second mark of the intro directly to the beginning of the high-energy chorus. Use a crossfade or hide the cut under a sound effect (like a "whoosh") to make the transition seamless. You'll only need 15 seconds of the chorus.
- For the ending (25-30s): You need a clean ending. You could take the final chord from the song's outro and place it at the 25-second mark. Better yet, you could cut the chorus on a strong beat at 25 seconds and apply a "ring out" with reverb, letting the music echo over the final shot and title card.
Conclusion
You are now equipped with the fundamental skills to move beyond being a passive user of music and become an active editor of it. You don't have to let the music push your story around; you can shape it, cut it, and rearrange it to perfectly serve your narrative.
Key Takeaways:
- The Story is King: Always edit the music to fit the story, not the other way around.
- Embrace "Frankensteining": Don't be afraid to cut up and rearrange a music track. Use cuts on the beat and crossfades to hide your work.
- Adjust Duration: Use looping to extend music and strategic cuts to shorten it.
- Emphasize Moments: Use swells, shrinks, and shifts to accent the action. Use a drop out to create space and a ring out to create a polished ending.
Next Lesson Preview:
Now that we've chosen our music and edited it to fit the scene, we have multiple audio elements competing for attention: dialogue, sound effects, and music. How do we make them all work together without turning into a muddy mess? In our next lesson, you will learn how to balance dialogue, sound effects, and music in a final mix.