Hello! Welcome back to our course on Advanced BGP Routing.
In the last lesson, we explored the crucial theoretical differences between eBGP and iBGP. We learned that whether a peering session is external or internal dictates fundamental behaviors like administrative distance, next-hop modification, TTL values, and loop prevention mechanisms.
Today, we move from theory to practice. This lesson is dedicated to the learning outcome: Configure BGP peering for IPv4 and IPv6 using neighbor statements and verify session establishment. You will learn the essential commands to build a BGP session from scratch and the verification tools to confirm it's working correctly. This is one of the most fundamental hands-on skills for any network engineer working at the enterprise or service provider level.
1. BGP Session Establishment Fundamentals
Unlike IGPs such as OSPF or EIGRP which use multicast to automatically discover neighbors, BGP requires you to manually define each neighbor relationship. This deliberate process reflects BGP's role in carefully controlled inter-domain routing.
The key characteristics of a BGP session are:
- Reliable Transport: BGP uses the Transmission Control Protocol (TCP) as its transport, establishing a session on TCP port 179. This ensures reliable, ordered delivery of routing updates.
- Manual Configuration: You must explicitly tell a BGP router the IP address and Autonomous System Number (ASN) of its intended peer.
- Peer Relationships: BGP speakers form sessions with configured peers (often called neighbors). As we learned, if the peer is in a different AS, it's an eBGP session; if it's in the same AS, it's an iBGP session.
To understand how a session is formed, let's look at the BGP Finite State Machine (FSM).
BGP Peer Session Establishment
This section of the Cisco IOS XE configuration guide clearly defines the different states a BGP session goes through before it becomes fully operational.
Read the section titled 'BGP Peer Session Establishment'. Focus on understanding the meaning of each state from Idle to Established.
The process described in the article is visualized perfectly in the following sequence diagram.
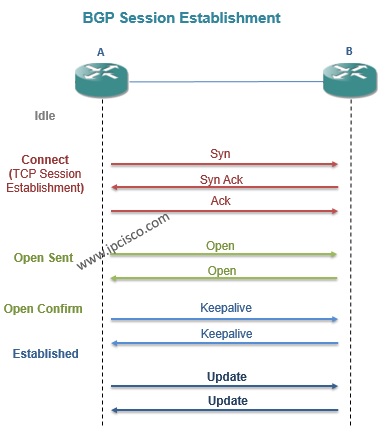
The goal is always to reach the Established state. If a session is stuck in any other state (like Idle or Active), it indicates a problem with reachability, configuration mismatch, or an access control list (ACL) blocking TCP port 179.
2. Configuring and Verifying eBGP for IPv4
Let's start with the most common scenario: establishing an eBGP session between two routers in different ASes. We'll use a basic configuration to illustrate the core commands.
BGP - Complete ENCOR (350-401) Exam Coverage
This video from Kevin Wallace provides a great introduction to the manual nature of BGP peering and then demonstrates a basic eBGP configuration.
First, watch from 02:56 to 04:52 to reinforce the core concepts of BGP peering. Then, watch the configuration demo from 19:08 to 23:16. Pay attention to the three essential commands used: router bgp, neighbor, and network.
As you saw in the video, the configuration is straightforward. Let's break it down using a reference topology. Imagine we are configuring the eBGP link between Router A (AS 40000) and Router B (AS 45000).
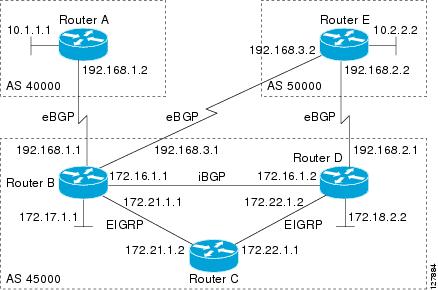
On Router A (AS 40000):
! Enter global configuration mode
configure terminal

! Start the BGP process for AS 40000
router bgp 40000

! (Best Practice) Manually set a stable router-ID
bgp router-id 1.1.1.1

! Define the neighbor's IP and its remote AS
neighbor 192.168.1.2 remote-as 45000
On Router B (AS 45000):
configure terminal
router bgp 45000
bgp router-id 2.2.2.2
neighbor 192.168.1.1 remote-as 40000
Verification
Once both routers are configured, the BGP session should come up. The single most useful command to verify this is show ip bgp summary.
RouterB# show ip bgp summary
BGP router identifier 2.2.2.2, local AS number 45000
BGP table version is 1, main routing table version 1

Neighbor        V           AS MsgRcvd MsgSent   TblVer  InQ OutQ Up/Down  State/PfxRcd
192.168.1.1     4        40000      10      11       1    0    0 00:05:12        1
The key information here is the State/PfxRcd column. If you see a number (even 0), it means the state is Established, and that number is the count of prefixes received from the neighbor. Any other value (like Idle or Active) indicates a problem.
For more detail, use the show ip bgp neighbors command.
This Cisco Press article provides a sample configuration and a detailed breakdown of the show ip bgp neighbors command output.
Review the section 'Case Study: EBGP Peering'. Look at the configuration in Example 2-6 and then study the annotated output of show ip bgp neighbors in Example 2-8. This will help you interpret the detailed status of a BGP peer.
3. iBGP Configuration and Loopbacks
Configuring iBGP uses the same neighbor remote-as command, but the ASN will be the router's own AS. However, there are two critical differences in practice:
- Reachability: iBGP peers are often not directly connected. BGP itself does not provide this reachability. You must have an IGP (like OSPF or EIGRP) running within your AS to provide routes to the iBGP peer addresses.
- Stability: Physical interface failures can cause iBGP sessions to drop. The best practice is to peer between loopback interfaces, which are always up as long as the router is running.
When you peer to a loopback address, you must tell BGP which source IP to use for its TCP connection.
On Router B (AS 45000, Loopback0: 2.2.2.2):
router bgp 45000
 ! Peer with Router D's loopback address
 neighbor 4.4.4.4 remote-as 45000
 ! Tell BGP to source its packets from Loopback0
 neighbor 4.4.4.4 update-source Loopback0
On Router D (AS 45000, Loopback0: 4.4.4.4):
router bgp 45000
 neighbor 2.2.2.2 remote-as 45000
 neighbor 2.2.2.2 update-source Loopback0
This combination of an IGP providing reachability to loopbacks and using the update-source command creates a robust and stable iBGP mesh.
Test your understanding!
A network administrator configures iBGP peering between the loopback interfaces of two routers, R1 and R2. An IGP is correctly configured, and R1 can ping R2's loopback address. However, the BGP session is stuck in the 'Active' state. What is the most likely missing configuration command on both routers?
Show answer
The most likely missing command is neighbor <peer-loopback-ip> update-source Loopback0. Without it, each router will try to initiate the TCP session using the IP address of its physical egress interface. The remote router, however, is expecting a connection from the configured neighbor's loopback IP, causing the TCP handshake to fail. The session remains in 'Active' state as it continuously tries and fails to connect.
4. Configuring BGP for IPv6 using Address Families
Modern BGP, known as Multiprotocol BGP (MP-BGP), is designed to carry routing information for more than just IPv4. This is accomplished using address families. To configure BGP for IPv6, you must enter the IPv6 address family and specifically activate your neighbor there.
The process involves two main steps:
- Define the neighbor in the main
router bgpconfiguration. - Activate the neighbor within one or more address families (
ipv4 unicast,ipv6 unicast, etc.).
This next video provides a perfect demonstration of creating a single BGP session that supports both IPv4 and IPv6 peering.
IPv4 and IPv6 Address Families in BGP
This video from Charles Judd clearly demonstrates how to use address families to configure BGP for both IPv4 and IPv6 simultaneously.
Watch the entire video. It's a concise and complete walkthrough. Focus on: The use of no bgp default ipv4-unicast for explicit control. Defining neighbors with both their IPv4 and IPv6 addresses globally. Entering address-family ipv4 unicast and address-family ipv6 unicast modes. Using the neighbor <ip> activate command within each address family. The separate verification commands for each address family.
Let's summarize the configuration logic from the video.
On Router 1:
router bgp 65100
 ! Optional: Prevents auto-activation of IPv4 neighbors, forcing explicit activation.
 no bgp default ipv4-unicast

 ! Define both neighbors globally
 neighbor 10.1.1.2 remote-as 65200
 neighbor 2001:DB8:1:1::2 remote-as 65200

 ! Activate the IPv4 neighbor in the IPv4 AF
 address-family ipv4 unicast
  neighbor 10.1.1.2 activate
 exit-address-family

 ! Activate the IPv6 neighbor in the IPv6 AF
 address-family ipv6 unicast
  neighbor 2001:DB8:1:1::2 activate
 exit-address-family
This modern, address-family-centric configuration is the standard approach and what you are expected to know for the ENCOR exam.
IPv6 Verification
Verification for IPv6 is similar to IPv4, but you must specify the IPv6 address family in your commands.
show bgp ipv6 unicast summary: To quickly check the status of IPv6 BGP neighbors.show bgp ipv6 unicast neighbors <ipv6-address>: For detailed information about a specific IPv6 peer.
Conclusion
In this lesson, we translated BGP theory into practical configuration. You now have the foundational skills to establish and verify both eBGP and iBGP peering for IPv4 and the increasingly important IPv6.
Key Takeaways:
- BGP peering must be manually configured and relies on TCP port 179. The session must progress through the FSM to the Established state.
- The essential commands for peering are
router bgp <asn>andneighbor <ip> remote-as <asn>. - iBGP typically requires an underlying IGP for reachability and uses loopback interfaces with the
neighbor ... update-sourcecommand for stability. - Multiprotocol BGP (MP-BGP) uses the
address-familyconfiguration model to support protocols like IPv6. Neighbors must be explicitly enabled using theneighbor <ip> activatecommand within each address family. - Your primary verification tools are
show ip bgp summaryandshow bgp <address-family> summary.
Preview of the Next Lesson:
Now that we know how to form BGP adjacencies, a new question arises: what happens when a BGP router learns multiple paths to the same destination from different neighbors? In our next lesson, we will delve into the BGP path selection algorithm and analyze the key attributes (like weight, local preference, and AS path) that BGP uses to choose the single best route.