Welcome back! In our last lesson, we dissected the BGP best path selection algorithm and analyzed the key attributes that guide a router's decision-making process. You learned to read the show ip bgp output and understand why BGP chooses one path over another.
Today, we'll build directly on that knowledge. We're moving from passive analysis to active control. This lesson addresses the learning outcome: Configure BGP path attribute manipulation to influence routing decisions (e.g., local preference, AS-path prepending).
You'll learn the practical skills to implement routing policies, a core task for any network professional. For a solutions engineer, this is fundamental to traffic engineering—directing data flow to meet business requirements like performance, cost, and resilience. We'll focus on the two most common tools for this job: Local Preference to control how your network sends traffic out, and AS-path prepending to influence how traffic comes in.
1. Inbound vs. Outbound Traffic Engineering
Before diving into configuration, it's crucial to distinguish between the two primary goals of BGP traffic engineering:
-
Controlling Outbound Traffic (Egress): This involves choosing which exit point your Autonomous System (AS) uses to send traffic to an external destination. Because you control all the routers within your AS, you have authoritative control over this decision. The primary attribute for this is Local Preference.
-
Influencing Inbound Traffic (Ingress): This involves influencing which of your entry points other ASes use to send traffic to your network. You don't control your provider's routers, so you can't command them. Instead, you advertise your routes in a way that makes one path appear more or less desirable. The most common tool for this is AS-path prepending.
We will tackle each of these in turn.
2. Controlling Outbound Traffic with Local Preference
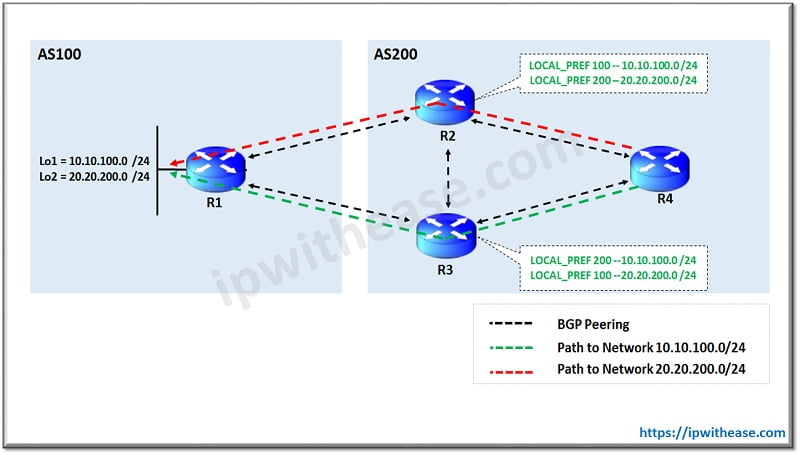
Recall from our last lesson that Local Preference is evaluated before AS-path length, and the highest value wins. It is propagated to all iBGP peers within an AS, making it the perfect tool to ensure all routers in your network agree on the best way to exit. The default Local Preference is 100.
Let's imagine your enterprise network (AS 100) has two connections to the internet via two different ISPs (AS 200 and AS 300). You want all traffic destined for a partner network (e.g., 8.8.8.8/32) to use the link to AS 300, perhaps because it offers a better service level agreement (SLA).
To achieve this, you need to set a higher Local Preference on the route to 8.8.8.8/32 as it is learned from AS 300. This is done using a route map.
The following video provides a concise and clear demonstration of this entire process.
This video from Network Route walks through a classic scenario, demonstrating how to use a route map to set Local Preference and influence outbound path selection.
Watch the entire video (it's about 6 minutes). Pay close attention to the configuration steps: creating the prefix list, building the route map, and applying it inbound to the BGP neighbor.
Configuration Breakdown
As you saw in the video, the configuration process follows these key steps:
-
Identify Traffic: Define the routes you want to influence. This is typically done with a prefix list.
ip prefix-list PL_TARGET_PREFIX permit 8.8.8.8/32 -
Create a Route Map: The route map matches the traffic and sets the attribute. Remember to include a second, empty
permitstatement to avoid implicitly denying all other routes.route-map RM_SET_LP permit 10 match ip address prefix-list PL_TARGET_PREFIX set local-preference 200 ! route-map RM_SET_LP permit 20 -
Apply the Route Map: You apply this policy to the eBGP neighbor from which you want to prefer the routes. A crucial point here is the direction: you apply it inbound.
router bgp 100
 neighbor 13.0.0.3 remote-as 300
 neighbor 13.0.0.3 route-map RM_SET_LP in
Why apply the route map in?
You are modifying the attribute of a route as it is being learned and entering your AS. By setting the Local Preference at the ingress edge router, that router will then advertise the route to its iBGP peers with the new, higher Local Preference (200), ensuring the entire AS prefers this path.
Test your understanding!
You are the administrator for AS 65100. You are learning the prefix 192.0.2.0/24 from two different providers: ISP_A (AS 65200) and ISP_B (AS 65300). You want all outbound traffic to this prefix to exit via ISP_B. Your peering with ISP_B is on neighbor 203.0.113.2.
Which of the following commands correctly applies the route map PREFER_ISP_B to achieve this goal?
A) neighbor 203.0.113.2 route-map PREFER_ISP_B out
B) neighbor 203.0.113.2 route-map PREFER_ISP_B in
C) bgp default local-preference 200
D) set local-preference 200
Show answer
The correct command is B) neighbor 203.0.113.2 route-map PREFER_ISP_B in.
To influence your AS's outbound path choice, you use Local Preference. You must modify this attribute on the route as it is learned from your eBGP peer, so the route map is applied in the in direction. The modified route is then advertised with the higher Local Preference to your iBGP peers.
3. Influencing Inbound Traffic with AS-Path Prepending
Now for the more subtle art of influencing your neighbors. Since you can't configure their routers, you make one of your paths look less attractive. The most common way to do this is to make the AS-path seem longer. This technique is called AS-path prepending.
You'll advertise a route to your non-preferred ISP with your own AS number repeated several times. Since BGP's default behavior is to choose the path with the shortest AS-path, other routers on the internet will see the prepended path as longer and less desirable.
This next video is an excellent, practical demonstration from a real-world perspective. The presenter's goal is to shift traffic away from a more expensive provider link, a scenario you would absolutely encounter as a solutions engineer.
Tuning Inbound Load Balancing! Ep.9: Real World BGP
Watch this segment from Jeremy Cioara's 'Real World BGP' series. It's a fantastic walkthrough of identifying a problem, using AS-path prepending to solve it, and verifying the result with real tools.
Please watch the following segments: The Concept (01:56 - 08:28): Understand what AS-path prepending is and why it's used to influence inbound traffic. Configuration (14:37 - 19:33): Follow the step-by-step configuration of the prefix list, route map, and its application to the BGP neighbor. Verification (19:33 - 22:14): See how to use a BGP looking glass and traffic graphs to verify that the policy change had the intended effect. This is a very valuable, practical skill.
Configuration Breakdown
The configuration for AS-path prepending is conceptually similar to what we did for Local Preference but with two key differences: the set command used and the direction of the route map.
- Identify Traffic: Use a prefix list to match the networks you are advertising.
ip prefix-list PL_MY_PREFIXES permit 63.232.144.0/24 - Create a Route Map: Match the prefix list and use the
set as-path prependcommand. You repeat your own AS number. Adding it 3 times makes the path 3 "hops" longer.route-map RM_AS_PREPEND permit 10 match ip address prefix-list PL_MY_PREFIXES set as-path prepend 19468 19468 19468 ! route-map RM_AS_PREPEND permit 20 - Apply the Route Map: Apply the policy to the eBGP neighbor towards which you want to make the path less preferable. The direction is outbound.
router bgp 19468
 neighbor 72.44.x.x remote-as 209
 neighbor 72.44.x.x route-map RM_AS_PREPEND out
Why apply the route map out?
You are modifying the attribute of a route as you are advertising it to your external neighbor. You are altering the information you send them to influence their decision.
A key takeaway from the video is that this is not a guaranteed method. A neighboring AS might have its own policies (like a higher Local Preference) that override your attempt to influence them. However, for most default scenarios, it is a very effective technique.

4. A Brief Look at Configuring Weight and MED
To complete the picture, let's briefly cover how to configure two other attributes we've discussed: Weight and MED. While Local Preference and AS-path prepending are the most common tools for traffic engineering, it's good to know how to set these as well.
The following article provides detailed configuration examples for all major BGP attributes.
Configuring BGP Best Path Algorithm on Cisco IOS – A Deep Dive
This deep-dive article from 'Journey2theCCIE' provides excellent, detailed examples for configuring various BGP attributes. We will use it as a reference for Weight and MED.
Please read the following two sections: Step 2. Weight: Read this section to understand the two ways to configure weight: per-neighbor and with a route map. Notice it's a Cisco-proprietary attribute and is applied inbound. Step 7. The Multi-Exit Discriminator: Skim this section to see how MED is configured with set metric in a route map and applied outbound. Pay attention to the important note that by default, MED is only compared between paths learned from the same neighboring AS.
Here's a quick summary of the configuration:
-
Weight:
- Goal: To influence path selection on a single router. Highest weight wins.
- How:
- Simple method:
neighbor <ip> weight <value>underrouter bgp. - Flexible method:
set weight <value>in a route-map appliedinbound.
- Simple method:
-
MED (Multi-Exit Discriminator):
- Goal: To influence how a single neighboring AS chooses to enter your network (if you have multiple links to that same AS). Lowest MED wins.
- How:
set metric <value>in a route-map appliedoutbound.
Conclusion
In this lesson, you've made the leap from analyzing BGP paths to actively controlling them. You now have the fundamental tools of BGP traffic engineering at your disposal, a skill set that is essential for designing robust and efficient enterprise networks.
Key Takeaways:
- You can control outbound (egress) traffic for your entire AS using Local Preference. Higher is better, and the policy is applied
inboundon your edge router. - You can influence inbound (ingress) traffic from external networks using AS-path prepending. Shorter is better, so you lengthen the path on non-preferred links. The policy is applied
outbound. - Route maps are the essential mechanism for implementing BGP policies, using
matchcriteria to identify routes andsetcommands to modify attributes. - Always remember to add a
permitstatement at the end of your route map to prevent unintended filtering of other routes.
Preview of the Next Lesson:
Now that you have a solid grasp of how to manage routing policy within your AS, a new challenge arises: as your network grows, how do you manage the full mesh of iBGP sessions required to propagate these policies? In the next lesson, we will solve this problem by learning how to configure and verify iBGP route reflection for scalability.