Hello! Welcome to your first lesson in the "Learn SQL" course. I'm excited to get started with you on this journey.
Given your extensive background in product design and strategy, you're already skilled at understanding user needs and behaviors. Learning SQL will give you a powerful new tool to directly query data and gain quantitative insights into those behaviors, helping you make even more data-informed decisions.
This first lesson is all about the most fundamental building block of SQL: the SELECT statement. By the end of this 60-minute session, you will be able to write your own queries to retrieve specific columns of data from a table. This is the first step toward asking complex questions about your users, such as "Who are my most recent signups?" or "What features are they using?".
Let's begin.
1. Databases and the SELECT Statement
At its core, a database is simply a structured collection of data. This data is organized into tables, which you can think of as super-powered spreadsheets. Each table has rows (representing individual records, like a specific user) and columns (representing attributes of those records, like a user's email address or signup date).
To communicate with a database and ask it for data, we use a language called SQL (Structured Query Language). The most basic and essential command in SQL is SELECT.
The SELECT statement has two mandatory parts:
SELECT: You list the columns you want to retrieve.FROM: You specify the table you want to retrieve them from.
The basic syntax looks like this:
SELECT column_name1, column_name2
FROM table_name;
Let's dive into the details.
This article from Mode's SQL tutorial provides a clear and concise introduction to the SELECT statement. It's a great starting point for understanding the basic syntax.
Please read the section titled 'Basic syntax: SELECT and FROM'. Focus on how SELECT and FROM work together and the use of the asterisk (*) to select all columns.
2. Retrieving Data from a users Table
Throughout this course, we'll often work with a hypothetical users table, which is a common sight in any digital product. Imagine a table with the following columns:
user_idfirst_namelast_nameemailsignup_datesubscription_plan(e.g., 'free', 'premium')
Selecting All Columns
The simplest query is to ask for everything in the table. As you just read, you can do this using an asterisk (*), which is a wildcard character for "all columns".
SELECT *
FROM users;
This query would return all rows and all columns from our users table. This is useful when you're first exploring a table and want to see what data is available.
Selecting Specific Columns
More often, you only need a few specific pieces of information. For instance, you might want to compile a list of user emails for a research survey. You don't need their user_id or signup_date for that task.
To select specific columns, you simply list them after the SELECT keyword, separated by commas.
SELECT first_name, last_name, email
FROM users;
This query is more efficient and returns a cleaner, more focused result set. It retrieves only the first_name, last_name, and email for every user in the table.
The image below provides a great visual breakdown of this process.
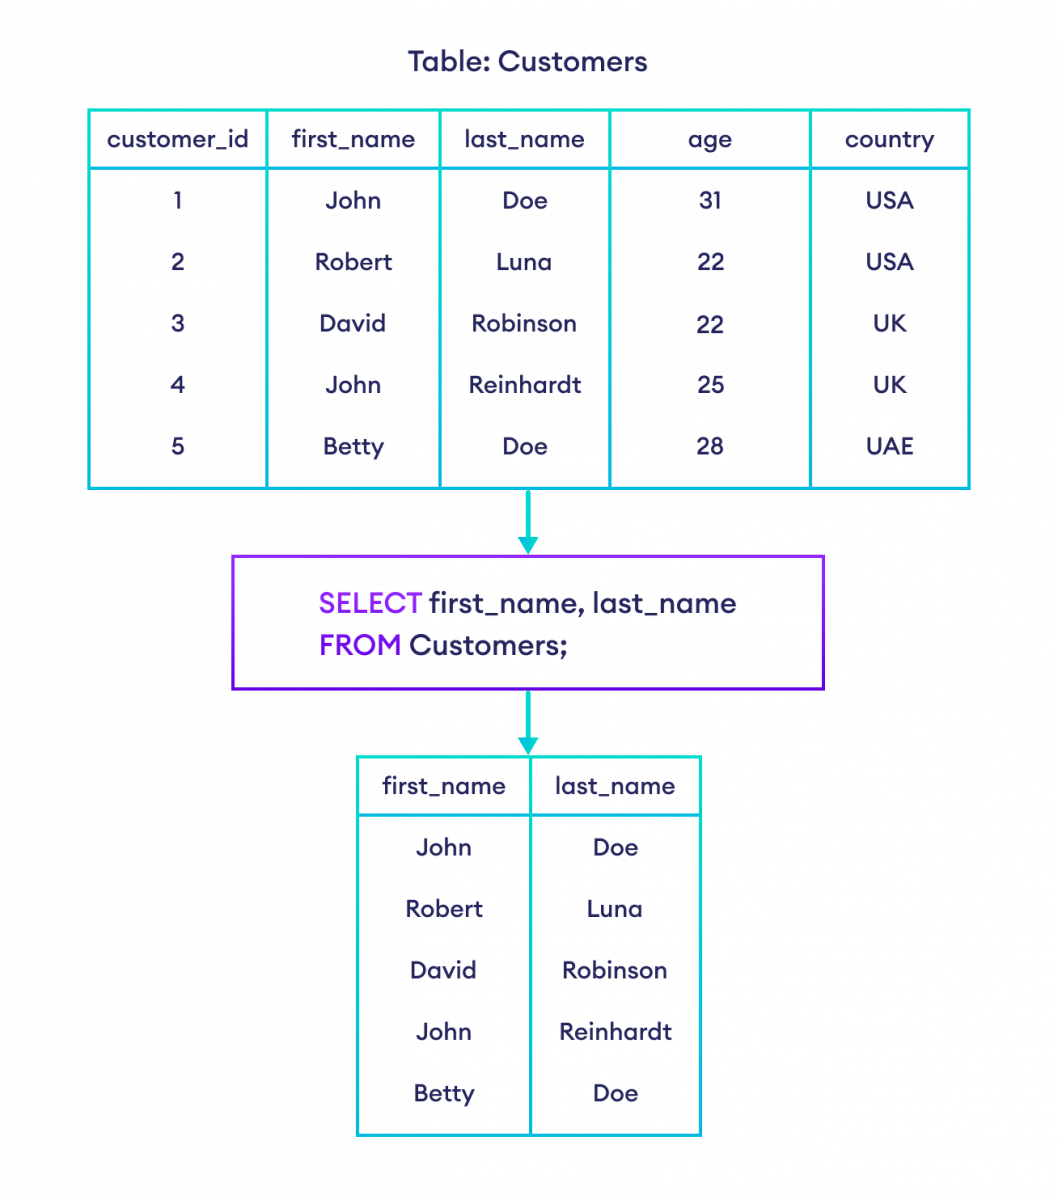
To see this in action, let's watch a short video.
Select Statement in MySQL | Beginner MySQL Series
Alex The Analyst provides a very clear, step-by-step demonstration of writing basic SELECT queries. Watching someone else code is a great way to solidify your understanding.
Please watch the following two segments: 'Selecting All Columns from a Table' (00:34 - 02:12) and 'Selecting Specific Columns' (03:48 - 05:24). Pay attention to the syntax and how he builds the query piece by piece.
3. Formatting and Aliases: Writing Clean Queries
While SQL is not strict about capitalization or line breaks, following conventions makes your code much easier to read for yourself and others.
- Capitalization: It's standard practice to write SQL keywords (
SELECT,FROM) in uppercase and table/column names in lowercase. - Line Breaks: When selecting many columns, it's common to place each column on a new line to improve readability.
-- This is hard to read
SELECT user_id, first_name, last_name, email, signup_date, subscription_plan FROM users;

-- This is much easier to read
SELECT
    user_id,
    first_name,
    last_name,
    email,
    signup_date,
    subscription_plan
FROM
    users;
Renaming Columns with AS
Sometimes, the column names in the database aren't ideal for a report or presentation. You can rename columns in your query's output using the AS keyword. This is called creating an alias.
For example, if you wanted the signup_date column to be called Registration Date in your results, you would write:
SELECT
    email,
    signup_date AS "Registration Date"
FROM
    users;
This is purely for presentation; it does not change the column name in the actual database table. As a designer, you can appreciate how aliasing helps in crafting clear and presentable data outputs.
Let's return to the Mode article, which has a great section on formatting and column naming.
Please read the section titled 'Column names'. It covers the use of the AS keyword for aliasing and the convention of using double quotes for aliases with spaces.
4. Practice Your Skills
Now it's time to write some queries yourself. Based on our hypothetical users table with the columns user_id, first_name, last_name, email, signup_date, and subscription_plan, write the SQL queries for the following tasks.
Problem 1: Write a query to retrieve only the email addresses of all users.
Solution
SELECT email
FROM users;
Problem 2: Write a query to get the first_name, last_name, and signup_date for every user.
Solution
SELECT
    first_name,
    last_name,
    signup_date
FROM
    users;
Problem 3: Write a query that retrieves the user_id and subscription_plan for all users. In the output, rename the subscription_plan column to Plan Type.
Solution
SELECT
    user_id,
    subscription_plan AS "Plan Type"
FROM
    users;
Conclusion
Excellent work! In this lesson, you've taken your first and most important step in learning SQL. You now understand the fundamental structure of a database query and can use it to retrieve precisely the data you need.
Here are the key takeaways:
- Data in databases is stored in tables with rows and columns.
- The
SELECTstatement is used to retrieve data from these tables. SELECTspecifies the columns you want, andFROMspecifies the table.- You can select all columns with
SELECT *or select specific columns by listing their names. - You can rename columns in your output for clarity using an alias with the
ASkeyword.
You've learned how to pull specific columns of data. But what if you don't want to see all the users? What if you only want to see users on the 'premium' plan, or those who signed up this year?
In our next lesson, "Filter rows using WHERE clauses," we will learn how to filter the rows in our result set to answer these more targeted questions.