In our previous lesson, we traced the journey of a Spring Boot application from the main method to a fully running state. We saw how the ApplicationContext is created and how it scans for your classes to create and manage beans. Now, we'll focus on the next crucial step in that process: how Spring connects these beans to each other.
This lesson addresses a fundamental concept in Spring and a very common topic in developer interviews: Dependency Injection (DI). You've used it implicitly when building your CRUD APIs, likely with @Autowired on fields. Today, we'll dissect the three primary methods of dependency injection—constructor, setter, and field injection. By the end of this lesson, you will be able to compare their trade-offs and understand why constructor injection has become the undisputed standard in modern Spring development. We will also refactor a service to use this recommended approach, giving you a practical skill to apply immediately.
A Quick Refresher: Why Dependency Injection?
Before comparing the different methods, let's briefly revisit why we use dependency injection in the first place. At its core, DI is a design pattern that implements Inversion of Control (IoC). Instead of a component creating its own dependencies (e.g., new MyDependency()), it declares what it needs, and an external container (the Spring ApplicationContext) provides—or injects—those dependencies.
This practice decouples your components. A UserService doesn't need to know how to construct a UserRepository; it only needs a UserRepository to do its job. This makes your code more modular, flexible, and easier to test.
The following video explains this core problem of tight coupling and introduces DI as the solution that allows us to follow the Dependency Inversion Principle from the SOLID design principles.
Spring Boot Dependency Injection Explained: Types, Issues, and Solutions
Watch this segment to understand the problem DI solves.
The video starts by showing how creating objects with the new keyword creates tight coupling. Watch from the beginning until the explanation of how dependency injection resolves this by adhering to the Dependency Inversion Principle.
The Three Styles of Dependency Injection
Spring provides three ways to inject dependencies into your beans. Let's look at how a UserService that depends on a UserRepository would be written using each style.
The article "Thorough Comparison of Spring Boot's 3 Dependency Injection Methods" provides clear, side-by-side code examples.
This article will be our primary guide for comparing the three injection types. First, let's familiarize ourselves with the syntax for each.
Please read the introduction, which notes that @Autowired is optional on single constructors, and then review the code examples under the heading the three patterns. Notice the difference in where the @Autowired annotation is placed (or if it's present at all).
As you saw, the three styles are:
- Field Injection:
@Autowiredis placed directly on the field. This code is the most concise. - Setter Injection:
@Autowiredis placed on a public setter method. - Constructor Injection: The dependencies are provided as arguments to the class's constructor. Since Spring 4.3, if a class has only one constructor, the
@Autowiredannotation is optional.
Field injection looks the simplest, which is why many developers start with it. However, as you'll see, its simplicity hides significant downsides.
Why Constructor Injection is Recommended
In any technical interview for a Spring developer role, you can expect to be asked which injection style you prefer and why. Stating a preference for constructor injection and being able to defend that choice with clear reasoning is a strong signal of a knowledgeable developer.
Let's break down the reasons by comparing the injection types across several critical criteria. The following summary tables give a great high-level overview of the comparison we're about to make.

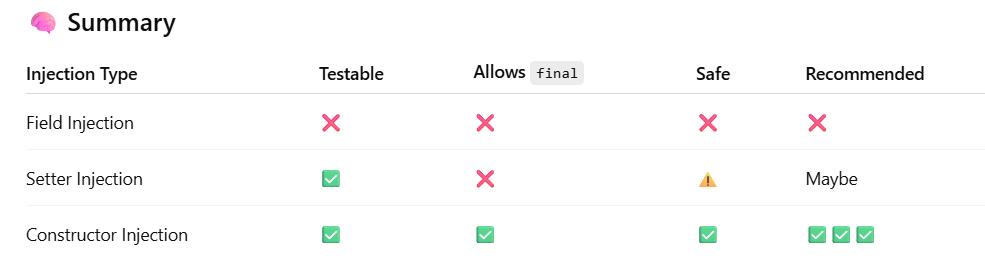
Now, let's explore these points in detail.
1. Testability
This is arguably the most significant advantage of constructor injection. Your class remains a plain old Java object (POJO). To unit test it, you can simply instantiate it with the new keyword and pass in mock implementations of its dependencies.
With field injection, this becomes difficult. The dependency fields are usually private, and since there's no constructor or setter to provide a mock, you're left with two poor choices:
- Use reflection to forcefully set the private field. This is complex and brittle.
- Run the test with the full Spring testing framework (
@SpringBootTest). This is much slower and turns a simple unit test into an integration test.
The following video provides a practical demonstration of these issues.
Spring Boot Developers Are Doing This Wrong ❌ (@Autowired Field Injection Problem) ✅
This video clearly demonstrates the problems field injection creates.
First, watch the segment from this point to see how field injection can lead to a NullPointerException if the class is instantiated outside of Spring's control. Then, see how this same issue makes unit testing difficult, as dependencies are null unless you use reflection or a mocking framework.
2. Immutability and Null Safety
Constructor injection allows you to declare your dependency fields as final. This is a powerful guarantee.
- Immutability: Once the dependency is injected at construction time, it cannot be changed. This makes your components more robust and their behavior more predictable.
- Null Safety: A
finalfield must be initialized. This means the Java compiler enforces that your object cannot be constructed without its required dependencies. If a dependency bean is missing, the Spring application context will fail to start. You find the error immediately, not at runtime when a method is called and throws aNullPointerException.
Field and setter injection do not allow for final fields. The dependencies are injected after the object is constructed, meaning there's a window where they are null.
Let's reinforce the concepts of immutability and null-safety.
Read the section Null safety and immutability in the article. It clearly explains the benefits of using final with constructor injection.
3. Hidden Dependencies
With constructor injection, a class's required dependencies are part of its public contract. It is impossible to create an instance of the class without providing them. This makes the class's requirements explicit and clear to any developer using it.
Field injection hides these dependencies. Looking only at the empty default constructor, a developer might wrongly assume the class has no dependencies, leading to the instantiation issues and NPEs we saw earlier. This is considered poor API design.
4. Circular Dependencies
A circular dependency occurs when bean A depends on bean B, and bean B depends on bean A. This is almost always a sign of a design flaw—your components' responsibilities are likely tangled.
- Constructor Injection: If you have a circular dependency, Spring's IoC container cannot resolve it and will throw a
BeanCurrentlyInCreationExceptionon startup. This fail-fast behavior is a feature. It forces you to address the design problem immediately. - Setter/Field Injection: Spring can sometimes break the cycle by creating one bean, injecting its dependencies later, and then creating the second bean. This allows the application to start, but it masks the underlying design issue and can lead to strange runtime behavior or
NullPointerExceptionif one bean tries to use the other before it's fully initialized.
The official Spring documentation discusses this very point.
Dependency Injection :: Spring Framework
The Spring team itself advocates for constructor injection and explains the circular dependency problem.
First, read the section under the heading Constructor-based or setter-based DI?. This clearly states the Spring team's recommendation. Then, read the section on Circular dependencies to see why constructor injection helps detect this issue at startup.
Refactoring to Constructor Injection
Now that the "why" is clear, let's focus on the "how". Fortunately, refactoring from field injection to the recommended constructor style is straightforward.
Manual Steps:
- Remove the
@Autowiredannotation from the field. - Make the field
private final. - Create a public constructor that accepts the dependency as an argument and assigns it to the field.
Using Lombok (The Modern Standard):
Manually writing constructors becomes tedious as dependencies grow. The de facto standard in the Java community to solve this is Project Lombok. By adding a single annotation, @RequiredArgsConstructor, to your class, Lombok will automatically generate a constructor for all final fields at compile time.
This gives you all the benefits of constructor injection with the conciseness of field injection.
Let's see the refactoring process and the role of Lombok.
Read the section Cutting boilerplate with Lombok to see how this annotation simplifies your code. Then, read The reasoning behind IntelliJ’s warning for a summary of the mechanical steps to refactor.
Here's the final, recommended form for our UserService:
@Service
@RequiredArgsConstructor
public class UserService {
    private final UserRepository userRepository;
    // Add other final dependencies here

    public User find(Long id) {
        return userRepository.findById(id).orElseThrow();
    }
}
When to Use Setter Injection
While constructor injection is the best choice for required dependencies, setter injection has a valid, albeit niche, use case: optional dependencies. If a bean can function without a particular dependency, or if you want to provide a default implementation that can be overridden, a setter method is a clear way to express that optionality. You can combine it with @Autowired(required = false).
Conclusion
In this lesson, we've moved from knowing that Spring creates beans to understanding precisely how it should wire them together. This knowledge is crucial for writing robust, testable, and maintainable applications—and for proving your expertise in an interview.
Here are the key takeaways:
- Constructor Injection is Recommended: It ensures dependencies are provided at creation, enables immutability with
finalfields, preventsNullPointerException, makes dependencies explicit, and fails fast on circular dependencies. - Field Injection Should Be Avoided: It hides dependencies, makes testing difficult, prevents immutability, and can mask design problems like circular dependencies.
- Setter Injection is for Optional Dependencies: It should be used when a dependency is not strictly required for the component to function.
- Use Lombok's
@RequiredArgsConstructor: This annotation provides the benefits of constructor injection without the boilerplate code, and is the current industry standard.
In our next lesson, we will continue exploring the bean lifecycle. Now that we know how beans are created and injected, we'll investigate how their scope (singleton, prototype, etc.) and lifecycle callbacks (@PostConstruct, @PreDestroy) affect their creation, destruction, and behavior within the application.