Welcome back! In our last lesson, we successfully converted your static tool page into a dynamic template capable of displaying information from any Tool in your database. This was a fantastic step toward your goal of a scalable multi-tool platform. However, there's a missing link: how do we tell the page which specific tool to load?
This lesson will bridge that gap. We will explore URL parameters, a powerful and common method for passing information between pages. You will learn how to send a tool's unique identifier from your list of tools to the dynamic tool page, and then configure that page to read the identifier and load the corresponding data. This technique is fundamental to making your app's navigation truly dynamic and is a cornerstone of scalable web applications.
Given your experience with dynamic content in WordPress, you might recognize this concept. URL parameters function similarly to the query strings used in URLs (like ?category=calculators) to filter content on a page. Today, you'll master how to implement this pattern in Bubble.
What are URL Parameters?
Before we dive into Bubble, let's clarify what URL parameters are. They are small pieces of information, structured as key-value pairs, that are appended to the end of a URL. They always start with a question mark (?), and multiple parameters are separated by an ampersand (&).
For example, in a URL like myapp.com/tool?id=123x456&theme=dark:
- The first parameter's key is
id, and its value is123x456. - The second parameter's key is
theme, and its value isdark.
Your Bubble app can both create these URLs and read the information within them. This allows us to pass data—like the unique ID of a tool—from one page to another without using the page's built-in data type.
The following article from Amlie Solutions provides an excellent, detailed overview of URL parameters.
Bubble URL Parameters: Everything you need to know - Amlie Solutions
This article will give you a solid foundation in what URL parameters are and how they are structured.
Please read the first three short sections: The introduction to understand their purpose. The next section, which shows real examples from within Bubble itself. The section on their structure, explaining the role of the ?, &, key, and value.
Now that you understand the concept, let's put it into practice. We'll configure the navigation from your list of tools to the tool page.
Step 1: Sending the Tool's ID as a URL Parameter
Our goal is to make each tool in your repeating group link to the tool page and tell that page which tool to display. We'll do this by passing the unique id of the tool as a URL parameter.
- Navigate to the page where you have the repeating group that displays your list of tools (e.g., your homepage or a category page).
- Inside the repeating group's cell, choose the element you want users to click to navigate. This could be a "View Tool" button, the tool's name, or the group containing the tool's card.
- Select that element and add a workflow.
- In the workflow editor, add the action Navigation > Go to page....
- Set the Destination to your
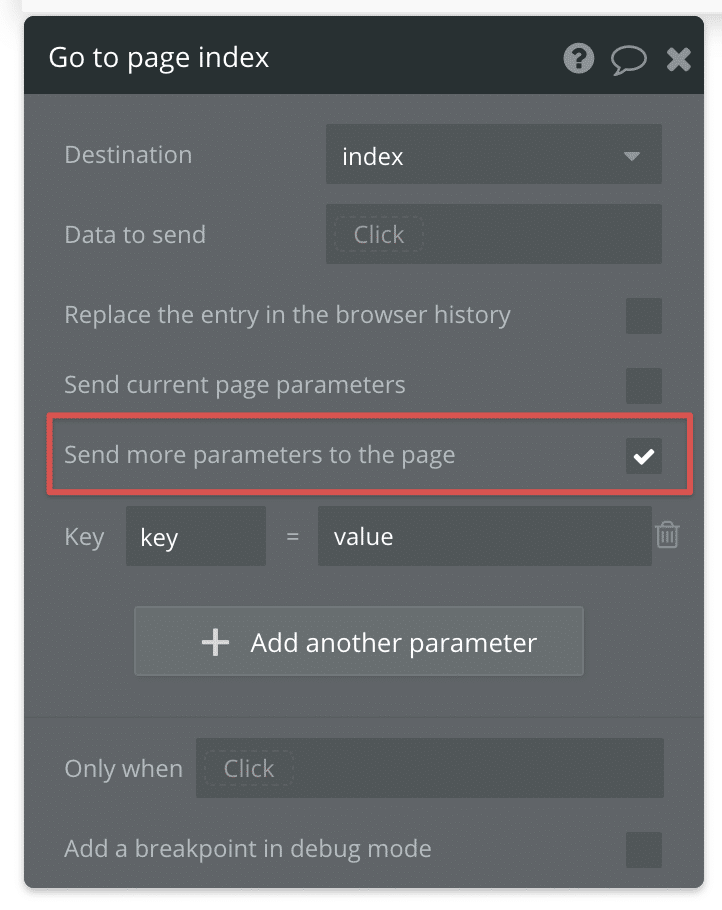
toolpage. - Here is the crucial step: check the box that says Send more parameters to the page.
This will reveal fields to define a key and a value. We will create a parameter with the key id and set its value to be the unique ID of the tool in the current repeating group cell.
- For Key, type
id(you can use any name, butidis a common convention). - For Value, click "Insert Dynamic Data" and choose
Current cell's Tool's unique id.
This workflow now tells Bubble: "When this element is clicked, navigate to the tool page and add ?id=[the unique id of this specific tool] to the URL."
This video from Building With Bubble provides an excellent demonstration of this entire process, using a search page as an example. The principle is identical.
How to Use URL/Page Parameters in Bubble.io
This video demonstrates a practical use case for URL parameters, showing how to send and receive data for a search results page.
Watch the segment from this timestamp. The creator configures a "Go to page" workflow and uses the "send more parameters to the page" option to pass values from input fields. Follow the same logic, but instead of input values, you will be sending the Current cell's Tool's unique id.
Step 2: Reading the URL Parameter on the Tool Page
Now that we're sending the tool's ID to the tool page, we need to configure that page to use it. The URL will look something like this: .../tool?id=168....
In the last lesson, we set the page's "Type of content" to Tool. This works when Bubble sends the full data object to the page (which puts the ID in the URL path, like /tool/168...). However, since we are now sending the ID as a parameter, we need a more flexible setup. We will use a group as our main data container instead of the page itself.
Here's how to adapt your tool page:
- Remove Page Content Type: Open the
toolpage. If you select the page itself, find the Type of content dropdown and set it back to be empty. - Create a Container Group: If you don't already have one, add a Group element to the page that will contain all the elements for displaying your tool (the name, description, icon, input/output sections, etc.). Make it span the full page.
- Set the Group's Data:
- Select this new container group.
- Set its Type of content to
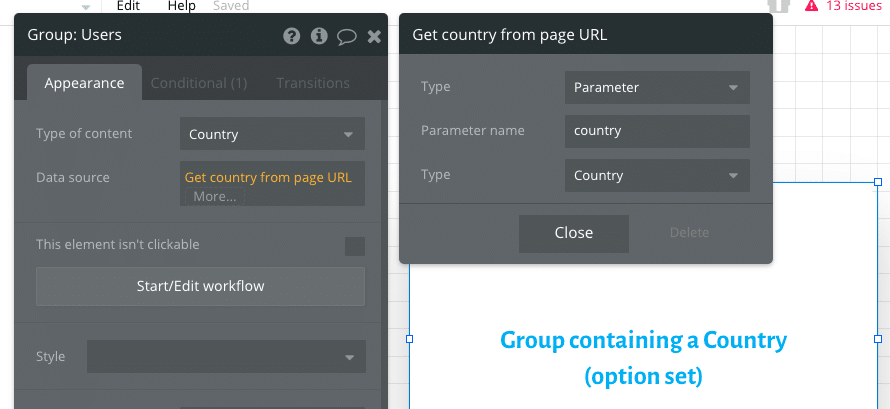
Tool. - For the Data source, we'll build an expression to find the tool using the ID from the URL. Click "Insert Dynamic Data" and choose Get data from page URL.
- In the pop-up, set the Parameter name to
id(the key we defined in our workflow). - Change the Type from
texttoTool. This tells Bubble to not just read the ID as text, but to use that ID to look up a record in theTooldata type.
- Update Dynamic Expressions: Your text and image elements inside the group were probably referencing
Current page Tool's.... Since the data is now in the parent group, not the page, you must update these. Change each expression fromCurrent page Tool's NametoParent group's Tool's Name, and so on for the description and icon.
The image below illustrates the final step of setting the group's data source.
This method is extremely powerful. The group now acts as a self-contained component that fetches its own data based on the URL.
The article from Amlie Solutions clearly explains this "reading" part of the process.
Bubble URL Parameters: Everything you need to know - Amlie Solutions
This part of the article explains how to retrieve data sent via URL parameters.
Focus on the section Reading a database Thing. It walks through the exact process of setting a group's data source using "Get data from page URL" and specifying the data type. This is precisely the logic you are implementing for your tool page.
Once you've completed these steps, preview your app. Click on different tools in your list. You should be taken to the tool page, and you'll see the content change to reflect the tool you clicked, with the tool's unique ID visible in the URL bar.
Conclusion
Fantastic work! You have now mastered a critical technique for building scalable applications in Bubble. By using URL parameters, you've successfully connected your list of tools to your dynamic tool page, allowing users to select exactly what content they want to see.
Here are the key takeaways from today's lesson:
- URL parameters are key-value pairs in the URL used to pass information between pages.
- You can send parameters using the Go to page workflow action and enabling Send more parameters to the page. The most common value to send for a database record is its
unique id. - On the destination page, you use the Get data from page URL expression to read the parameter. By setting the correct data type, you can instruct Bubble to fetch the full database record.
- Using a group as a data container (instead of the page itself) provides a flexible and powerful way to load content based on URL parameters.
In our next lesson, we will formalize the structure of your category pages. We will build a dynamic list of tools belonging to a specific category and ensure each one links correctly to the tool page using the URL parameter technique you just learned.