Welcome back! In our last lesson, you installed the API Connector and got familiar with its interface, effectively building the bridge between your app and the vast world of external services. We covered the theory, but today is all about putting that theory into action.
This lesson is designed to be very hands-on, guiding you through the process of making your very first live API call. You will set up, test, and successfully retrieve data from a public API directly into your Bubble editor. Mastering this skill is the foundation for integrating the unique, niche tools you plan to feature on your platform.
Your First Live Request: The GET Call
We'll start with the most common type of API request: a GET request. As we discussed, this is how you ask for or get data from a server. For this exercise, we will use a simple, public API that doesn't require any complex authentication, allowing us to focus purely on the mechanics of the call itself.
Let's configure your first connection.
Step 1: Configuring the API Call
In the previous lesson, you installed the API Connector plugin. Now, navigate to the Plugins tab in your Bubble editor and open it. You should see a blank canvas, ready for your first API.
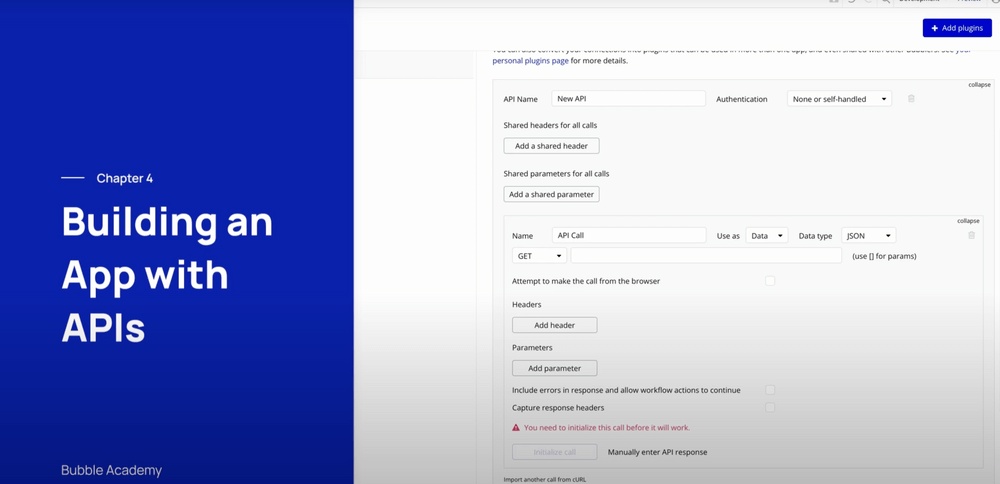
We will follow along with an excellent tutorial from Bubble that uses a demo movie database API. This is a perfect example because it's public and well-structured, making it ideal for a first attempt.
Intro to APIs & the API Connector | Bubble Crash-Course
This segment of Bubble's official crash course will walk you through the entire process of setting up your first GET request. Follow the steps in the video within your own Bubble editor.
Watch the section from the beginning of the setup. As you watch, perform these key actions: Click "Add another API". Give the API a descriptive name, like "Demo Movie API". Leave the Authentication as "None or self-handled". Expand the call and name it something clear, like "Get All Movies". Ensure "Use as" is set to "Data". This is crucial for fetching data to display. The request type should be GET. Copy the endpoint URL from the video (https://bubble.io/blog/api/v1/movies/) and paste it into the URL field.
At this point, your API Connector should have a new API and one call configured, waiting for the next crucial step. The configuration for another public API, like one for searching the iTunes store, would look very similar.

Step 2: Initialization—The Moment of Truth
You've told Bubble what to ask for and where to ask for it. Now, you need to press the "send" button for the first time. This is called initializing the call.
When you initialize, Bubble makes a real request to the API endpoint. If successful, it receives the JSON data in response, inspects its structure (the keys and data types), and automatically configures the data fields for you to use in your app.
Let's see this in action.
Intro to APIs & the API Connector | Bubble Crash-Course
This next part of the video shows the initialization process and, importantly, how to interpret the response that Bubble receives.
Continue watching from where you left off. Pay close attention to these points: Click the "Initialize call" button. A window will pop up showing the response data. This is Bubble's interpretation of the JSON it received. Look at the fields and their detected types (e.g., title as text, running_time as number). Bubble is usually smart about this, but you have the power to manually change a field's type here if needed. Once you're satisfied, click "Save".
Congratulations! You have successfully set up and tested a GET request. The API Connector now understands the structure of a "Movie" from this external API and is ready to pull that data into your app whenever you ask.
This exact process—configure, initialize, save—is the fundamental workflow you'll use for nearly every GET request you build for your multi-tool platform, whether it's for a currency converter, a stock price checker, or any other data-driven tool.
Reinforcing the Concepts
To solidify what you've just done, the article below provides a great written summary of these steps. Seeing the same process described in a different format can help reinforce the key ideas.
Integrating REST APIs with Bubble’s API Connector: A Full Guide - Lesscode LLC
This guide from Lesscode LLC provides a concise, step-by-step breakdown of setting up a GET request.
Please read the section "How Do You Set Up a GET Request in Bubble.io?". It uses a weather API as an example, but you'll recognize the exact same sequence of actions you just performed: create the API, add the call, paste the URL, add any info, and initialize.
Conclusion
In this lesson, you crossed a major threshold from theory to practice. You configured the API Connector to communicate with a live, external service, made a successful GET request, and instructed Bubble on how to understand the data it received. This is the core engine for building the dynamic, integrated tools you envisioned.
Here are the key takeaways:
- API Calls are configured with a name, a request type (
GET), and an endpoint URL. - Setting a call to be used as "Data" makes its response available as a data source throughout your app.
- Initializing a call is a mandatory, one-time test where Bubble learns the structure of the API's JSON response.
- During initialization, you can verify and correct the data types for each field returned by the API.
You've successfully built and tested the connection. The next logical step is to do something with the data you've fetched. In our next lesson, we will focus on taking the movie data you just connected to and displaying it dynamically on a page in your Bubble application.