Welcome back! In our last session, we successfully embedded a JavaScript-based calculator into a Bubble page using the HTML element. However, we also discovered a crucial limitation: the embedded tool was completely isolated, a "black box" that couldn't communicate with the rest of your Bubble app. This is a significant hurdle for your goal of creating a deeply integrated multi-tool platform.
Today, we're going to break down that wall. This lesson focuses on installing and using a powerful plugin that acts as a bridge between your custom JavaScript code and Bubble's no-code environment. By the end of this session, you'll be able to trigger a Bubble workflow from an action inside your embedded calculator, a foundational skill for building the dynamic and interactive tools you've envisioned.
The Key to Communication: The Toolbox Plugin
To achieve the "deep integration" you're aiming for, we need a way for the JavaScript inside the HTML element to talk to Bubble, and for Bubble to talk back. The most popular and versatile solution for this is a free plugin called Toolbox.
Toolbox is a "must-have" for many Bubble developers because it provides several utility elements and actions that extend Bubble's native capabilities, particularly when working with code. Let's start by getting it installed.
Bubble.io copy to clipboard : easy 2 min guide
This guide from Nocodable Components, although focused on a "copy to clipboard" feature, provides an excellent rationale for installing the Toolbox plugin.
Please read the brief section titled Step 1. It includes a direct link to the plugin's page in the Bubble marketplace. Follow the link and click "Install" to add it to your application.

With the plugin installed, you'll find new elements and workflow actions available in your editor, which we'll explore now.
Receiving Data: The JavascriptToBubble Element
The first direction of communication we'll establish is from your embedded JavaScript to Bubble. Toolbox provides a special visual element for this purpose called JavascriptToBubble.
Think of this element as a listening post. You place it on your page, and it waits for a specific JavaScript function to be called. When that function is called, it can receive a value (like the result of a calculation) and trigger a Bubble workflow.
The following video from Jacob Gershkovich provides a fantastic walkthrough of this entire process. We'll watch it in segments to understand each step.
The Bubble.io Toolbox Plugin | How to save a value from Javascript to Bubble | Bubble.io Tutorials
This tutorial clearly explains how the JavascriptToBubble element works.
First, watch the segment from the start where the instructor adds the element to the page and introduces the bubble_fn_suffix property. This suffix is what you'll use to name the unique JavaScript function that communicates with this specific element.
Configuring the Element
Once you've placed the JavascriptToBubble element on your page, you need to configure it. This involves giving its function a unique name and telling it what to do when it receives data.
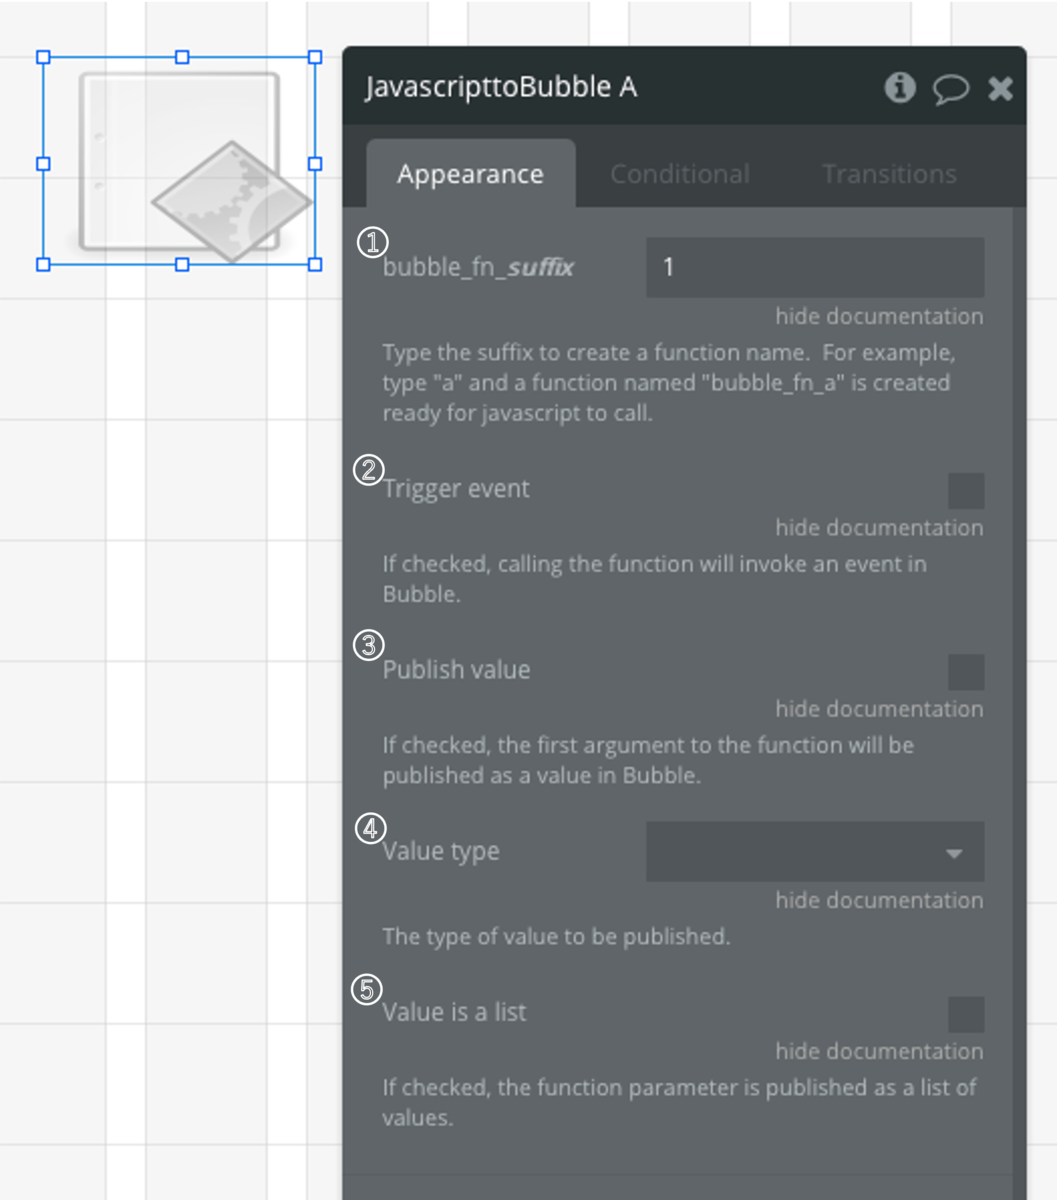
Let's look at the key settings, which are also covered in the next part of the video:
bubble_fn_suffix: This is the unique part of the function name. If you typeresult, Toolbox creates a JavaScript function namedbubble_fn_result().Trigger event: This checkbox is crucial. When checked, it creates a new event in the Workflow tab that will fire every time the JavaScript function is called.Publish value: This checkbox tells the element to capture the first piece of data (or "argument") passed into the JavaScript function and make it available in Bubble.Value type: Here you specify the type of data you expect to receive, such astext,number, ordate.
Now, let's continue the video to see this configuration in action and understand how to trigger the workflow.
The Bubble.io Toolbox Plugin | How to save a value from Javascript to Bubble | Bubble.io Tutorials
This next segment shows the configuration and the complete workflow, from calling the function in JavaScript to catching the event in Bubble.
Watch from this section, where the instructor calls the bubble_fn_ function from a Run javascript action and configures the element's value type. Then, continue from the final part, which demonstrates how to check the "Trigger event" box and build the corresponding workflow to capture the value and save it.
To summarize the process in writing, the following article provides a clear, step-by-step guide that mirrors the video's content.
How to send data from JavaScript to Bubble with Toolbox Plugin and localStorage | Beyond the Code
This article by Julie T. Edjere provides a great textual summary of the process for setting up the JavascriptToBubble element and its corresponding workflow.
Please read the sections titled Setup, Configuration, and finally Receiving Data. This will reinforce the key steps you saw in the video.
Practical Exercise: Connecting the Calculator
Now, let's apply this to the calculator you embedded in the previous lesson. Our goal is to add a button inside the calculator's HTML that sends the final calculated result back to Bubble, which will then display it in an alert.
-
Open Your Page: Navigate to the
tool_testpage (or whatever you named it) where your calculator is embedded. -
Add the
JavascriptToBubbleElement:- Find
JavascriptToBubblein the Visual Elements panel and drag it onto your page. It's an invisible element, so you can place it anywhere. - In its property editor, set the
bubble_fn_suffixtocalculatorResult. - Check the
Publish valuecheckbox. - Set the
Value typetonumber. - Check the
Trigger eventcheckbox.
- Find
-
Modify Your HTML and JavaScript:
- Select the HTML element containing your calculator code.
- Find the HTML part of your code. You need to add a button that will trigger our function. A good place might be right after the display screen element. Let's assume the calculator's display has an
id="result"or similar. You'll add a button like this:<button onclick="sendResultToBubble()">Send Result to Bubble</button> - Now, scroll down to the
<script>section of your code. Add the new JavaScript function that this button calls:function sendResultToBubble() { // Find the calculator's display element. The original code uses a 'result' id. const display = document.getElementById('result'); // Get the current value from the display. const value = display.value; // Call the bubble function, converting the text value to a number. bubble_fn_calculatorResult(parseFloat(value)); } - Note: The exact
idof the display element ('result') might vary based on the specific calculator code you used. Check theindex.htmlfile from the GitHub repository to confirm.
-
Create the Bubble Workflow:
- Go to the Workflow tab.
- Click "Click here to add an event..." and select Elements > A JavascriptToBubble event is triggered. Choose the
JavascriptToBubbleelement you just added. - For the first action, select Element Actions > Show an alert.
- In the "Message" box, type:
The calculator result is:and then use the dynamic data inserter to select This JavascriptToBubble's value.
-
Test It: Preview the page. Perform a calculation with the embedded calculator. Now, click your new "Send Result to Bubble" button. You should see a Bubble alert pop up with the correct result!
Conclusion
You have now successfully built a bridge between the isolated world of an embedded JavaScript tool and your Bubble application's powerful workflow engine. This is a critical milestone for your project.
Here are the key takeaways from today's lesson:
- The Toolbox plugin is a free, essential tool for advanced Bubble development, enabling communication with custom code.
- The
JavascriptToBubbleelement acts as a receiver, allowing JavaScript to send data to Bubble. - The process involves three main steps: configuring the
JavascriptToBubbleelement (defining asuffixand enabling events), calling the correspondingbubble_fn_...()function from your JavaScript, and creating a workflow in Bubble to catch the triggered event and use its value.
You've learned how to get data out of your custom tool. In our next lesson, we will complete the circle. We'll explore another feature of the Toolbox plugin—the Run javascript action—to send data from Bubble inputs into your embedded JavaScript tool. This will unlock the ability to create truly dynamic tools that are controlled by your Bubble UI.