Introduction
Welcome back! In the last lesson, we built a "scene constructor" pattern to dynamically spawn Goblin instances. This was a great step forward, but we identified a key architectural problem: the goblin's properties, like card_name and health, were hard-coded directly into the goblin.gd script. This is inflexible and won't scale for a game with dozens or hundreds of unique cards.
This lesson tackles that problem head-on. Your learning outcome is to define and export custom resource types to create data-driven objects in Godot.
This concept is central to building flexible and maintainable games in Godot. It enables a powerful software design principle: the separation of data from logic and presentation. Given your background in systems engineering and Java development, you'll likely recognize this as a way to create custom, serializable data-transfer objects (DTOs) or plain old Java objects (POJOs), but with deep integration into the game engine's editor.
In this lesson, we will:
- Understand what Godot
Resourcesare and why they are the ideal tool for this job. - Create a custom
CharacterStatsresource to hold our goblin's data. - Refactor the
Goblinscene to be driven by this new data resource. - Demonstrate the power of this approach by creating a new creature type without writing any new code.
What Are Resources and Why Use Them?
In Godot, almost everything you save to a file is a Resource. This includes scenes (.tscn), scripts (.gd), and images (.png). While Nodes provide functionality (drawing sprites, handling physics), Resources are primarily data containers.
For our card game, we want to define the stats of a card (name, cost, health, abilities) in a data file and then have a generic "Card" scene that can load and display that data. This is precisely what custom resources are for.
The following video provides an excellent overview of what resources are, how they differ from nodes, and how they can be used to create data-driven systems like inventories or character variations—a concept directly applicable to our card game.
How to use Resources in Godot 4
Watch these sections from the video "How to use Resources in Godot 4" by Bitlytic to get a solid conceptual understanding.
Watch the following parts: What are resources? (0:15 - 0:39): Understand the core definition. Example with enemy variations (0:39 - 1:52): This is a perfect analogy for creating different cards using the same scene. Item and crafting systems (2:18 - 3:15): This shows how resources form the backbone of data-heavy game systems, similar to our deck and card library.
As the video explained, creating your own resource types offers several advantages over just using a generic data format like JSON, especially for a developer who appreciates robust system design.
- Editor Integration: Godot's Inspector can read and edit your custom resources out-of-the-box. No need to write a separate tool.
- Type Safety: By defining properties in a script, you know exactly what data a resource will contain. This is much safer than a loosely-structured dictionary.
- Encapsulation: Resources are full-fledged objects. They can have methods and signals, allowing you to encapsulate data-related logic directly with the data itself.
- Efficient Serialization: Godot handles saving (
.trestext files, great for version control) and loading (.resbinary files in the exported game, for speed) automatically.
Hands-On: Creating a CharacterStats Resource
Let's refactor our Goblin to use a data-driven approach. We will create a CharacterStats resource to hold its data, then modify the Goblin scene to use it.
The overall workflow we'll follow is:
- Define the data structure in a script (
CharacterStats.gd). - Create a data instance as a resource file (
goblin_stats.tres). - Link the scene's script (
goblin.gd) to the data instance.
This video from Glitched Code walks through this exact workflow, using a card as its example. Watching it will give you a clear visual of the steps we're about to take.
Using Scriptable Objects/Resources in Godot
This video, "Using Scriptable Objects/Resources in Godot", provides a complete, practical walkthrough of the process we are about to undertake.
Watch from 2:19 to 11:00. This covers: Creating the custom resource script. Creating a .tres file instance in the editor. Exporting a variable for the resource on a scene's script. Accessing the resource's data in code to update the scene.
Now, let's do it ourselves.
1. Create the CharacterStats Script
First, we need to define the "class" for our data object.
- In the
FileSystemdock, right-click and selectNew Script.... - In the
Create Scriptdialog:- Set Inherits to
Resource. - Set the Path to
res://character_stats.gd.
- Set Inherits to
- Click
Create.
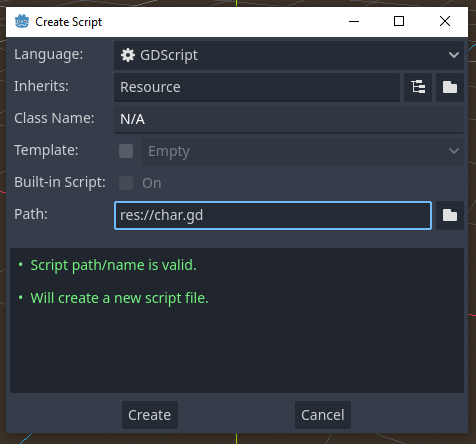
Now, open character_stats.gd and add the following code. This defines the data fields for our character.
# character_stats.gd
class_name CharacterStats
extends Resource

@export var card_name: String = "Unnamed"
@export var max_health: int = 100
class_name CharacterStats: This is crucial. It registersCharacterStatsas a new type within Godot, allowing us to create it from the editor and refer to it in other scripts.extends Resource: This tells Godot that this script defines a data resource.@export: This keyword exposes the variable in the Inspector, allowing us to edit its value and, most importantly, save it to a.tresfile.
2. Create the goblin_stats.tres Resource File
Now that we have the template, let's create a specific data file for our goblin.
- In the
FileSystemdock, right-click where you want to save your card data (e.g., in the rootres://for now) and selectNew Resource.... - In the
Create New Resourcedialog, search for and selectCharacterStats. - Name the file
goblin_stats.tresand clickSave.
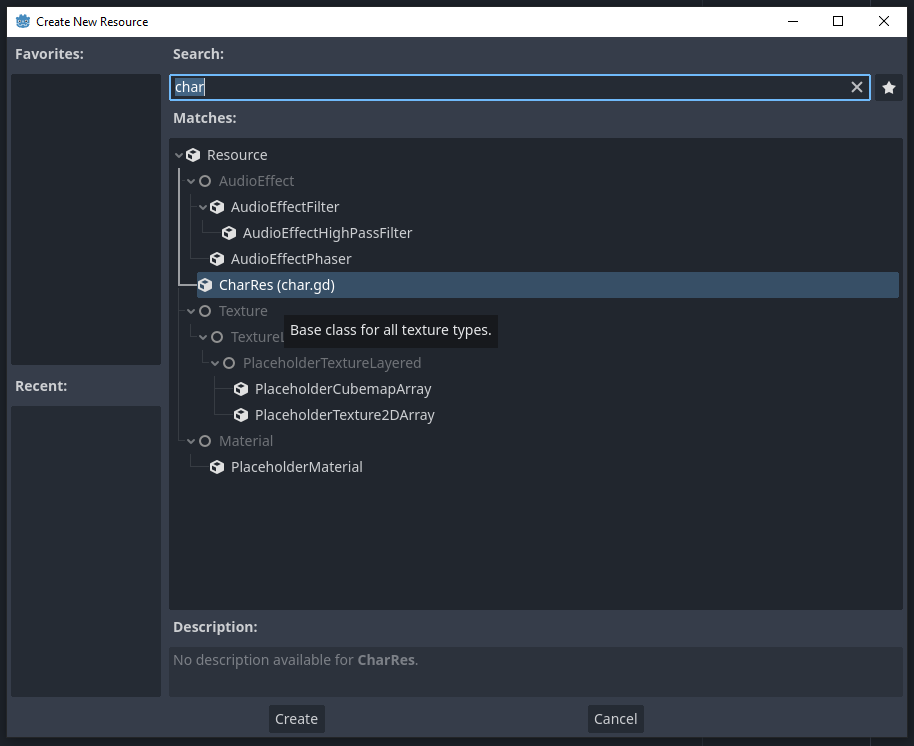
You will now see goblin_stats.tres in your FileSystem. Click on it. The Inspector will show the properties we defined with @export.
- Set
Card Nameto "Goblin". - Set
Max Healthto100. - Save your project (
Ctrl+S). The data is now saved in the.tresfile.
3. Refactor the Goblin Scene
Finally, let's update goblin.gd to use this external data resource instead of its own hard-coded variables.
- Open
goblin.tscn. - Open
goblin.gd. - Modify the script as follows:
# goblin.gd
class_name Goblin
extends Node2D

const SCENE = preload("res://goblin.tscn")

signal defeated(card_name_arg)


# NEW: Export a variable to hold our data resource.
@export var stats: CharacterStats


# This 'health' variable is now for the instance's current state.
# The max_health comes from the resource.
var health: int


# Static factory function (no changes needed)
static func new_goblin(start_pos: Vector2, start_health: int = 100):
	var instance = SCENE.instantiate()
	instance.position = start_pos


	# We will ignore start_health for now and use the resource.
	return instance


# NEW: _ready() function to initialize from the resource
func _ready():


	# Check if the stats resource has been assigned in the editor
	if stats:
		health = stats.max_health
	else:


		# Fallback if no resource is assigned, to prevent crashes
		health = 100
		print_rich("[color=red]WARNING: Goblin instance has no stats resource assigned![/color]")

func take_damage(amount: int):
	health -= amount


	# Use the card_name from the resource
	print(stats.card_name + " takes " + str(amount) + " damage.")

	if health <= 0:
		health = 0


		# Emit the name from the resource
		defeated.emit(stats.card_name)
		print(stats.card_name + " has been defeated!")

	print("Current health: " + str(health))
Final Step: Connect the Data
The script is ready, but Godot doesn't know which CharacterStats resource to use.
- With
goblin.tscnopen, select the rootGoblinnode. - In the Inspector, you will now see a "Stats" property, which is currently empty.
- Drag
goblin_stats.tresfrom theFileSystemdock and drop it onto the "Stats" property slot.
Run your SignalTest scene (F6). Everything should work exactly as before. The difference is that the Goblin instance is now getting its name and starting health from the goblin_stats.tres file, not from hard-coded values in its script.
The Power of Data-Driven Design
So, what did all that work get us? Flexibility.
Let's create a more powerful "Hobgoblin" without writing a single new line of GDScript.
- Create New Data: In the
FileSystem, right-clickgoblin_stats.tresand chooseDuplicate.... Name the new filehobgoblin_stats.tres. - Edit Data: Click on
hobgoblin_stats.tres. In the Inspector, change its properties:Card Name: "Hobgoblin"Max Health:150
- Create New Scene: Duplicate
goblin.tscnand name ithobgoblin.tscn. - Assign Data: Open
hobgoblin.tscnand select the root node. In the Inspector, draghobgoblin_stats.tresonto its "Stats" property, replacing the goblin one. - Save all scenes and scripts.
That's it. You now have a Hobgoblin blueprint. To prove it works, you could even modify signal_test.gd to spawn hobgoblins instead of goblins by changing the preload path. You have successfully decoupled your game logic from your game data.
Conclusion
This lesson was a significant step in building a solid foundation for your card game. By separating data into Resource files, you've adopted a workflow that is scalable, maintainable, and deeply integrated with the Godot editor.
Key Takeaways:
- Resources as Data Containers:
Resourcesstore data, whileNodesprovide functionality. This is a fundamental concept in Godot architecture. - Creating Custom Resources: You can define your own data structures by creating a script that
extends Resourceand uses aclass_nameto register it with the editor. @exportis Key: The@exportkeyword makes resource properties visible and editable in the Inspector, which is what allows them to be saved in.tresfiles.- Data-Driven Workflow: By linking a scene to a resource file, you create a data-driven object. You can now create endless variations (different cards) simply by creating and editing data files, not code.
Preview of the Next Lesson:
We've created a simple CharacterStats resource, proving the concept. Now it's time to apply this specifically to our card game. In the next lesson, we will officially begin Module 2 by designing a base 'Card' custom resource that will include shared properties for all cards, like name, mana cost, and artwork. This will be the true data foundation for every card in your game.