Introduction
In our last lesson, you learned the theory behind Convolutional Neural Networks (CNNs). We deconstructed their architecture, understanding the roles of convolutional layers for feature detection, pooling layers for downsampling, and how these components build a hierarchy of visual features. You now have the "what" and the "why."
Today, we transition from theory to practice. Your learning outcome is to build and train a CNN for image classification using a deep learning framework. We will go through the entire workflow of a practical computer vision project: setting up the data pipeline, defining the model architecture in code, training it, and finally, testing it on new images it has never seen before.
This lesson is a significant step toward your goal of building transformative AI. The ability to create systems that can "see" and interpret the world is a foundational skill for everything from autonomous vehicles to the kind of advanced, interactive AI you envision. We will be using TensorFlow's Keras API, a powerful and widely-used framework in the field.
Part 1: Revisiting the CNN Architecture
Before we start coding, let's quickly refresh our memory of the core CNN components and how they fit together. A typical CNN for classification consists of two main parts:
- Feature Extraction: A series of
ConvolutionalandPoolinglayers that process the image to extract relevant features. - Classification: A set of
Dense(fully connected) layers that take the extracted features and make a final prediction.
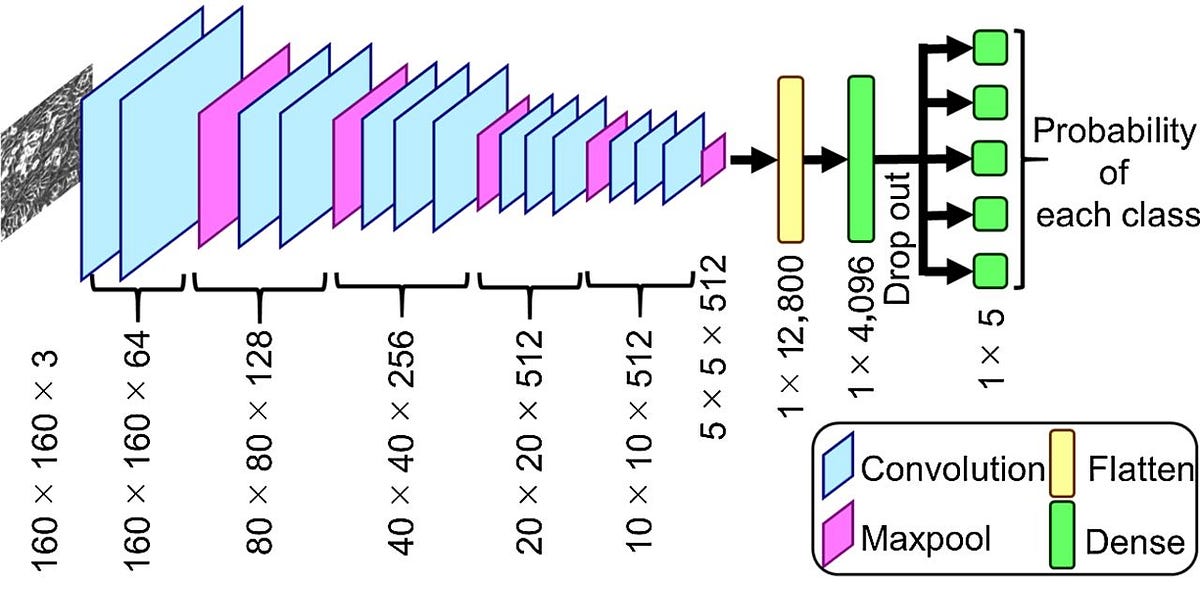
The video segments from StatQuest in this lesson will serve as quick refreshers to connect the code we write back to these fundamental concepts.
Part 2: A Practical Walkthrough: Building an Image Classifier
For this lesson, we will follow a comprehensive video tutorial by Nicholas Renotte that builds a deep CNN to classify images of happy and sad people. This is a complete, end-to-end project that mirrors how real-world AI applications are developed. We will break down the video into logical steps.
Step 2.1: Project Setup and Data Loading
A huge part of any machine learning project is preparing the data. A well-structured data pipeline makes your work more efficient and scalable. In this first step, you will install the necessary libraries and learn how to load a dataset of images directly from folders using a powerful Keras utility.
Build a Deep CNN Image Classifier with ANY Images
This first segment from Nicholas Renotte's tutorial covers setting up the environment and, most importantly, loading the image data. Pay close attention to the image_dataset_from_directory function, as it's a highly efficient way to create a TensorFlow dataset.
Watch from 03:06 to 08:30 and then from 22:55 to 33:42. You can skip the section in between where he curates the data. Focus on: The libraries being installed: tensorflow, opencv-python, matplotlib. (03:06 - 04:30) How tf.keras.utils.image_dataset_from_directory automatically creates batches of images and labels from a folder structure. (25:50 - 27:30) How to access and inspect a batch of data (images and labels) from the dataset iterator. (28:00 - 33:42)
The key function here, tf.keras.utils.image_dataset_from_directory, is a major time-saver. It automatically:
- Finds all images in the specified directory.
- Infers the class labels from the sub-folder names (e.g., images in the
/happy/folder get labeled as "happy"). - Resizes all images to a consistent size.
- Creates batches of data, which is essential for training.
Step 2.2: Pre-processing and Splitting the Data
Raw image data, with pixel values from 0 to 255, is not ideal for training a neural network. We need to scale these values. Furthermore, to evaluate our model properly and avoid overfitting, we must split our data into training, validation, and testing sets.
Build a Deep CNN Image Classifier with ANY Images
This next segment demonstrates two critical pre-processing steps: scaling the pixel values and partitioning the dataset.
Watch from 33:42 to 47:42. Focus on: Scaling: How to use the .map() method on the dataset to apply a function that scales pixel values from the [0, 255] range to the [0, 1] range. (34:40 - 37:15) Splitting: How to use the .take() and .skip() methods to partition the main dataset into training, validation, and test sets without having to load everything into memory. (42:30 - 47:00)
This is the proper way to handle data pipelines in TensorFlow. By using .map(), .take(), and .skip(), we create an efficient pipeline where transformations are applied on the fly as the model trains, rather than requiring us to hold multiple large datasets in memory.
Step 2.3: Building the CNN Architecture in Code
Now for the main event: translating the architectural diagram into Keras code. We will use the Sequential API, which allows us to stack layers one after another.
Let's start with a quick conceptual reminder of the main layer types we'll be using.
Neural Networks Part 8: Image Classification with Convolutional Neural Networks (CNNs)
This clip from StatQuest provides a concise visual summary of the convolution, ReLU, and max pooling steps, which form the feature extraction part of our network.
Watch from 04:53 to 09:39. Notice how the input is transformed through a Filter (convolution), then a ReLU activation, and finally Max Pooling to produce a smaller, feature-rich representation.
With that fresh in your mind, let's build it.
Build a Deep CNN Image Classifier with ANY Images
In this part of the tutorial, you will construct the CNN model layer by layer using tf.keras.models.Sequential.
Watch from 47:42 to 01:02:36. Focus on: Importing the necessary layers: Conv2D, MaxPooling2D, Dense, Flatten. (48:30) How model.add() is used to stack these layers. (51:50) The parameters for a Conv2D layer: number of filters, kernel size (e.g., (3,3)), and the relu activation function. (53:00) The purpose of the Flatten layer as a bridge between the convolutional base and the dense classification head. (57:15) The final Dense layer with a sigmoid activation, which is used for binary classification to output a value between 0 and 1. (58:15) Using model.summary() to see the architecture and the number of parameters at each stage. (01:00:20)
The architecture you just built can be summarized as follows:
- Three
[Conv2D -> MaxPooling2D]blocks: These form the feature extractor. Note how the number of filters generally increases as the image size shrinks, allowing the network to learn more complex features in deeper layers. - A
Flattenlayer: This unrolls the final 3D feature maps into a 1D vector. - Two
Denselayers: This is the classifier. The final layer has 1 neuron with a sigmoid activation, perfect for our happy/sad (0/1) binary classification problem.
Step 2.4: Compiling and Training the Model
With the architecture defined, we need to configure it for training. This is done with the .compile() method. Then, we can begin the training process with .fit().
Build a Deep CNN Image Classifier with ANY Images
This section covers the final steps before training and the training process itself. You will see how to compile the model and then launch the training with a single command.
Watch from 01:02:36 to 01:09:54. Focus on: Compiling: The three key arguments to model.compile(): optimizer (Adam is a great default), loss (BinaryCrossentropy for this problem), and metrics (accuracy). (Found in section 3 of video, at 59:20) Training: The model.fit() command, passing it the training data, validation data, and the number of epochs. (01:04:30) Monitoring: How to interpret the output during training, watching the loss and accuracy for both the training and validation sets. (01:05:40) Visualizing the training history (loss and accuracy curves) using Matplotlib. (01:07:30)
Watching the training metrics is crucial. Ideally, you want to see both training loss and validation loss decrease, while training accuracy and validation accuracy increase. If the validation metrics start getting worse while the training metrics improve, it's a sign of overfitting.
Step 2.5: Evaluation and Prediction on New Data
Our model has been trained. Now, we must evaluate its performance on the test set—data it has never seen during training. The final, most exciting step is to give it a brand new image from the internet and see if it can classify it correctly.
Build a Deep CNN Image Classifier with ANY Images
The final segment shows how to use the trained model. You'll first evaluate its performance on the test data partition and then use it for inference on single, new images.
Watch from 01:09:54 to 01:20:37. Focus on: Using model.evaluate() on the test dataset to get final performance metrics. (01:10:30 - 01:13:40) The process for making a single prediction: load an image, resize it to the model's expected input size (256x256), scale its pixels, and pass it to model.predict(). (01:14:45 - 01:18:00) How to interpret the sigmoid output: a value close to 0 means one class (e.g., happy), and a value close to 1 means the other (e.g., sad). (01:19:30)
Conclusion
Congratulations! You have just walked through the entire process of building, training, and testing a Convolutional Neural Network. You've bridged the gap between theory and application, turning abstract concepts of layers and kernels into a functional AI model that can classify images.
Key Takeaways:
- A practical deep learning project involves a full pipeline: data loading, pre-processing, model building, training, and evaluation.
- Keras utilities like
image_dataset_from_directoryand the dataset methods.map(),.take(), and.skip()create efficient and scalable data pipelines. - The Keras
SequentialAPI provides an intuitive way to stack layers (Conv2D,MaxPooling2D,Flatten,Dense) to build a CNN. model.compile()configures the training process (optimizer, loss), andmodel.fit()executes it.model.evaluate()is used to test performance on unseen batch data, whilemodel.predict()is used for inference on new, individual examples.
Preview of the Next Lesson:
We have now tackled neural networks for tabular data (feedforward networks) and for spatial data (CNNs). But what about sequential data, like text, speech, or financial time series? In the next lesson, we will explore a new architecture designed specifically for this purpose: Recurrent Neural Networks (RNNs). You will learn how RNNs use loops to maintain a "memory" of past information, making them powerful tools for understanding sequences.