Hello! Welcome to the fourth lesson in our module on Object-Oriented Programming.
In our last lesson, we explored class methods, static methods, and properties. We saw how properties, using the @property decorator, allow us to run code (like a "getter" or "setter") whenever an attribute is accessed or assigned, all while keeping the interface clean and attribute-like.
Today, we'll build directly on that foundation to explore a core principle of OOP: Encapsulation. This lesson is designed to help you apply encapsulation principles using private and protected attributes. We'll cover:
- The concept of encapsulation and why it's important for building robust, maintainable code.
- Python's naming conventions for signaling that attributes are for internal use (
_protectedand__private). - How to combine these non-public attributes with properties to create a secure but user-friendly class interface.
This is a fundamental skill in class design that you'll see used extensively in mature Python libraries, including the machine learning frameworks we'll be studying later.
What is Encapsulation and Why Do We Need It?
Encapsulation means bundling the data (attributes) and the methods that operate on that data into a single unit, or "capsule"—the class. More importantly, it involves restricting direct access to some of an object's components.
Why restrict access? Let's look at a simple example.
class Payment:
    def __init__(self, price):
        # A 5% tax is added
        self.final_price = price * 1.05

# Let's buy a book for $10
book_purchase = Payment(10)
print(f"The final price is: ${book_purchase.final_price}")

# Uh oh, someone can do this...
book_purchase.final_price = 0
print(f"The final price is now: ${book_purchase.final_price}")
The output would be:
The final price is: $10.5
The final price is now: $0.0
This is a problem. The final_price attribute is part of our class's internal state. Allowing it to be changed arbitrarily from outside the class can lead to invalid or nonsensical data. Encapsulation helps us prevent this.
The following short video illustrates this exact problem and sets the stage for the solution.
Python - Object Oriented Programming | Encapsulation
This video from the Bitfumes channel clearly demonstrates the problem with public attributes that can be modified from outside the class, motivating the need for encapsulation.
Watch the first 2 minutes of the video (00:00 - 01:58). The presenter sets up a simple Payment class and shows how its final_price attribute can be easily and incorrectly changed.
Python's Approach: Convention Over Enforcement
Unlike languages such as Java or C++ that use strict public and private keywords, Python's philosophy is often summed up as "we're all consenting adults here." It relies on naming conventions to indicate the intended visibility of an attribute or method.
This excellent article from Real Python explains the two main conventions.
Python Classes: The Power of Object-Oriented Programming
The article 'Python Classes: The Power of Object-Oriented Programming' explains Python's conventions for public and non-public members. It is essential reading to understand how Python handles encapsulation.
Read the sections titled 'Public vs Non-Public Members' and 'Name Mangling'. These sections detail the use of single leading underscores (_) for 'non-public' (or protected) members and double leading underscores (__) for name-mangled ('private') members.
Let's summarize the key points from the article:
1. "Protected" Attributes: The Single Underscore (_)
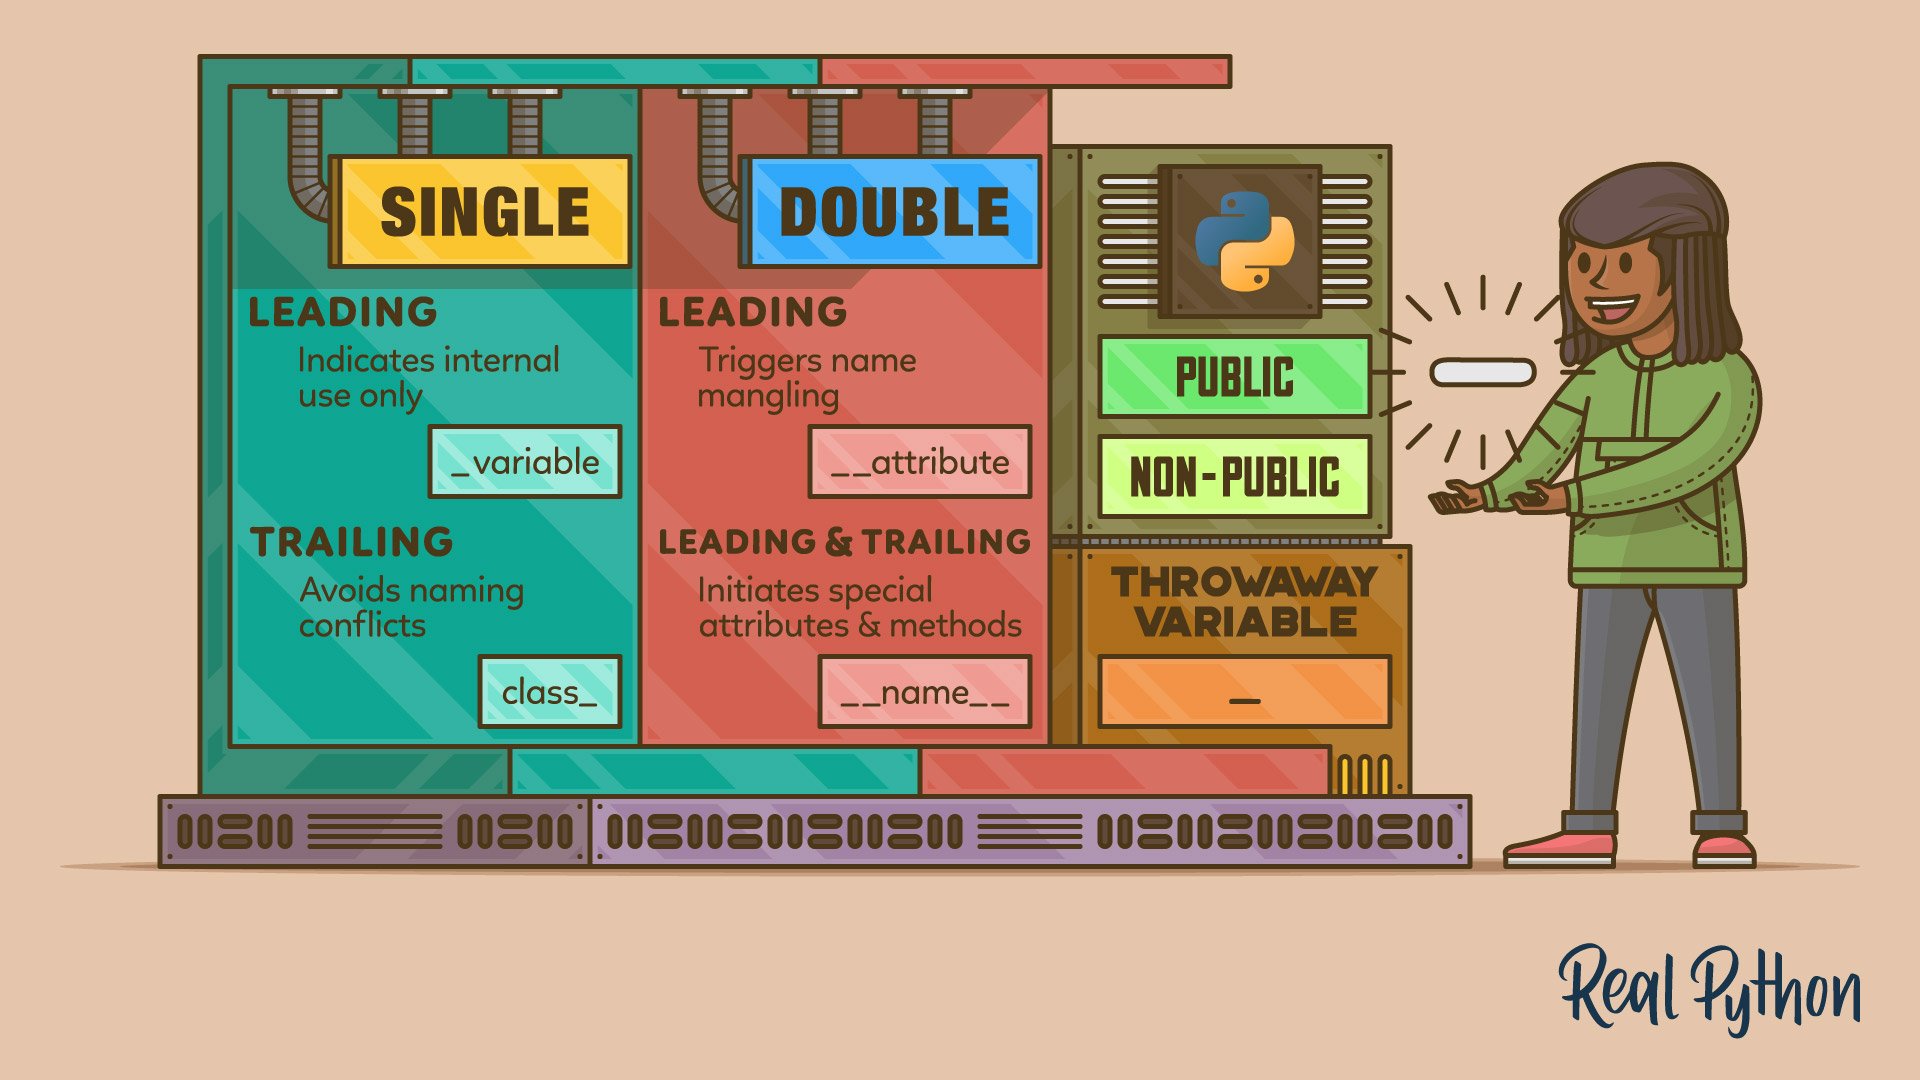
A name prefixed with a single underscore (e.g., _my_attribute) is a convention. It signals to other developers, "This is intended for internal use within the class. You shouldn't access or modify it directly from the outside, but the language won't stop you." It's a strong hint, not a lock.
class MyClass:
    def __init__(self):
        self._internal_var = 10

obj = MyClass()
print(obj._internal_var) # Works, but it's bad practice
2. "Private" Attributes: The Double Underscore (__)
A name prefixed with a double underscore (e.g., __my_secret) triggers a Python mechanism called name mangling. Python automatically renames the attribute to _ClassName__attributeName. This makes it difficult to access from outside the class using its original name, effectively hiding it.
class MySecret:
    def __init__(self):
        self.__secret_code = "1234"

    def get_code(self):
        return self.__secret_code

secret = MySecret()

# This will raise an AttributeError
# print(secret.__secret_code)

# This works, but is VERY bad practice
print(secret._MySecret__secret_code) # Output: 1234
Name mangling isn't about creating perfect security, but about preventing accidental modification and avoiding naming conflicts in subclasses (which we covered in lesson 2).
This diagram provides a great visual summary of Python's underscore conventions.
Providing Controlled Access
If we hide our attributes, how do we let users interact with them safely? We provide a public interface using methods.
There are two main ways to do this: traditional getter/setter methods and Python's properties.
Traditional Getters and Setters
This pattern involves creating explicit methods to get and set the value of a non-public attribute. The "setter" method is where you can add validation logic.
Python - Object Oriented Programming | Encapsulation
Continuing with the Payment class example, this part of the video shows how to implement traditional get_ and set_ methods to control access to a private attribute.
Watch from 02:53 to 06:30. Notice how a private attribute __final_price is created. Then, a get_final_price() method is added to read it, and a set_final_price() method is added to modify it in a controlled way (applying a discount).
While this works, it can feel a bit clunky in Python. For example, to increase a value, you might have to write obj.set_value(obj.get_value() + 5), which isn't as clean as obj.value += 5.
The Pythonic Way: Properties
As we saw in the last lesson, properties are the preferred Pythonic solution. They allow you to combine the safety of getter/setter methods with the clean syntax of direct attribute access.
Let's revisit our Employee class from the previous lessons. We can refactor it to use a non-public attribute for the full name.
Python OOP Tutorial 6: Property Decorators - Getters, Setters, and Deleters
In this video, Corey Schafer demonstrates the elegant solution using properties. He refactors a class to handle a computed attribute, and then adds a setter to control how the underlying data is changed.
Watch from the beginning to 06:58. Pay close attention to how he identifies the problem of dependent attributes. He first creates a @property for fullname. Then, crucially, he implements a @fullname.setter that takes an input string, parses it, and correctly updates the underlying self.first and self.last attributes. This is a perfect example of encapsulation in action.
Here's how this pattern looks in practice, combining a "protected" attribute with a property:
import math

class Circle:
    def __init__(self, radius):
        # The property 'radius' (defined below) will call the setter during initialization.
        self.radius = radius

    @property
    def radius(self):
        """The getter for radius."""
        return self._radius

    @radius.setter
    def radius(self, value):
        """The setter for radius, with validation."""
        if not isinstance(value, (int, float)) or value <= 0:
            raise ValueError("Radius must be a positive number")
        # The actual data is stored in a 'protected' attribute.
        self._radius = value

    def calculate_area(self):
        return math.pi * self._radius ** 2

# Let's use the class
c = Circle(10)
print(c.radius)         # 10. The getter is called.
print(c.calculate_area()) # 314.15...

c.radius = 20           # The setter is called, with validation.
print(c.radius)         # 20

try:
    c.radius = -5       # The setter is called and raises an error.
except ValueError as e:
    print(e)            # "Radius must be a positive number"
In this Circle class:
- The actual radius value is stored in
self._radius, signaling it's for internal use. - The public interface is the
radiusproperty. - When you access
c.radius, the@propertygetter runs, returningself._radius. - When you assign
c.radius = 20, the@radius.setterruns, validating the value before storing it inself._radius.
This gives us the best of both worlds: a simple, clean API for the user of the class (c.radius) and robust, controlled management of the internal state (self._radius).
Test your understanding!
You are creating a Product class for an e-commerce system. The class currently looks like this:
class Product:
    def __init__(self, name, price):
        self.name = name
        self.price = price
Refactor this class to apply encapsulation for the price attribute. You must ensure that the price can never be set to a negative value or zero. The public interface for accessing and setting the price should remain product.price.
Show answer
Here is one possible solution using a protected attribute and a property:
class Product:
    def __init__(self, name, price):
        self.name = name
        self.price = price  # This will call the setter on initialization

    @property
    def price(self):
        """Getter for the price."""
        return self._price

    @price.setter
    def price(self, value):
        """Setter for the price with validation."""
        if not isinstance(value, (int, float)) or value <= 0:
            raise ValueError("Price must be a positive number.")
        self._price = value

# Example usage:
try:
    # This works
    item = Product("Laptop", 1200)
    print(f"{item.name} costs ${item.price}")

    # This also works
    item.price = 1150
    print(f"New price for {item.name} is ${item.price}")

    # This will raise an error
    item.price = -50

except ValueError as e:
    print(f"Error: {e}")
Conclusion
You've now learned how to apply one of the most important principles of Object-Oriented Programming. By controlling access to your object's data, you make your classes safer, more predictable, and easier to maintain.
Key Takeaways:
- Encapsulation is the practice of bundling data and methods together and restricting direct access to an object's internal state.
- Python uses naming conventions, not strict enforcement, for data hiding.
- A single leading underscore (
_) signals an attribute is "protected" and for internal use. - A double leading underscore (
__) triggers "name mangling," making an attribute "private" and harder to access.
- A single leading underscore (
- The most Pythonic way to implement encapsulation is to use properties (
@property,@<name>.setter) combined with non-public attributes (e.g.,_my_var). This provides a clean public API with robust internal validation.
Preview of the Next Lesson:
Now that we've solidified how to define the internal structure of a class using encapsulation, our next lesson will focus on how different classes interact. We will explore polymorphism and duck typing, which allow us to write flexible code that works with objects of different types as long as they share a common interface or behavior.